Email Deliverability Best Practices to Follow in MassMailer
Spam email accounted for nearly 49% of the email traffic in 2023. This statistic highlights the importance of hygienic email practices to ensure your communications reach their destination. MassMailer has several features that empower you to boost email deliverability.

This blog takes you through the process step-by-step.
Understanding the Basics
There are four high-level areas where you should check your email hygiene. They are all interconnected:
1. Deliverability
Your recipient’s email service provider authenticates your emails using spam filters before they are delivered to the inbox. You can enhance email deliverability by applying robust strategies and monitoring campaign success.
Best practices:
- Avoid using spammy words in your email content to pass the spam filters.
- Your target email list should be clean and validated (you can do that in MassMailer).
- Your email domain should be SSL-certified and authenticated. You can also use branded links.
- Use a dedicated IP to avoid sharing your reputation with other businesses.
2. Reputation
The reputation of the domain you use to send emails should be good, and your IP address should not be blacklisted.
Best practices:
- Always act promptly on blacklisting and request authorities to remove your IP address from the blacklist.
- Honor the recipients who opt out of your emails to keep your lists clean.
3. Compliance
Your emails should comply with your region’s compliance policies, such as CAN-SPAM (Canada) or GDPR (the EU). Every country has its spam control laws; make sure you comply.
Best practices:
- Don’t purchase your email lists; they should only be opt-in lists.
- Ensure your emails have an unsubscribe link.
- Include your signature and company information in the email.
- Your email domain should be authenticated.
4. Inboxing
Inboxing is a way of ensuring that your emails don’t end up in the spam folder. One best practice is to engage with your readers and keep the emails relevant. MassMailer handles this for you by constantly warming up your domain and IP addresses.
Step-by-Step Guide for Hygienic Email Practices in MassMailer
//All screenshots taken from client video.
MassMailer helps you enhance email deliverability by focusing on these key aspects:
- Email validation
- Following the compliances
- Checking email deliverability score
- Monitoring domain and IP reputation
1. Verify Emails
- Start in your MassMailer Lightning dashboard. In the tab lists, click on “MassMailer List Views.”
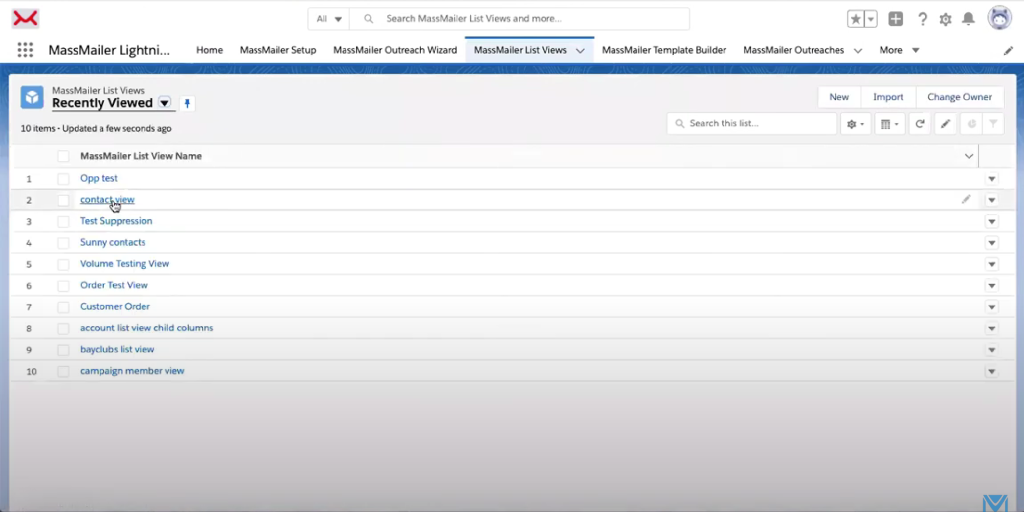
- In the new interface that opens, click on “Contact view.”
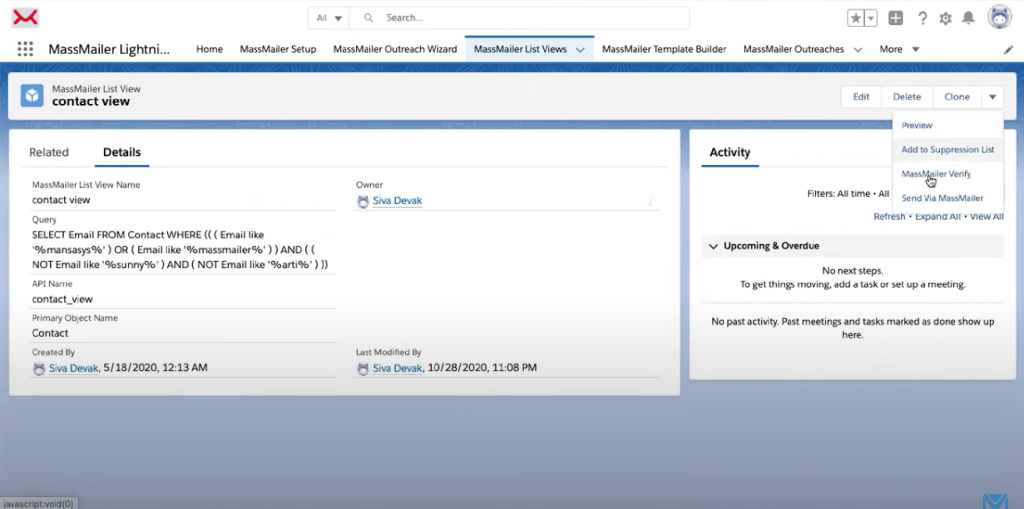
- In the top right corner, click the dropdown arrow and then click “MassMailer Verify.”
- The new interface will ask you to enter the email address. Click on “Email” and press “Submit.” Now MassMailer will validate the email addresses in the backend.
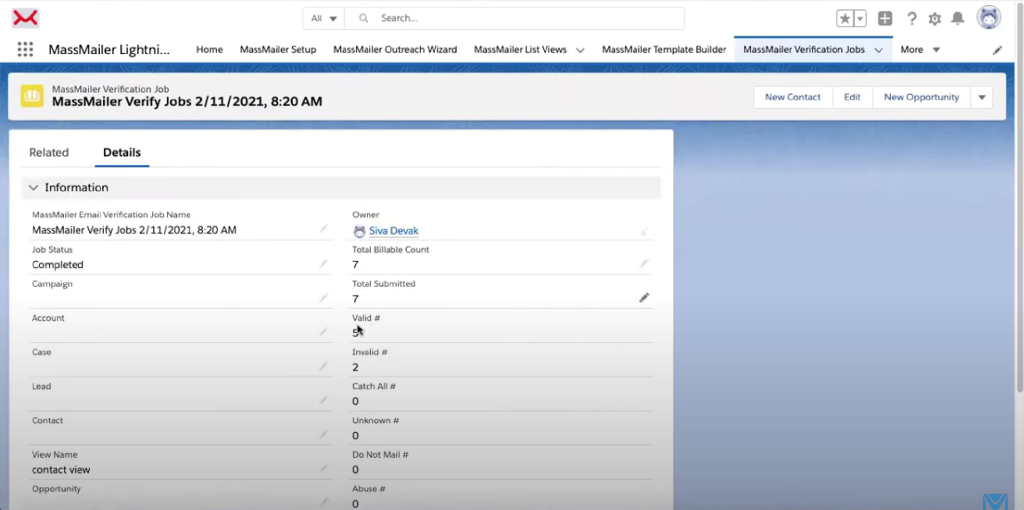

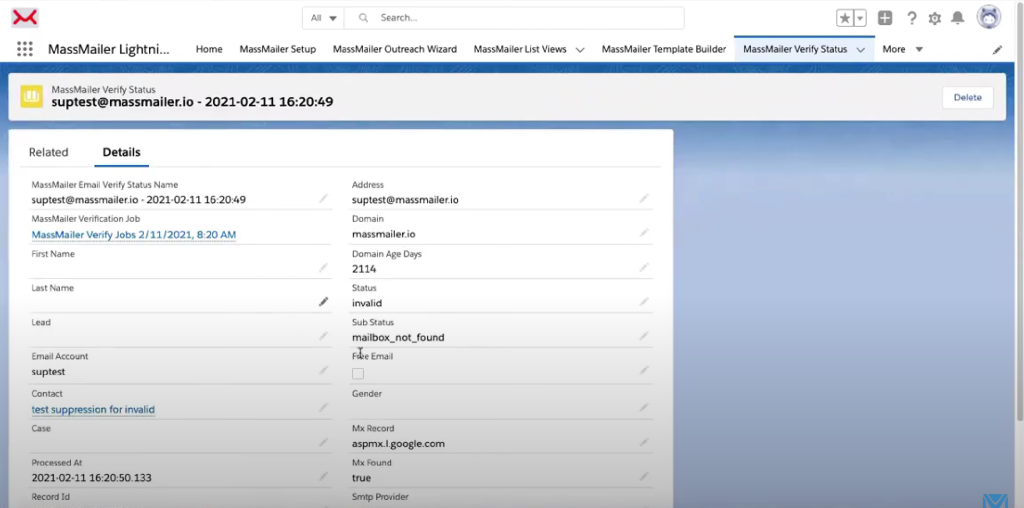
- You will see the verification report when MassMailer finishes the task. When you click on the “Related” tab, MassMailer shows you the valid/invalid addresses in your list.
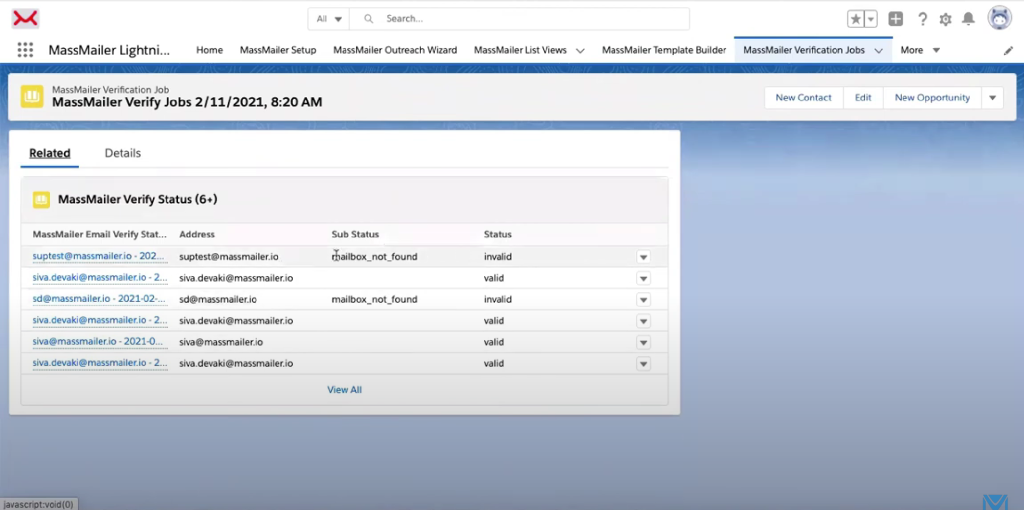
- Click on an email ID to see why it is invalid:
- Verify emails from a single record:
- Open the contact you want to verify.
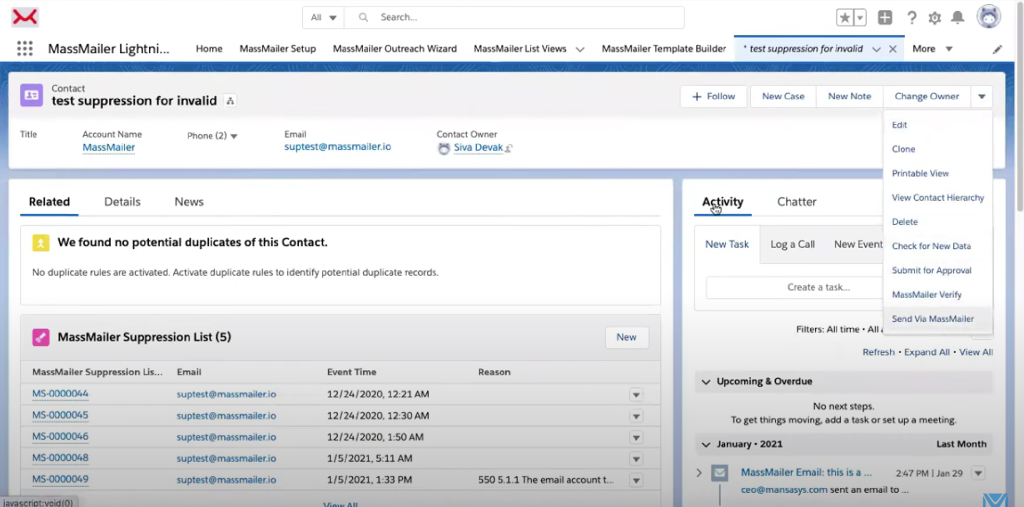
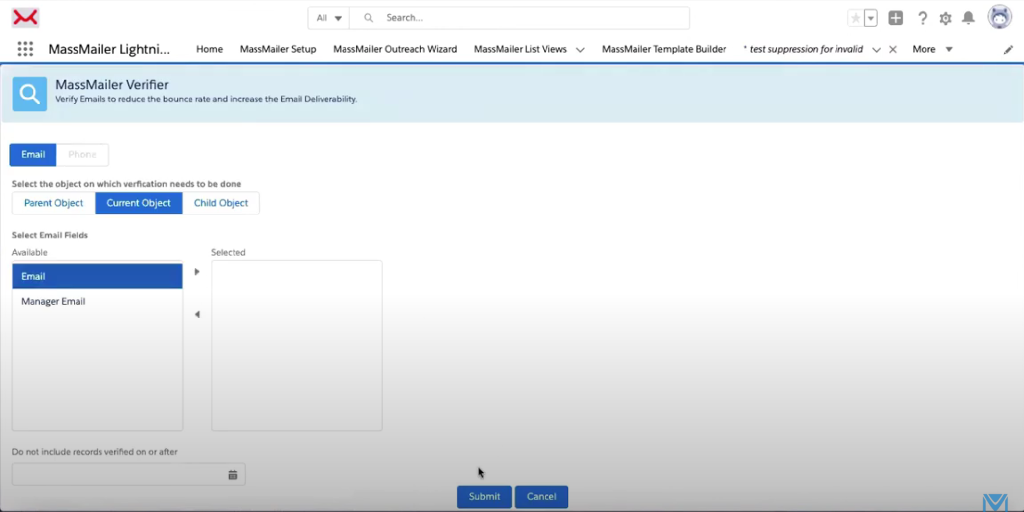
- At the top right corner, click on the dropdown menu, and then click on “MassMailer Verify.” Then click “Email” in the Email Fields option and press “Submit”
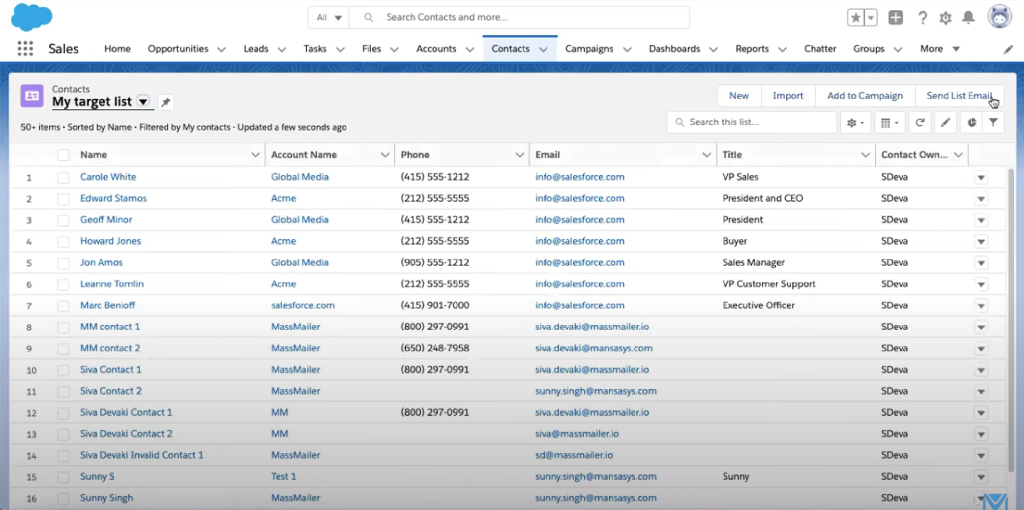
- Verify emails using Salesforce:
- Click on the waffle icon at the top left corner of your screen. In the Quick Find box, type “Sales”.
- In the interface that opens, select “Contacts” from the tab list.
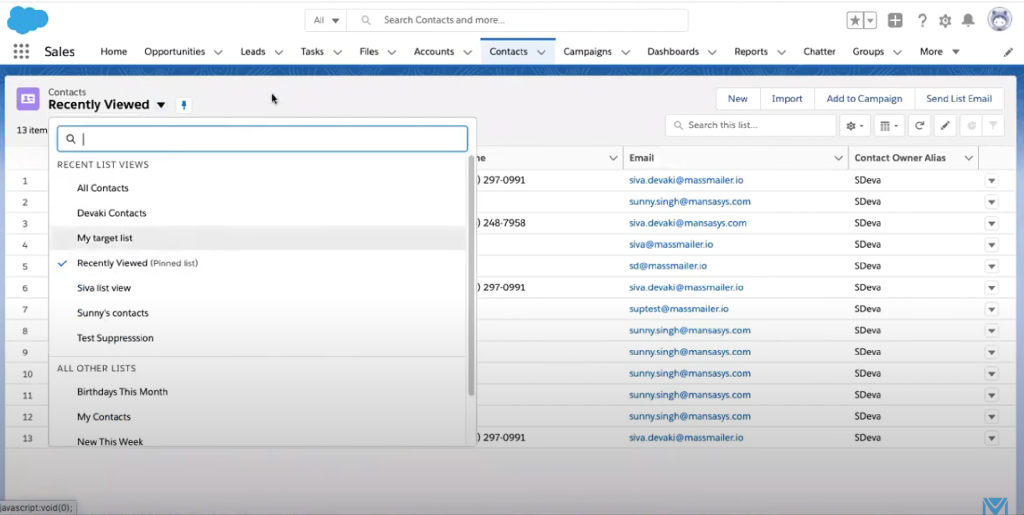
- In the “Recently Viewed” dropdown, select “My Target List.”
- At the top right corner, click “Send List Email,” then click on the dropdown arrow. Next, click on “MassMailer Verify.”
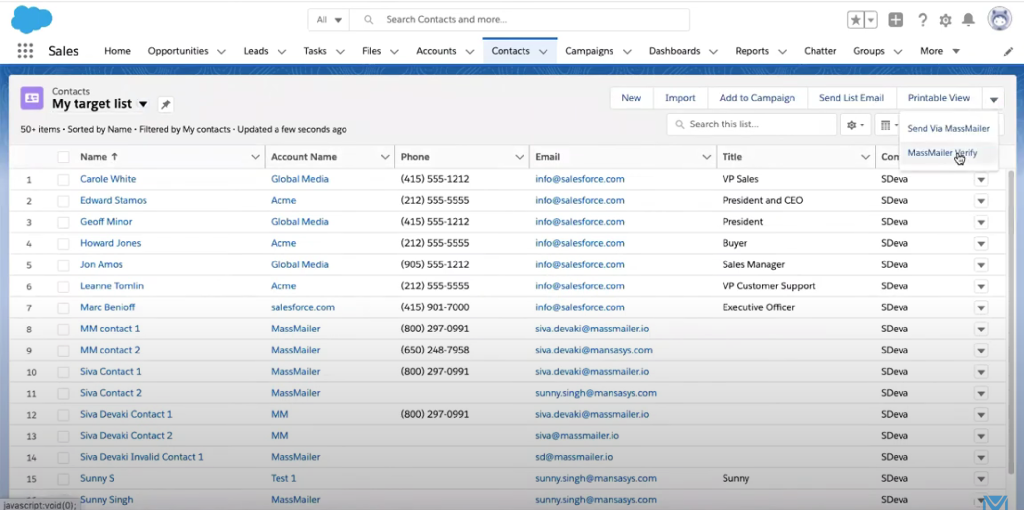
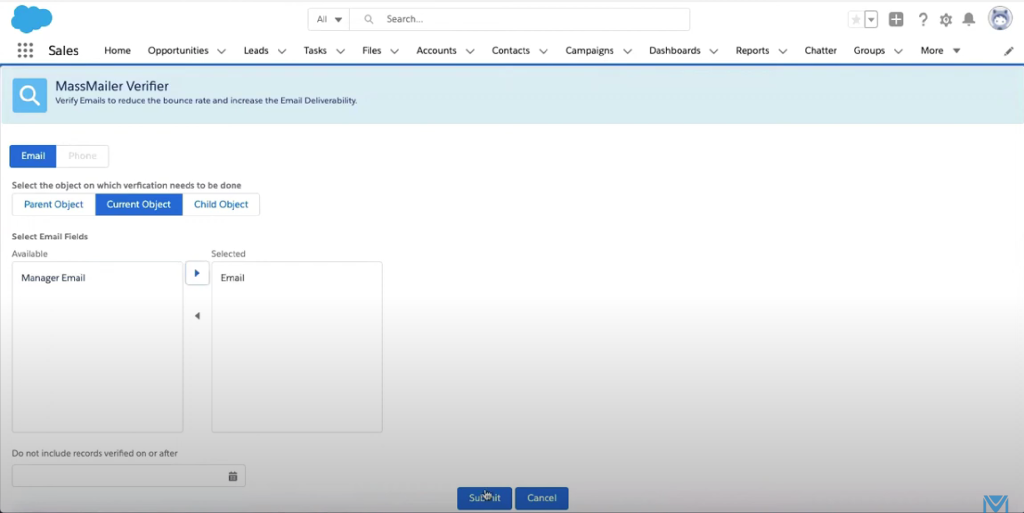
- The interface will ask you to enter the email fields you want to verify. Select “Email” and click on “Submit.”
- Verify selected contacts:
- Click on the “Contacts” tab in Salesforce Sales.
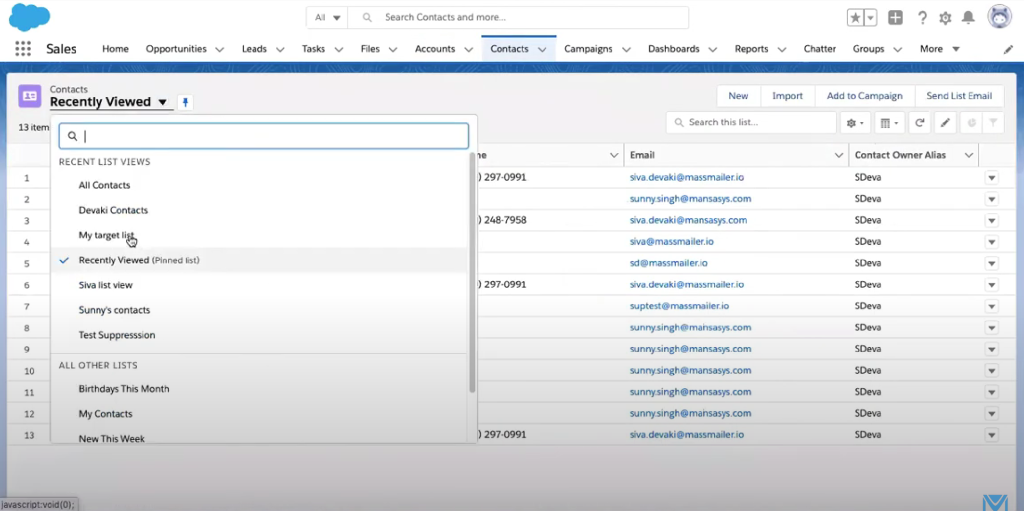
- In the “Recently Viewed” dropdown menu, click on the list name you want to validate.
- In the open interface, tick the checkboxes of the contacts you want to validate.
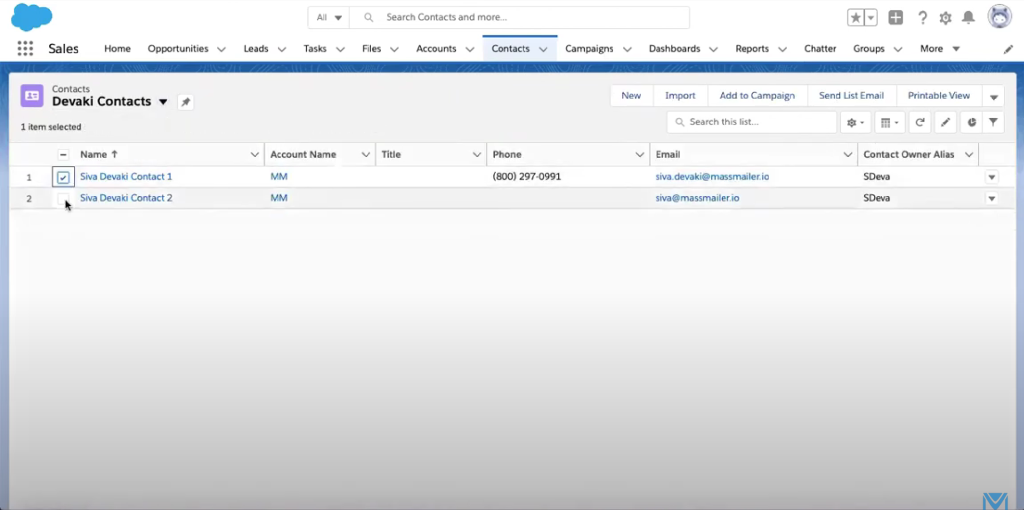
- At the top right corner, click the dropdown arrow and select “MassMailer Verify.” Specify the email fields you want to validate and click on “Submit.
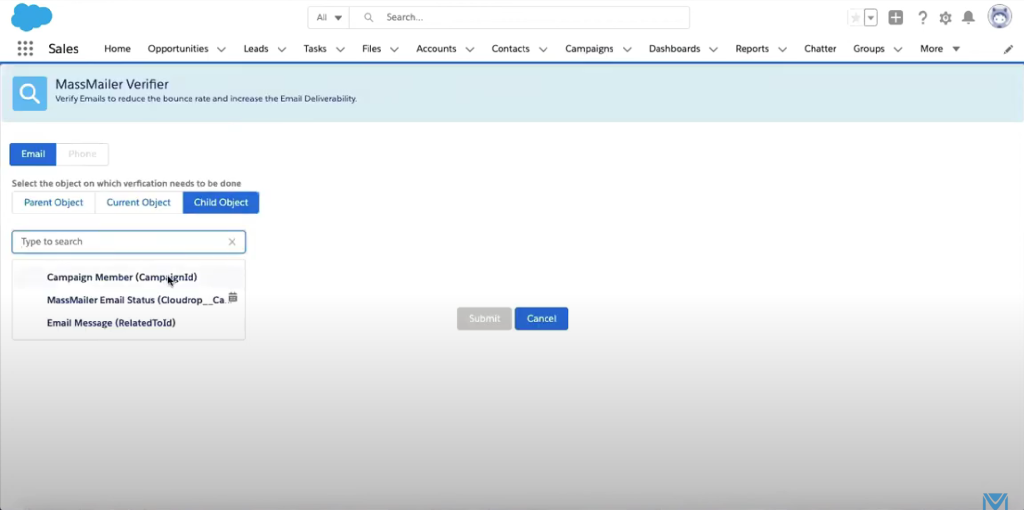
- Verify from Campaign:
- Click on the “Campaigns” tab, then click on “MassMailer Verify.”
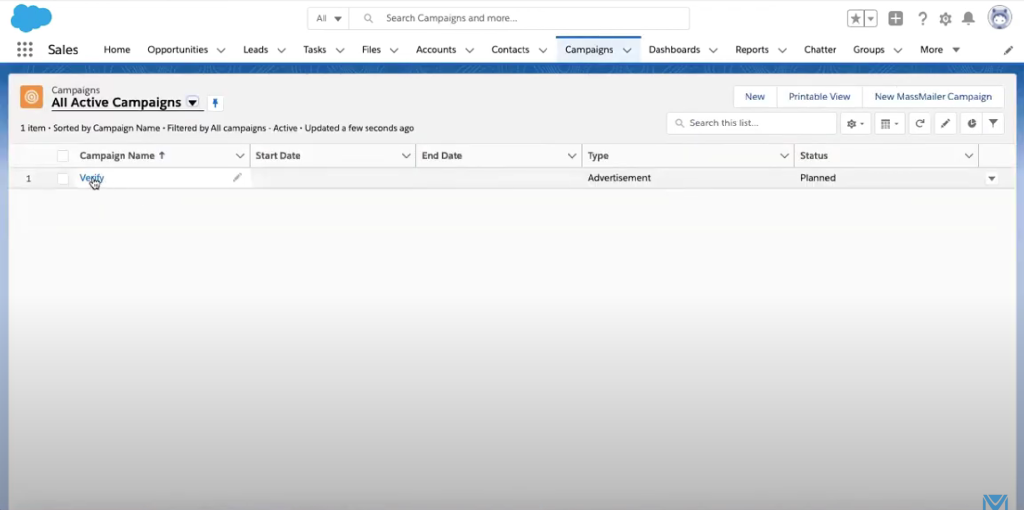
- Before proceeding with the validation, make sure that there are members added to the campaign.
- At the top right corner, click on the dropdown arrow. Click on “MassMailer Verify.”
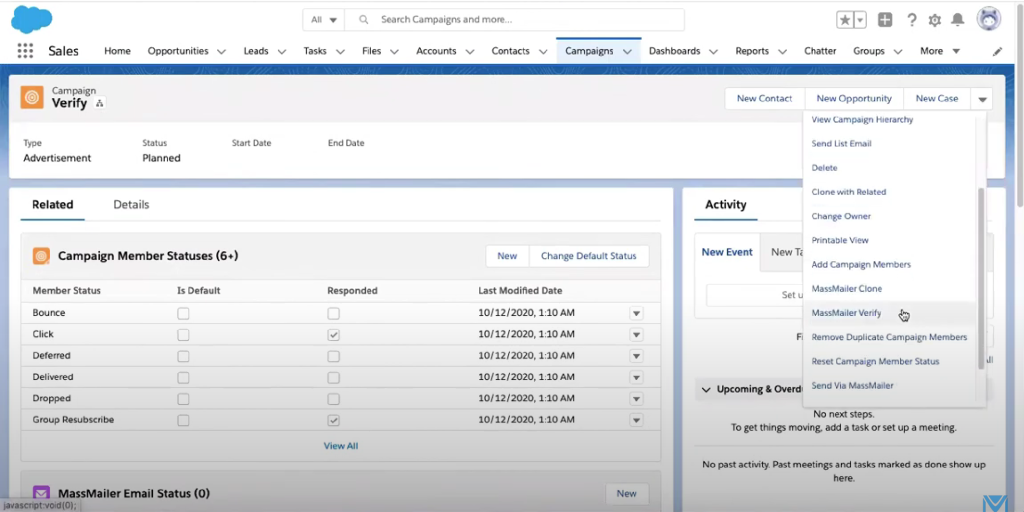
- In the new interface, select “Child Object” and enter “Campaign Member” in the field below.
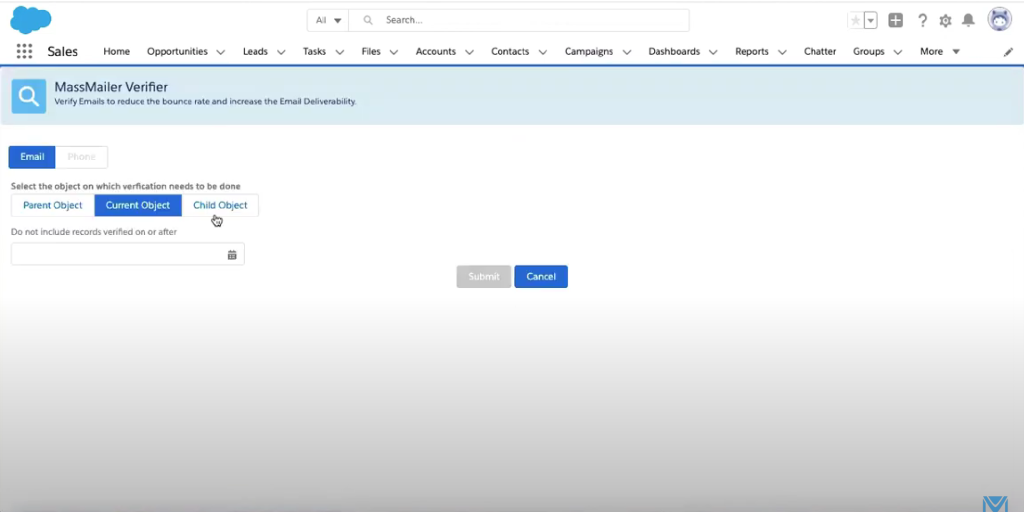
- Select “Email” from the Email Fields box, then click “Submit
2. Add Signature
- Start in the MassMailer Lightning dashboard. Navigate the tab list and click on “MassMailer Template Builder.”
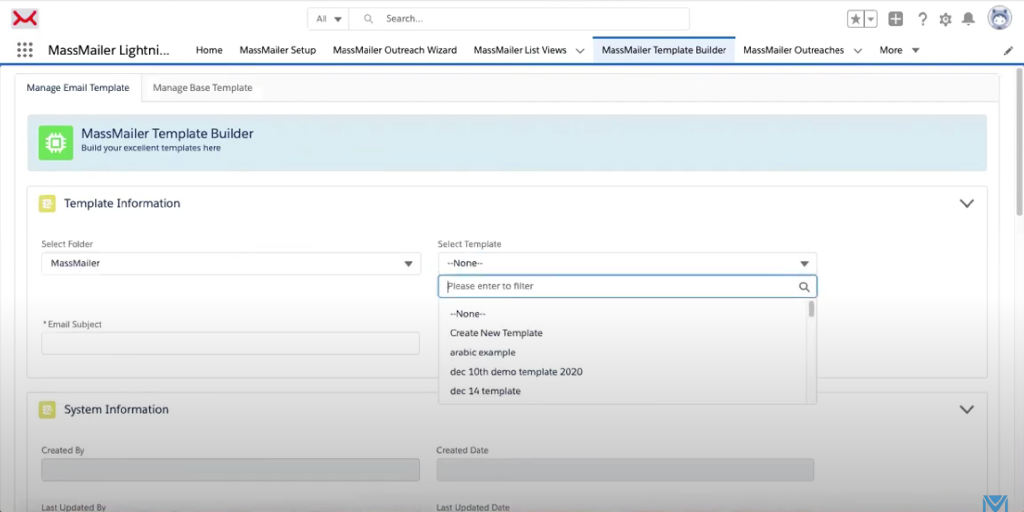
- Select the folder and template from the dropdown menus provided. You can also create a new template.
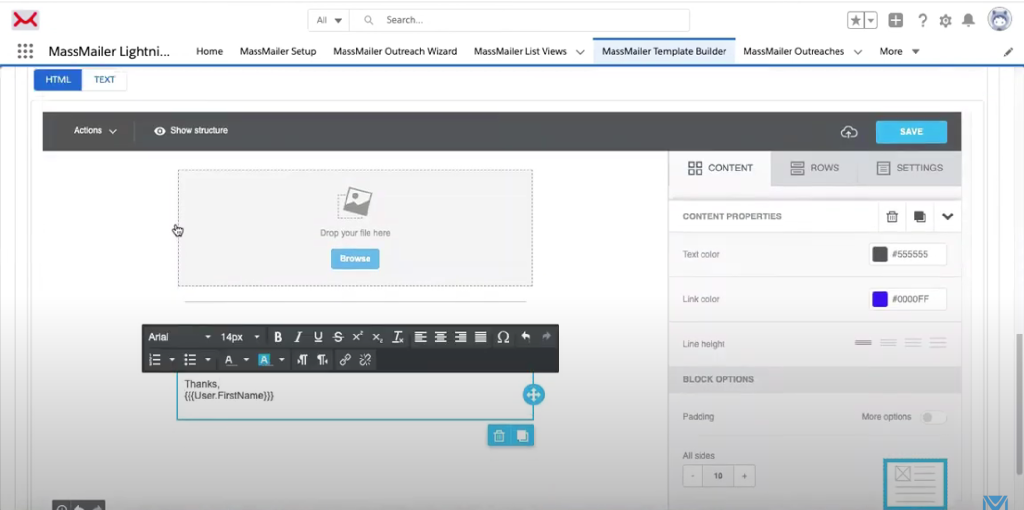
- Next, add an email subject. Scroll down to the email body. On the right side, you will see blocks that allow you to create the body. Compose your template and add a block for the signature. Then, type your message.
- If you want to add a dynamic signature, scroll up to the “Merge Field” section and select “User” from the drop-down menu. Click on “Select Field.”
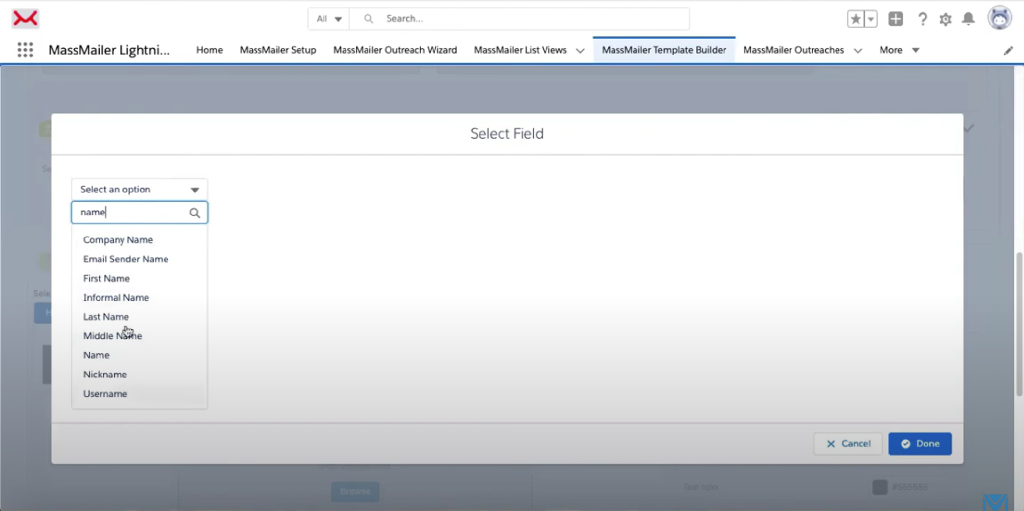
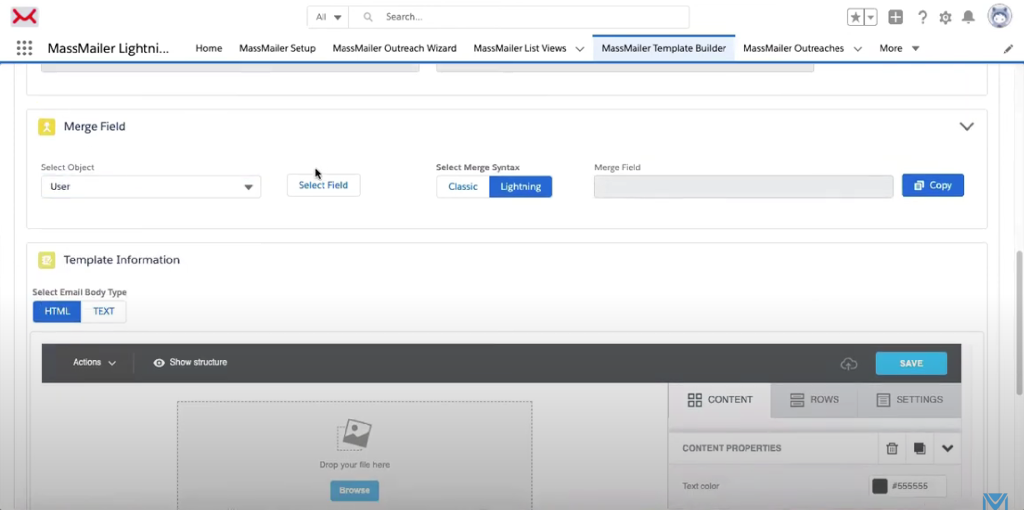
- In the pop-up dialog box, select the field you want to add to the signature block from the dropdown menu, then click on “Done.” From the “Merge Field” box, copy the code generated for the signature and paste it into your email signature block below.
- From the “Merge Field” section, you can add as many items to the signature in the same way as you want. Use the Content, Rows, and Settings blocks provided in the customizer to style your signature however you like.
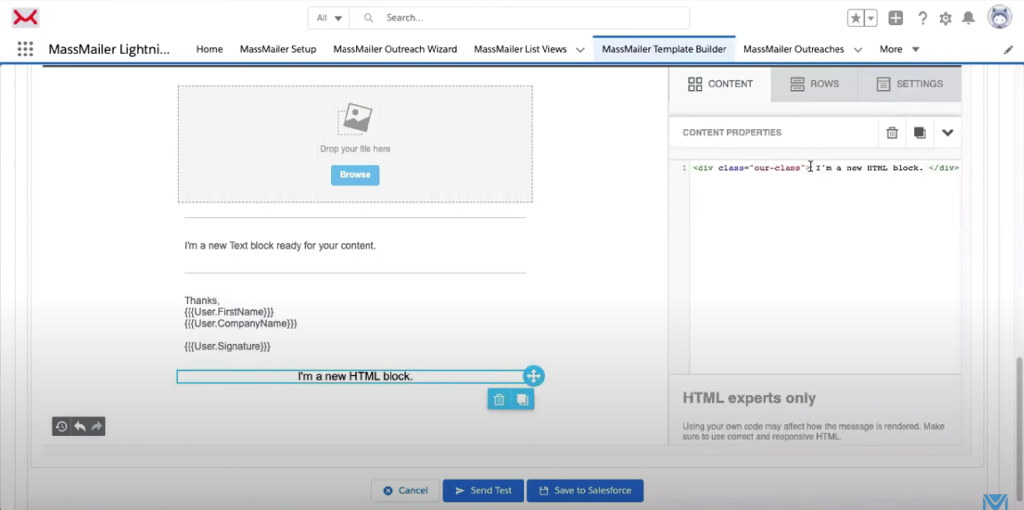
- Click on “Save”, then click on “Save to Salesforce.”
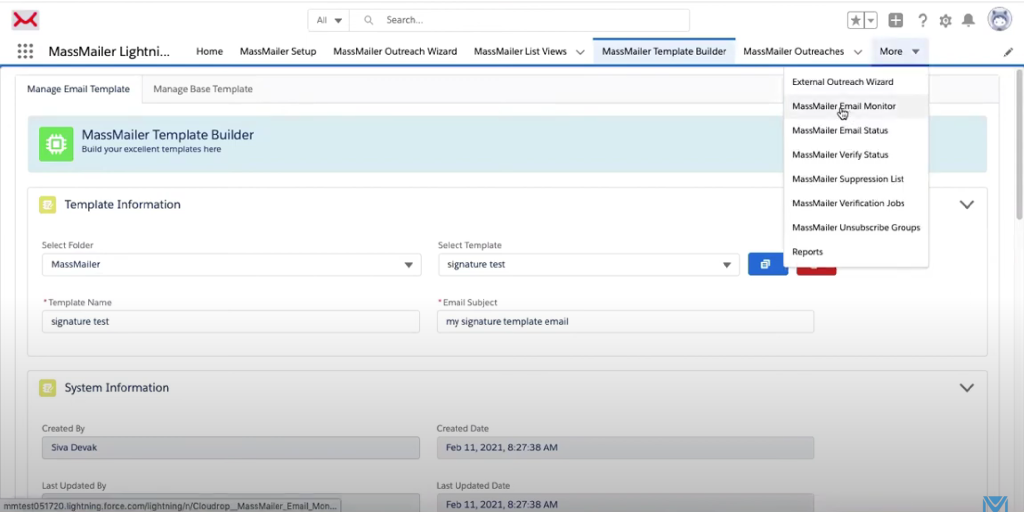
- Check Email Deliverability Score
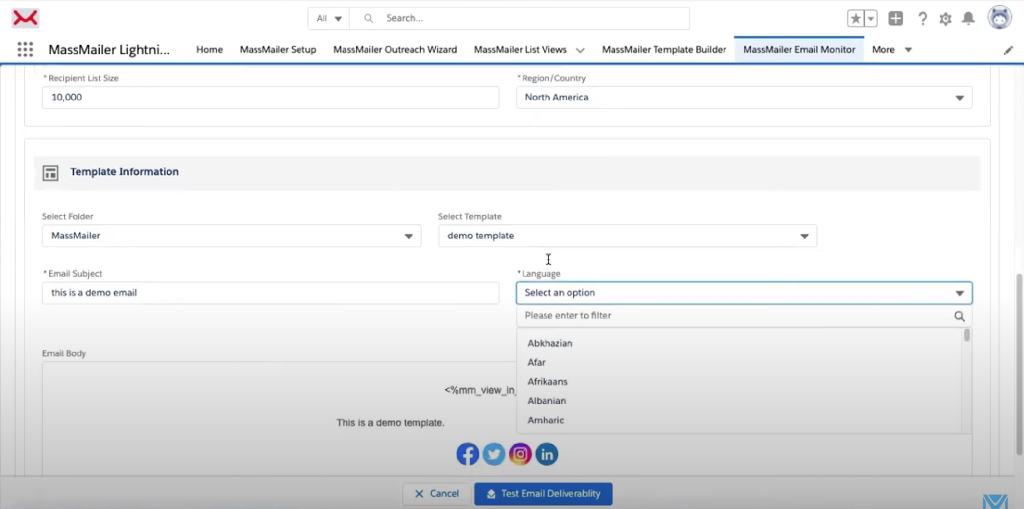
- Start in the MassMailer Lightning Dashboard. At the rightmost corner of the tab list, click on the dropdown arrow and select “MassMailer Email Monitor.”
- Fill out all the information that the interface asks for, and then click on “Test Email Deliverability.”
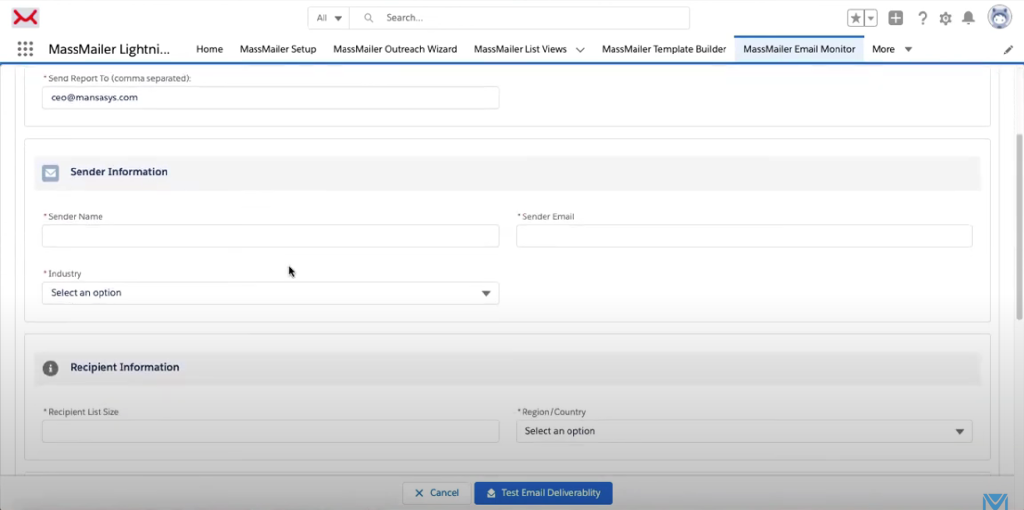
- It takes a few minutes for the report to display:
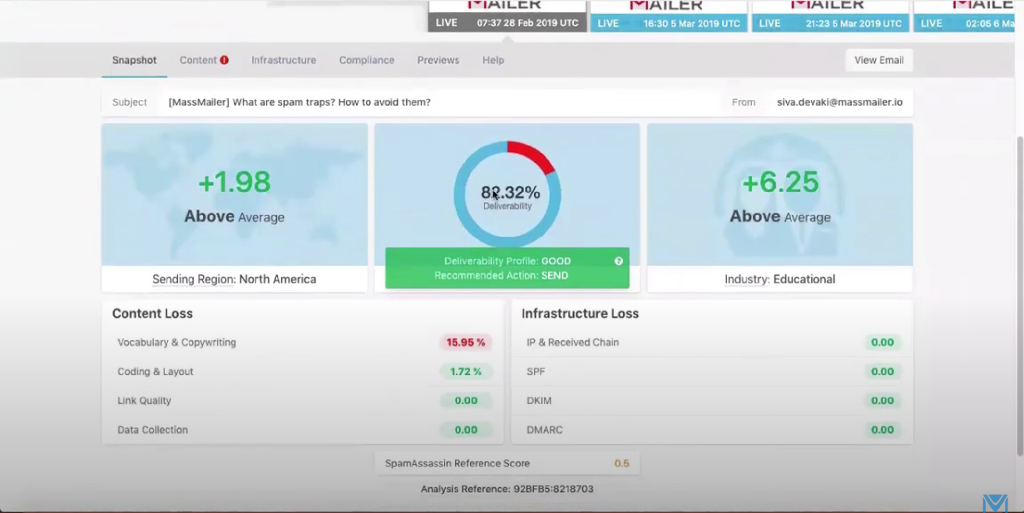
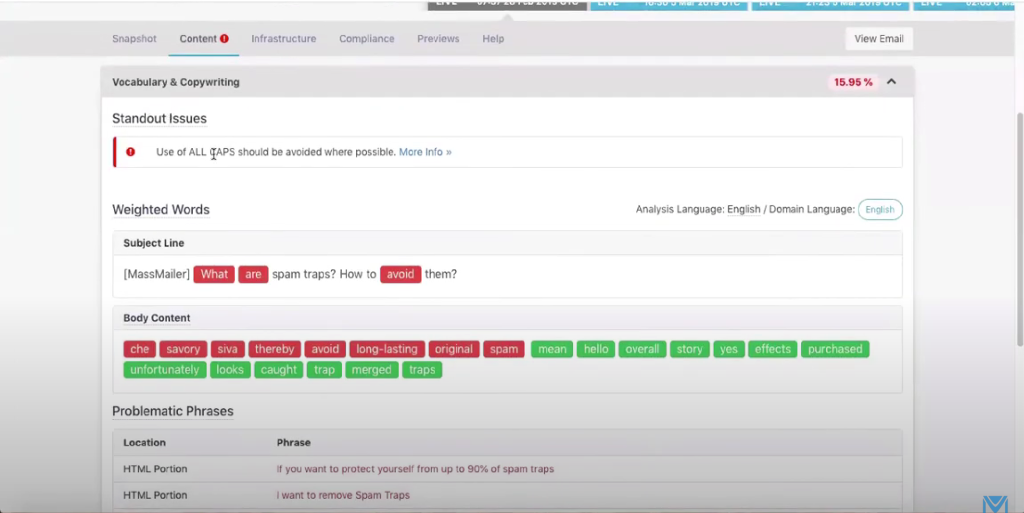
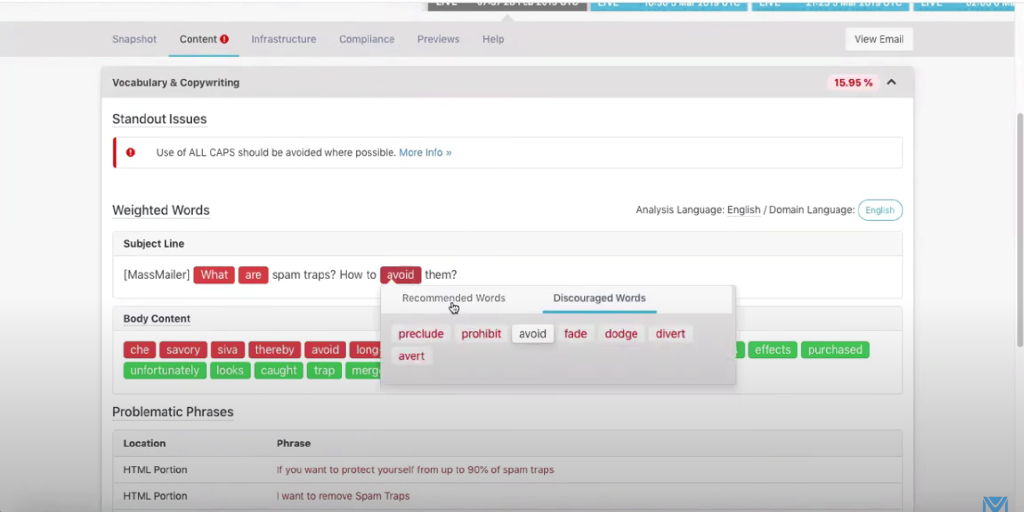
- You can click on the Content Loss fields individually to check the issues reducing deliverability. Then, you can use MassMailer-generated suggestions to improve your copy.
- You can scroll through the interface and its tabs to check and resolve other issues.
- Checking Compliance:
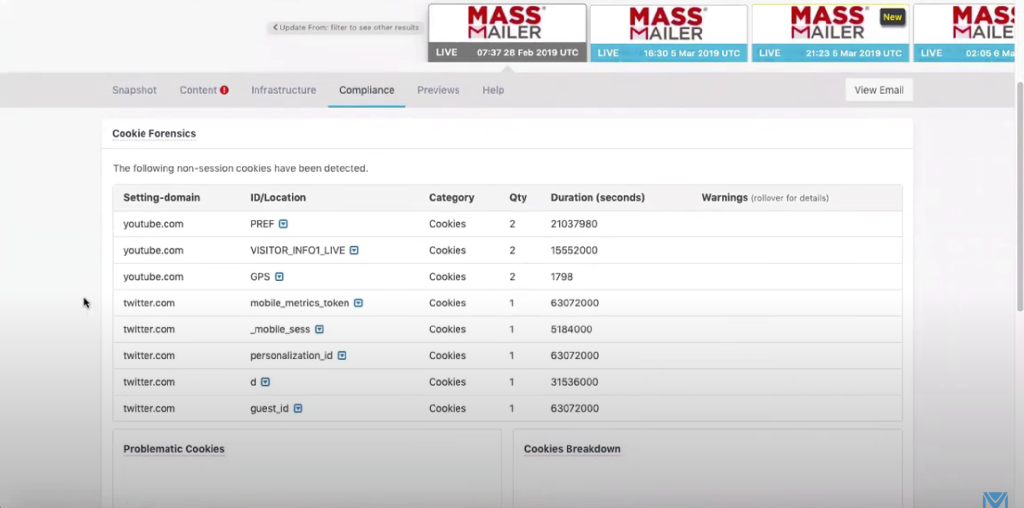
- In the same interface, scroll up and click on the Compliance tab. The new interface will highlight all your email’s compliance issues. Note that you can only make changes to the domains you control.
- 4. Unsubscribe Links
- MassMailer adds the Unsubscribe link automatically to emails.
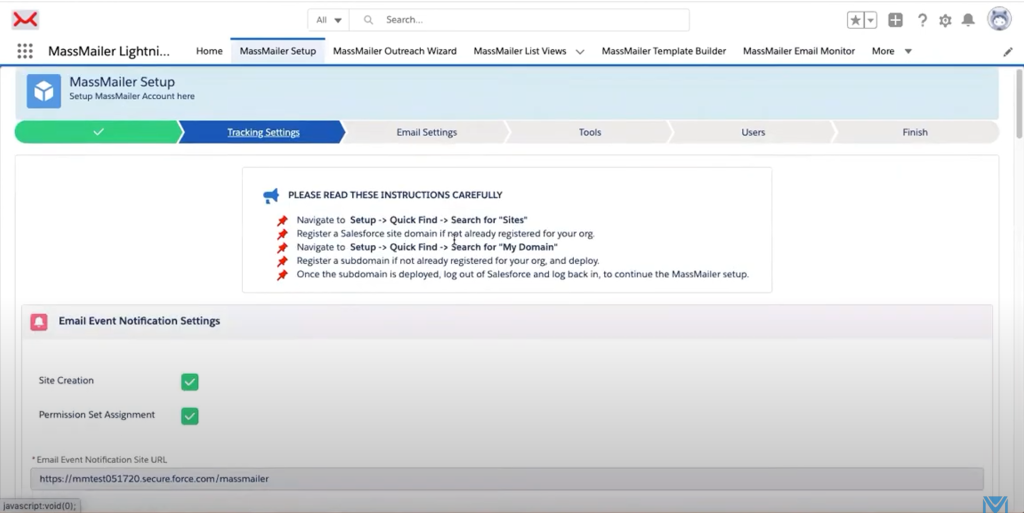
- Start in the MassMailer Lightning dashboard and click on the “MassMailer Setup” tab.
- Click “Tracking Settings” and scroll down to the “Subscription Tracking Settings” section.
- Enable the “Subscription Tracking” option to enable the Unsubscribe link.
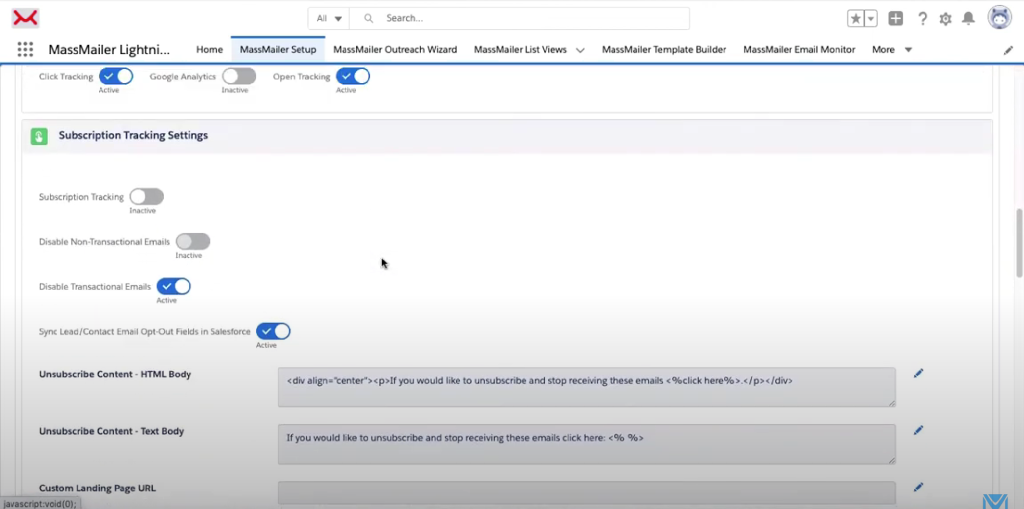
- Scroll down in the same section to customize the “Unsubscribe” content.
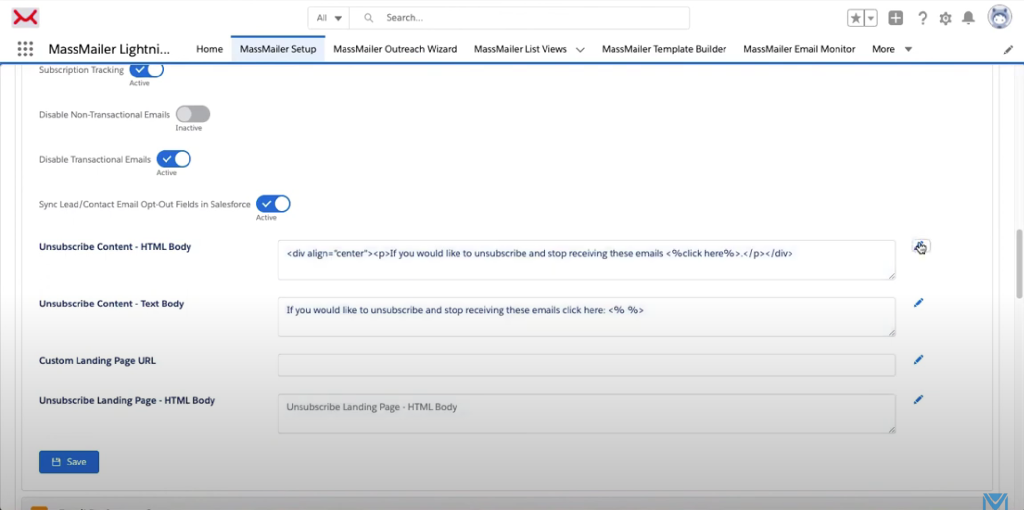
- Click on “Save” when done.
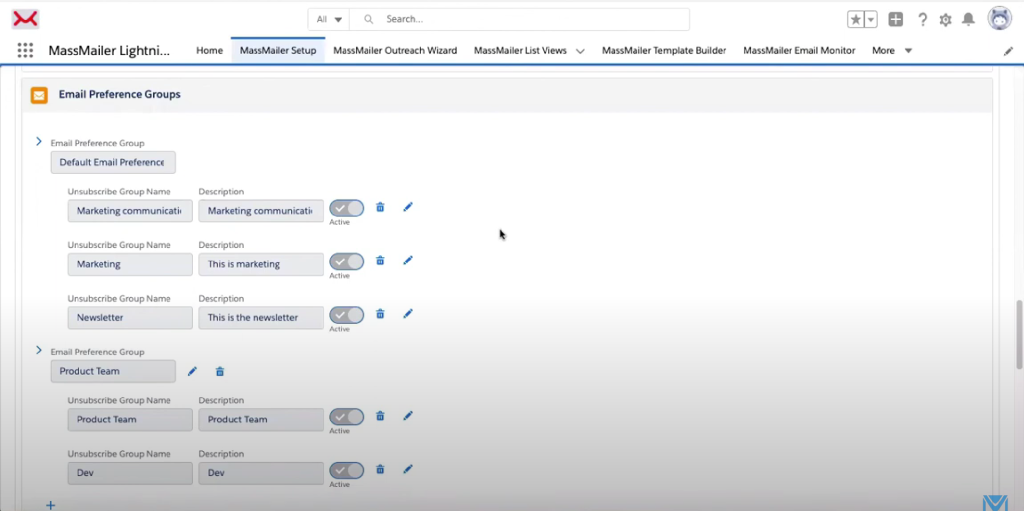
- Scroll down again to the “Email Preference Groups” section. Here, you can set custom “Unsubscribe” links for various subscription groups individually. Make your modifications and click on “Save.”
- MassMailer automatically suppresses emails that are invalid for any reason. You can view them in the “MassMailer Suppressions List” tab.
- If you want a video of this exercise, click here.
- Enhance Deliverability with MassMailer
- MassMailer is a Salesforce-native bulk email tool that integrates easily with your systems and offers value-added features to enhance email deliverability. Follow these best practices to improve your email deliverability scores drastically. Visit our website to explore other capabilities today.