How to Use Salesforce Inspector | A Comprehensive Guide
When it comes to productivity at work, few tools are similar to Salesforce Inspector, which makes tasking supremely easy.

For Salesforce users, this tool allows the creation of a metadata layer over the standard Salesforce UI, which can be embedded with features and functions that enhance productivity.
Within a few clicks, users can search the entirety of data from within Salesforce, drastically reducing the time they waste switching windows or screens.
Let’s take a look at how to use Salesforce Inspector Reloaded—the new version of Salesforce Inspector.
Why Use Salesforce Inspector?
Salesforce Inspector is a key productivity enhancer for the Salesforce environment. You can use this tool for several purposes, including:
- Data management: This tool allows you to import and export data, monitor usage, and track data changes.
- Development: It lets you modify metadata and data, test the changes, and align them with the organization’s needs.
- Navigation: Use this tool to navigate records and setups in Salesforce.
- User information: This tool makes it easy for you to search for users using information like names, emails, or other details.
This is not the end of the capabilities that Salesforce Inspector provides you. Let’s understand what the latest update to this tool has to offer.
What is Salesforce Inspector Reloaded?
The original Salesforce Inspector, for all its capabilities, has a small bug. If you have used it, you may have noticed an excessive comma in the query editor. Since this tool is open-source, several contributions later, this bug was finally removed in the newest version, Salesforce Inspector Reloaded.
The new version removes the extra comma issue and sweeps out any remaining bugs in this hyper-popular Chrome extension. It also includes some brand new features that further enhance your productivity at work.
Let’s take a look at how to use Salesforce Inspector Reloaded in a simple way.
How to Use Salesforce Inspector Reloaded
The first thing to know about Salesforce Inspector and Salesforce Inspector Reloaded is that they can both be accessed through the right-hand side panel by clicking on a translucent arrow button.
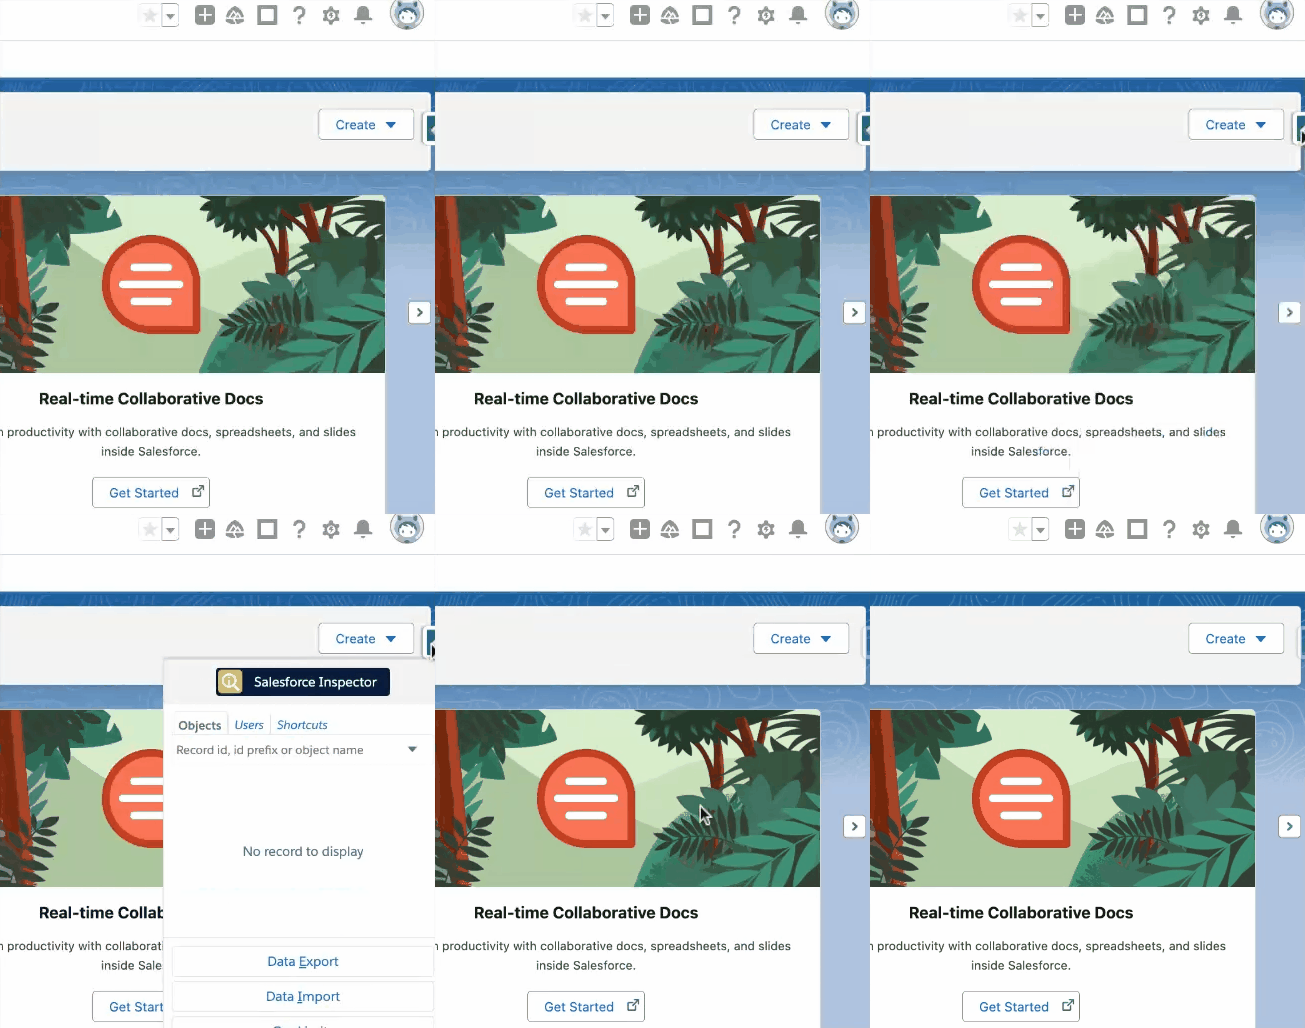
[Source]
To get around Salesforce using this tool, you need to know about the four key areas that it covers:
- Side Panel functionality
- Data Export
- Data Import
- Access Governance
Let’s get started.
1. Side Panel Functionality
The side panel allows you access to several features in Salesforce Inspector Reloaded:
Shortcuts
This feature allows you to access pages in the Setup menu much quicker. You can also access other items, such as deployment status, flows, profiles, etc., from anywhere in your Salesforce UI simply by looking them up in the Shortcuts option in the side panel.
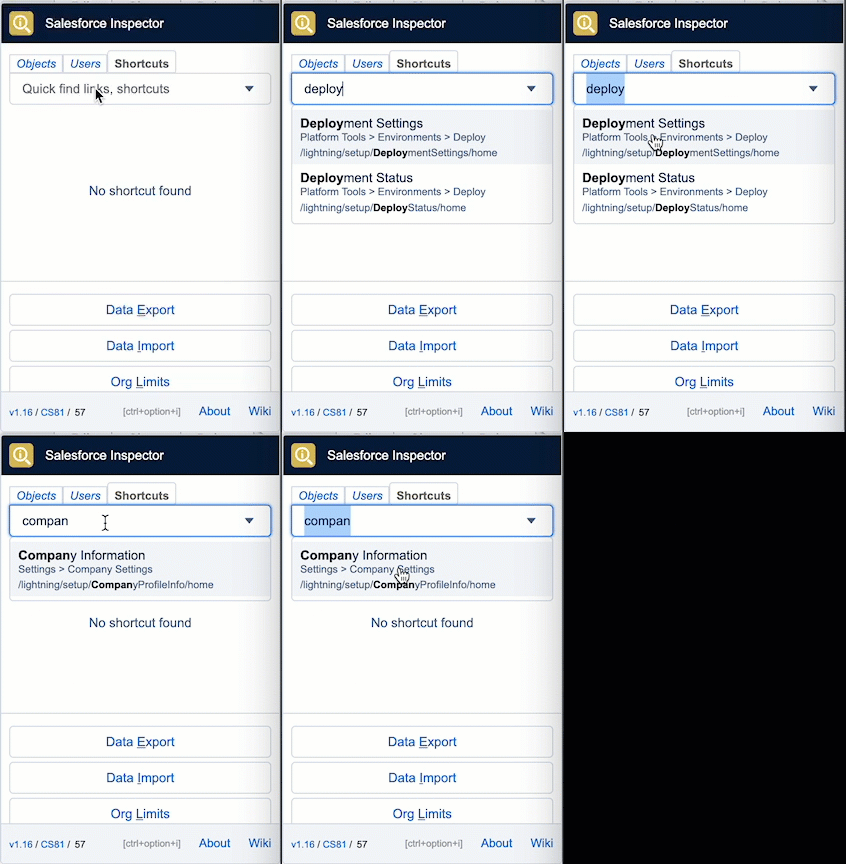
[Source]
Links
Use Salesforce Inspector Reloaded to accelerate your tasking by using links on the side panel pop-up or by setting up custom links. These links allow you to quickly navigate to items such as record details, user permissions, object configuration, and more.
Click on the Users tab and type any information about the users in Salesforce records.
Similarly, the Objects tab allows you to access information pertaining to objects, such as custom settings, metadata types, etc.
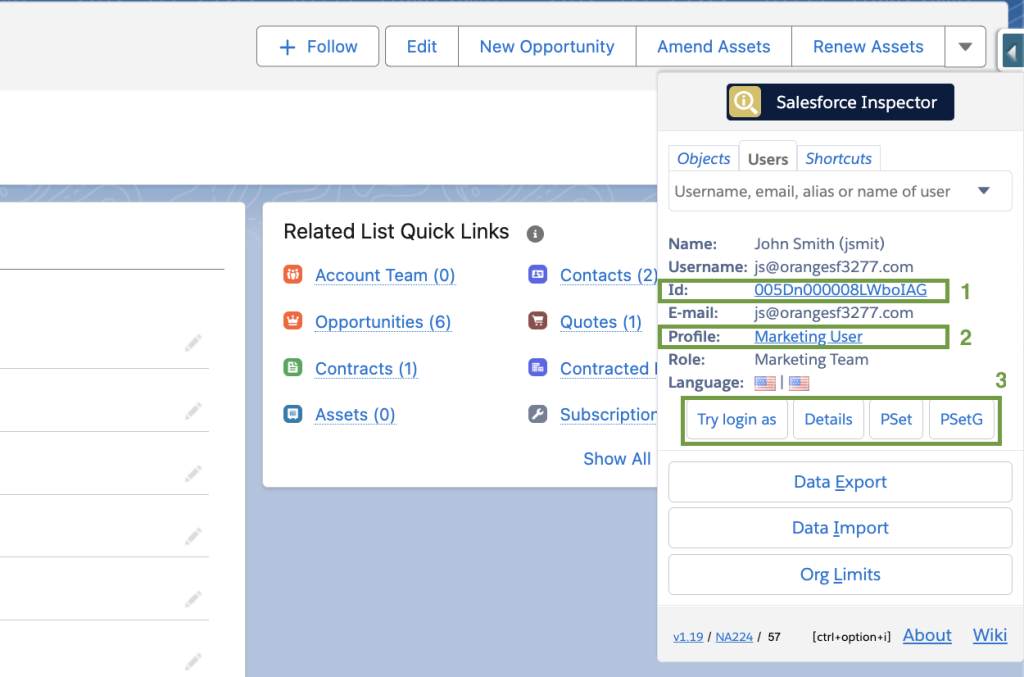

[Source]
API Version Update
At the bottom of the side panel, you will find an option to update the API version of this extension.
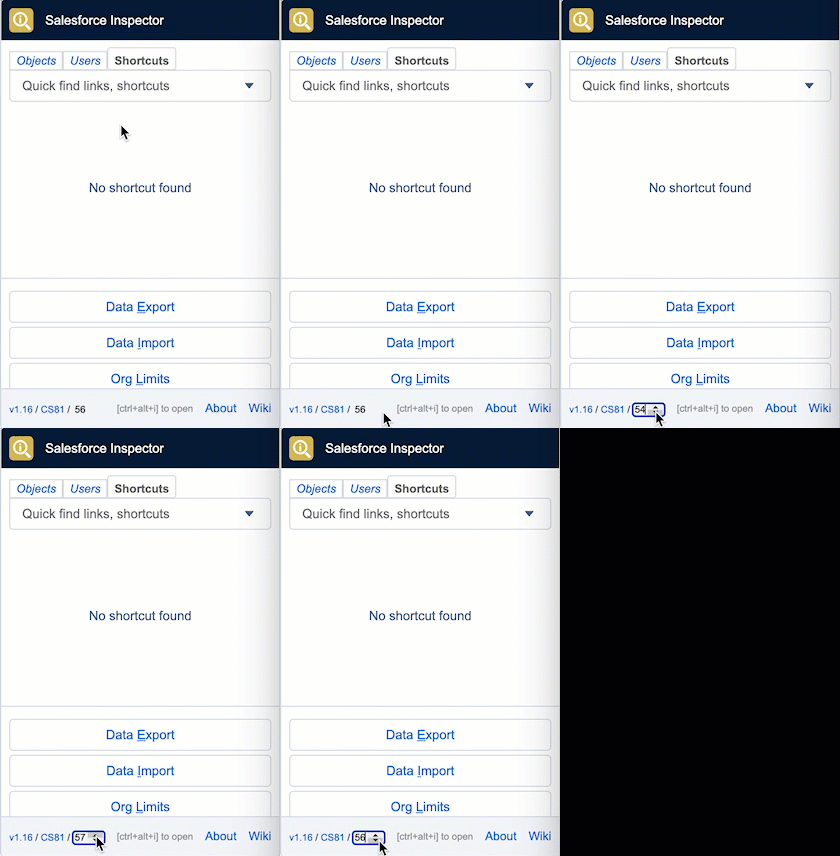
[Source]
2. Data Export
Data Export is a dedicated button in the Salesforce Inspector extension that redirects you to the query editor page. It allows you to quickly query all your Salesforce data (like filter return records) without leaving your current screen.
Using this option, you can also:
Add labels to saved queries
Save your queries under custom labels to reduce your querying time. This eliminates the need to search through queries (since they all start with SELECT).

[Source]
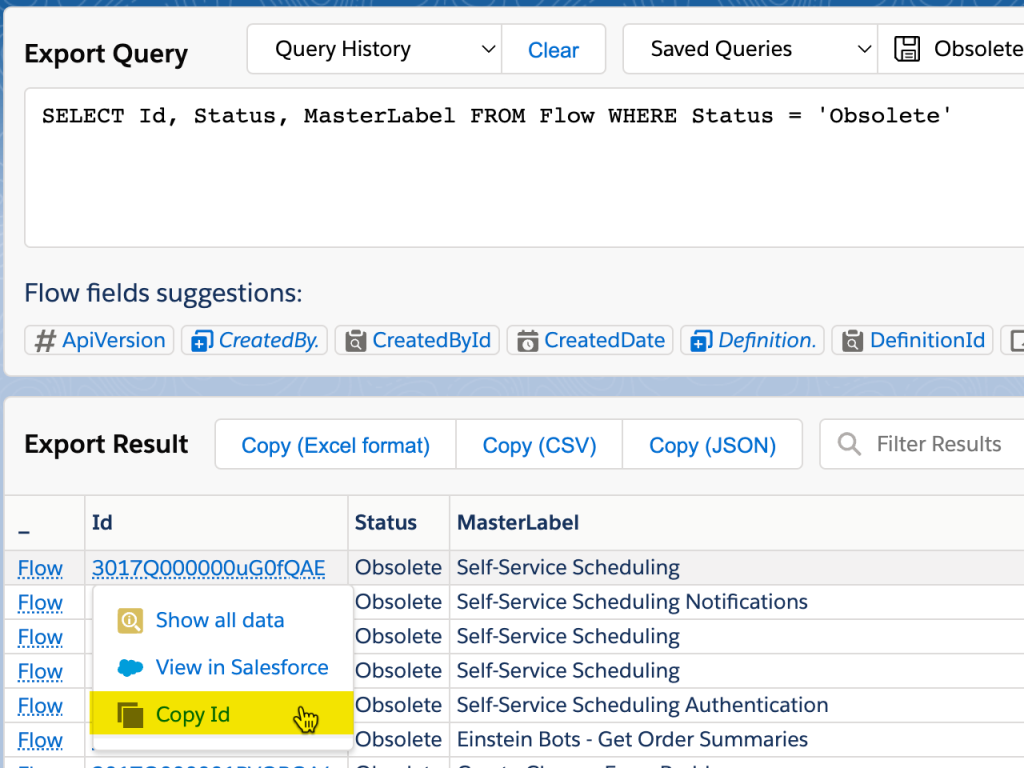
Add Copy ID option
You don’t need to select a whole Id in the Salesforce Exports page to select it anymore. With this option, you can directly copy the ID to your clipboard.
[Source]
Share queries
Help your coworkers become more productive by sharing your custom-labeled queries with them, whether they use Salesforce or Power. On this page, you can edit, clone, delete, and query records.

[Source]
3. Data Import
There are several ways to import data into Salesforce, like Data Loader or third-party applications. You can also achieve this using Salesforce Inspector and with functionality enhancements.
This interface prevents you from making mistakes by providing a red background for the production environment.
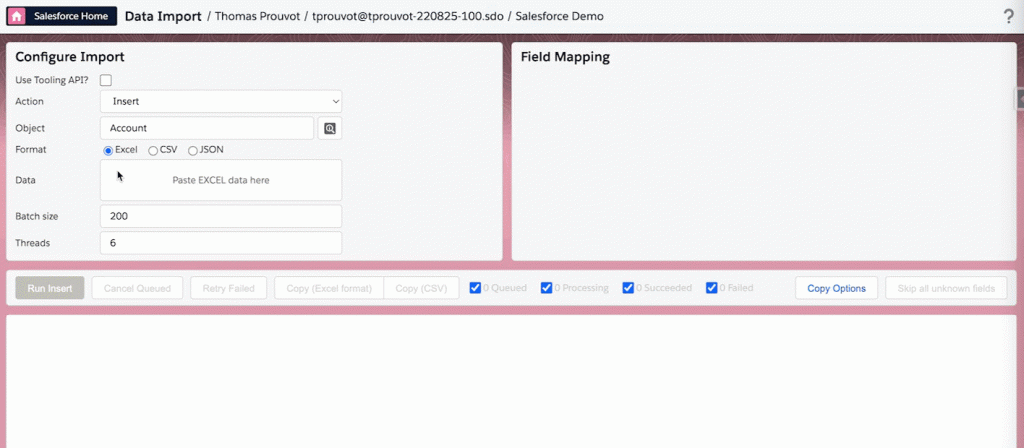
Auto-detect Objects
If you need to work on data on other applications before bringing it into Salesforce, you would need to write a query to export it, work on it, and then import it back. Salesforce Inspector shortens this process y auto-updating the Subject type when you paste the data into Salesforce.
[Source]
Skip Unknown Fields
The operation of pasting data back into Salesforce requires you to manually skip all the unknown fields one by one (for example, the new columns you may have added in the Excel version). This takes time and can be eliminated using Salesforce Inspector Reloaded. Just click on Skip All Unknown Fields to skip everything in one go.

[Source]
Access Governance
Salesforce Inspector lets you set access controls to the extension to enhance security. In Salesforce, you need to enable “API Client Whitelisting” which allows you to create new apps with profile authorization and permissions.
This exercise needs to be done separately because Salesforce Inspector re-uses the access token used by the browser.

[Source]
Augment Salesforce Functionality with Massmailer
Salesforce is a tool with great detail and capabilities. In order to harness its full potential, extensions like Salesforce Inspector Reloaded and Massmailer are necessary.
While Salesforce Inspector helps you enhance productivity while working, Massmailer helps enhance productivity while using Salesforce to send bulk mail. MassMailer is a Salesforce-native app that you can use to set up bulk email and email automation, along with several other capabilities.
It allows you to run Salesforce campaigns, use unlimited emails, monitor the results, verify your emails, send file attachments, build custom templates, remove spam traps, and much more.
Visit the website to know more.
