


Table of Contents
Follow-up emails play a significant role in driving engagement when using emails as a marketing medium.
That said, in the case of mass email campaigns, if you do not have an automated workflow to trigger these emails, you will have to invest a fair amount of time and resources to track every click and trigger a follow-up email individually—not the most efficient way to go about things.
MassMailer allows you to circumvent this predicament using the Salesforce Flow so that you can set up a system that automatically triggers follow-up emails when a recipient clicks on a link.
This blog will walk you through how you can set up such a system so that you never miss an opportunity to nurture a lead with zero effort. Read on!
What Are Follow-up Emails and Why You Should Automate Them?
Follow-up email, asthe name suggests, refers to a secondary email sent to a recipient after an initial interaction.
Essentially, when a prospect interacts with your email, it signals intereston their part. That said, interest does not always equate to a recipient taking the next step toward a conversion.
Without a well-timed follow-up, you lose the momentum gained when a prospect shows interest in your email and the opportunity to nurture them further down the sales funnel.This is where automation comes in. With it, timely follow-up emails pass on the right message to a potential lead at the right time without requiring any manual intervention.
As a result, you will witness:
- Higher Engagement & Conversions
- A significant reduction in time and resource investment
- A consistencyin communication with potential prospects/customers, and
- Explore the ability to scale at will.
How Does MassMailer’s Email Tracking System Work?
Before we discuss how to set up the automation, let's first understand how the functionality behind it works. To trigger automated emails, you need a system that can track recipient interactions in real time.
MassMailer does this using the Email Status object—a custom Salesforce object that captures and records various email engagement events, which, to name a few, include:
- Opens: When a recipient opens your email.
- Clicks: When a recipient clicks on a link within the email.
- Email Deliveries:When the email is successfully delivered.
- Bounces: When the email fails to reach the recipient due to an invalid address or other issues.
- Unsubscribed:When a recipient opts out of further communication.
- Reported as Spam: When a recipient marks the email as spam.
The act of logging these events is what serves as the foundation for setting up trigger-based automation within MassMailer and the Salesforce ecosystem.
How to Set Up Follow-Up Email Automation In MassMailer
The process of setting up follow-up emails on Massmailer is straightforward, and we will be using Salesforce Flow for it. For this demonstration, we will set up a follow-up email to trigger a "Click" event—a strong indicator of interest.
Step 1: Create A Process In Flow
Navigate to Salesforce Flow and create a process on the MassMailer Email Status object. Here, you can give the process a name, but make sure you set it to start when a record is created.
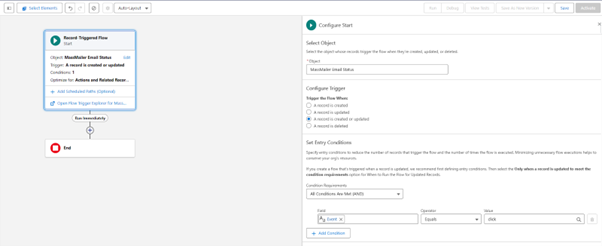
Under the "Object" field, make sure you select "MassMailer Email Status," as this is the object that stores all email activity data.
Step 2: Define The Trigger Criteria
Now, we add a criteria to the automation and give it a name. For this example, under the "Conditions for executing actions" section, we select "When conditions are met" and then enter the specifics for the conditions.

Here we select "Email Event Type" as the field, set the condition to "Equals" and enter "Click." This ensures that the process is triggered only when a recipient clicks on a link inside the email.
Note: You can also add additional (optional) filters that work only on specific campaigns or use subject line filters that trigger only the actionfor specifictypes of emails.
Click"Save" once all conditions are set.
Step 3: Configure the Follow-up Email Action
Now, we need to set up an action that sends a follow-up email. To do so, first click "Add Action" and choose "Apex" as the action type. Then select "Email via MassMailer" as the Apex Class to send the follow-up emails. Configure the following parameters:
- Record ID:Select Contact ID (ensures the email is sent to the correct recipient).
- Template ID: Choose the Salesforce email template for the follow-up email.
- From Name & Email: Set the sender details.
- To Name & Email: Pull recipient details from the Contact Object.
Note: The template ID is required to send automated emails. There are two ways to locate them:
- From Salesforce Classic Email Templates
- Using MassMailer Lightning Template Builder
Step 4: Activate and Test the Automation
Click “Activate” in Salesforce Flow to enable the workflow.

Once you hit "Confirm," the automation should be in place. The next step is to test this automation, and we do that with a simple test email like this:
- Navigate to MassMailer to send an email, select a contact, and send them a test email. Make sure that the email has a clickable link. Forthe purpose ofthis test, it is easiest to send the email to yourself.
- Open the test email in your inbox (or ask the selected contact to do so) and click on the linkinside it.This action should trigger the MassMailer Email Status Object to log the click event.
- To verify thatthe follow-up email was sent, refresh the contact's email activity log in Salesforce.You should see two entries: the original emailthat wassent initially and the automated follow-up email triggered by the click event.
With this setup, you will ensure timely and relevant engagement every single time.
Summing It Up
With the MassMailer Email Status Object capturing real-time engagement data, you can tailor your automation, ensuring that every potential lead is nurtured.
Whetheryou'rehandling a handful of prospects or running large-scale campaigns, this setup scales effortlessly, helping you drive conversions without added complexity.
If you're looking for a robust solution to send, track, and automate emails within Salesforce,MassMailerhas you covered. With features likeadvanced email verification, the ability to run mass and drip campaigns, and detailed real-time tracking, you can run sophisticated email campaigns without any of Salesforce's built-in limitations.
Start Your Free Trial Today
Experience MassMailer the easiest way to send personalized emails from Salesforce.
MassMailer Resources


MassMailer Glossary
About the Author

Siva Devaki 
Siva Devaki is the founder of MassMailer Inc., a tool that helps Salesforce users optimize email marketing. A passionate advocate for email marketing, Siva writes and hosts podcasts on the topic, sharing insights to help businesses drive revenue and enhance customer engagement through Salesforce email automation and tracking.