


Table of Contents
Introduction
Email is far from dead; it’s dominating. In fact, 44% of CMOs call it essential to their digital strategy with over 15% open rates, and nearly 8% of their marketing budgets are reserved just for email efforts. This highlights the importance of having an effective email marketing campaign, one that is incomplete without access to email analytics and records.
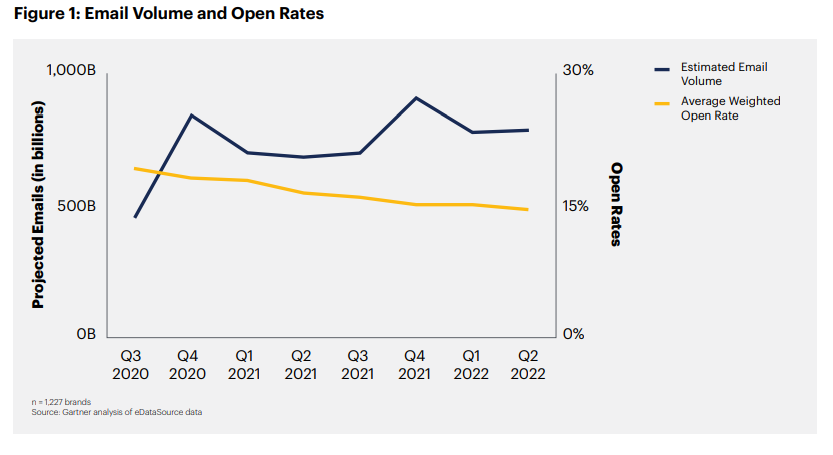
Email open rates - Gartner report
And that’s where Email to Salesforce can prove useful.
It is an effective way to link the external emails of your organization to Salesforce records. This feature can integrate your Outlook or Gmail data with Salesforce logs and contact records.
With this, you can send emails and get replies in Salesforce within the same contact form that was used to send the email. This helps you log emails automatically and keep uniform data records in the business.
This includes emails you have sent from third-party email IDs as part of lead acquisition activities. By enabling Salesforce Email, you can use the My Salesforce Email page to view emails and customize their settings based on your needs.
Read on to see what Email to Salesforce actually does, how to set it up in minutes, and how to avoid the common pitfalls that trip up first-time users.
How Does Email to Salesforce Work?
When you send a Salesforce email to a lead through an external email application, Email to Salesforce will automatically integrate that email with the Salesforce records, leads, contacts, and associated opportunities.
You can compose an email, send it to one or multiple recipients, forward old emails, or reply to an email thread through this platform. All you need to do is type the custom email address into Salesforce in the recipient, CC, or BCC field.
Then, when you send the email, Salesforce will also receive a copy. Based on your configuration settings, your sales emails will be added to the Activity History of the record whose email address is the same as the recipients. If there are no matches, it will go to the My Unresolved Items page.
For an email in the My Unresolved Items page, you can assign it manually to a record. In case you don’t, the email will appear on your open task list. It’s important to remember that each Salesforce user gets a unique “Email to Salesforce” address.
Benefits of Email to Salesforce
Setting up Email in your third-party application makes executing and tracking sales campaigns easier. You can also direct your marketing efforts in the right direction through data centralization.
- It helps acquire historical information in Salesforce.
- It is user-friendly and easy to set up and configure.
- You can enrich record information from historical data.
- Insights can help make better business decisions.
- It is undeniable that Salesforce emails can revolutionize your email analytics and marketing.
Now, let’s see how to set it up.
How to Set Up Email to Salesforce
Here is a step-by-step guide on how to set up email on your Salesforce account.
Step 1: Activate Salesforce Email
The first thing you need to do is to activate your Salesforce account and set up your email. These steps will help you do that:
- Log in to your Salesforce account and click Setup.
- Search for Email to Salesforce on the Setup screen.
- Click the Edit button.
- Select the Active checkbox.
- Click Save.
This is the beginning of your email setup.
Step 2: Parse the Inbound Email
The next step is to parse the email received from the configured Email Services based on your business requirements and create metadata in the system. Here’s how you can parse the inbound email.
- Go to the Quick Find box and search for Apex Classes.
- You need to create an Apex class that implements Messaging. InboundEmailHandler. This will help you read the email message for the Email Service you received. All the business logic goes here.
- Before creating email services, create Apex classes that implement the Messaging.InboundEmailHandler interface.
Global class myHandler implements Messaging.InboundEmailHandler {
global Messaging.InboundEmailResult handleInboundEmail(Messaging.InboundEmail email, Messaging.InboundEnvelope envelope) {
Messaging.InboundEmailResult result = new Messaging.InboundEmailresult();
return result;
}
}
Step 3: Create New Email Services
The third step in setting up Email is to create Email Services. To do so, follow these steps:
- Search Email Services in the Quick Find box.
- Click New Email Services.
- Fill out the required details.
- Under Apex Class, click the magnifying glass icon and select the Apex class you created in the previous step.
- Click the Save and New Email Address button.
- Fill out the required details:
- Email Address Name: Input the name of your choice.
- Email Address: Enter the string that your email should start with.
- Active checkout: Select it.
- Context User: Enter the same name as the email address.
- Accept Email From: You can leave this blank.
- Click the Save button.
- Copy the email ID displayed in the CreateEmailRecord field.
Step 4: Update Email Settings
To update My Email Settings, you must follow the steps below:
- Click the Avatar icon on the top right corner of your screen.
- Click Settings.
- In the Quick Find box, search for My Email Settings.
- Set the debug logs required to verify the new email address.
- In the Email Address field, paste the email address that you copied in the previous step.
- Click the Save button.
- Open the Email To ApexHandler debug log.
- Copy the verification link displayed in the log.
- Open a new tab and paste the copied link to follow it.
- Click Continue.
This completes the setup of your Email to Salesforce feature. You can perform other configuration tasks like setting an email template, customizing settings, and tracking the Salesforce link to a record.
To test your Salesforce Email feature after setup, you can try sending an email to any contact you want. Choose a contact record whose email address field is already populated. Ask the recipient to reply in the same mail chain.
Even if the recipient replies from Gmail or Outlook, refresh the contact record. You will be able to see the email reply in the Activity section in Salesforce.
Salesforce Email: Limitations and Considerations
A few considerations must be kept in mind while using Email for your business.
Addressing and Access
- You can add the Email address to your address book for quick access.
- If you want to save a message as an email without sending it to any of your contacts, add your Email address in the “To” field only (no other addresses in To, CC, or BCC).
Email Matching and Linking Limits
- Salesforce can match a maximum of 50 email addresses from the To and CC fields.
- Only the first 50 unique addresses are matched.
- Each received email allows up to 50 email activities.
- You can link up to 50 contacts to each email task record.
File and Email Size Restrictions
- Maximum file size in Salesforce Classic: 25 MB.
- Maximum file size in Lightning Experience: 2 GB.
- Maximum overall email size: 25 MB.
- Email text and HTML code are limited to 131 KB.
Attachments and Data Considerations
- When a record is matched, all email attachments are duplicated, which increases the total data size.
- If any attachments are not added, Salesforce will notify you via confirmation email.
No Automatic Threading and Simple Customization
- Emails are logged as separate activities, so you can’t always view an entire conversation thread in one place.
- You can’t easily customize how emails are logged or how activities are created without using extra automation or third-party tools.
Adding More Power: Using MassMailer with Email to Salesforce
Salesforce’s “Email to Salesforce” feature is a convenient way to log emails directly from your inbox into Salesforce records. But what if you want to go beyond basic workflows?
That’s where MassMailer comes in.
MassMailer is a Salesforce-native application that supercharges your email capabilities without ever leaving the CRM. It extends what “Email to Salesforce” can do, turning your CRM into a full-fledged email marketing and transactional messaging hub.
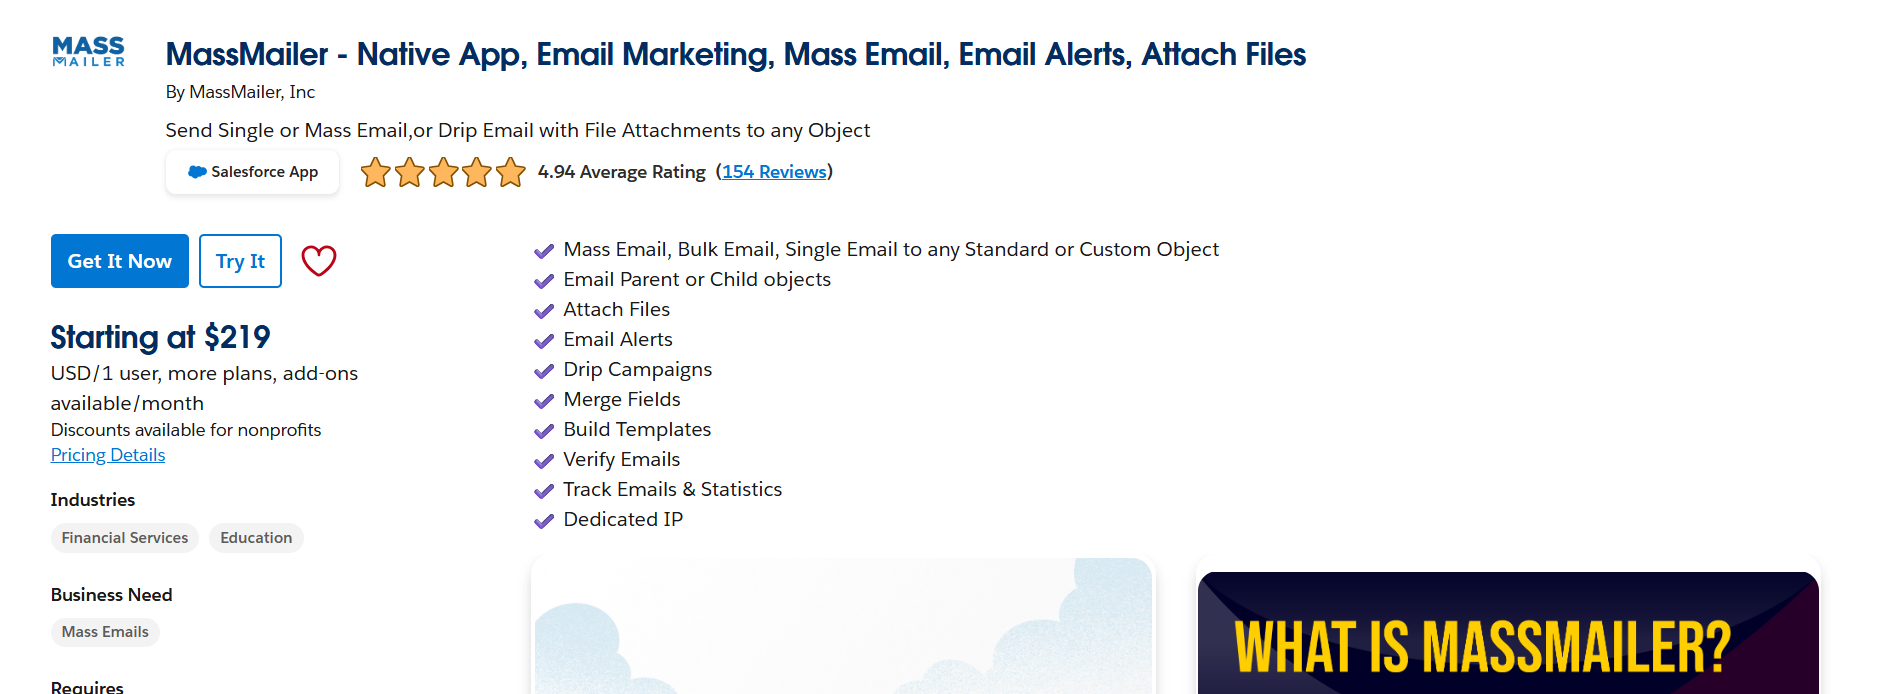
Salesforce Appexchange MassMailer Listing View
Here’s how MassMailer builds on the core functionality:
| Salesforce native feature | MassMailer enhancement |
|---|---|
| BCC-based logging only | Send and track emails natively from Salesforce |
| Limited deliverability insights | Built-in spam check, DMARC/SPF/DKIM validation, preview tests |
| No template builder | Drag-and-drop visual email builder with personalization |
| No unsubscribe or bounce management | Automatic tracking and suppression |
| Manual logging of transactional emails | Automate transactional sends using Flows or API |
| No analytics dashboard | Real-time open/click/bounce reports inside Salesforce |
| Daily email sending limits | Overcomes limits via MassMailer’s infrastructure |
MassMailer transforms Salesforce from a passive email logger to an active email engine, seamlessly integrating email creation, delivery, tracking, and optimization. Here are some of its use cases.
Bulk Email Campaigns
- Target leads, contacts, or any custom object
- Use filters or list views for segmentation.
- Personalize subject lines and email body fields
Transactional Emails
- Triggered by workflow: new sign-up, payment receipt, password reset
- Dynamic content and attachments
- Fully automatable via Salesforce Flows or APIs
Lead Nurturing & Drip Sequences
- Send follow-ups based on field updates, form fills, or status changes
- Schedule emails at set intervals
- Monitor engagement to guide sales outreach.
Internal Notifications
- Alert team members via email when certain actions happen
- Auto-log messages in Salesforce for future reference
Email Personalization & Branding
- Use merge fields from standard/custom objects
- Drag-and-drop branded templates
- Built-in dark mode and mobile previews
How to Integrate: Where MassMailer Offers Value‑Add
You don’t have to rip and replace anything. MassMailer works natively within Salesforce, so the integration process is smooth and seamless.
Here’s how you typically get started:
Integration Setup
- Install from Salesforce AppExchange
- Connect to your Salesforce org (100% native)
- Configure user permissions and access
Value Add Areas
- Deliverability Optimization: Get alerts for spammy language, broken links, or missing DMARC records before you hit send.
- Email Verification: Detect bad emails (bounces, spam traps, unknowns) before they hurt your sender score.
- Send Automation: Use Salesforce Flows or Process Builder to automate when emails get sent and to whom.
- Analytics & Reporting: Every email event — open, click, bounce, unsubscribe — is tracked at the record level in Salesforce.
- Unsubscribe & Compliance Management: MassMailer handles suppression lists and opt-outs natively, something Salesforce’s built-in email can’t do.
If you rely on Salesforce and want to get serious about email marketing, MassMailer is the natural extension to Salesforce.
Start your 15-day free trial with Massmailer now.
Conclusion
Setting up Salesforce Emails for your email workflow automation and marketing efforts might seem daunting at first glance and require occasional troubleshooting. But that’s not the only way. You need the right platform to address your email campaign needs and optimize processes. MassMailer helps you do just that!
You can send automated emails in Salesforce CRM for your marketing campaigns, set alerts, control your email and record data, and gain insights from in-depth reporting. Get
Book a call with MassMailer to start your journey and eliminate Salesforce Email limitations!
You can also request a live demo to understand how it works.
Frequently Asked Questions
What happens if the recipient’s email isn’t in Salesforce?
Can I forward old emails to Salesforce using the BCC address?
Where do I find my unique Email-to-Salesforce address?
Can I log emails by putting the Salesforce address in CC or To instead of BCC?
Do attachments get logged with the email?
Is there a limit on how many emails I can log using Email to Salesforce?
Start Your Free Trial Today
Experience MassMailer the easiest way to send personalized emails from Salesforce.
Related Blogs

MassMailer Resources


About the Author

Siva Devaki 
Siva Devaki is the founder of MassMailer Inc., a tool that helps Salesforce users optimize email marketing. A passionate advocate for email marketing, Siva writes and hosts podcasts on the topic, sharing insights to help businesses drive revenue and enhance customer engagement through Salesforce email automation and tracking.