


Table of Contents
Introduction
If you’ve ever caught yourself wondering whether a prospect opened your email or spent hours trying to log meetings into Salesforce, you know how frustrating sales admin can be. It’s easy to lose track of follow-ups when your tools don’t talk to each other.
That’s where Yesware’s Salesforce integration steps in. It connects your inbox, whether it’s Gmail or Outlook, directly with your CRM, so every tracked email, meeting, and call automatically logs in Salesforce. No more copy-pasting notes or chasing missing updates.
In this guide, we’ll walk through the exact steps to set it up, make sure it’s syncing properly, and show you how to turn on automation so your follow-ups, reminders, and reports happen on their own.
By the end, you’ll have a clean, connected workflow that gives you more time to focus on selling instead of managing spreadsheets. Whether you’re running a team or closing deals yourself, this integration can help you stay organized and move faster.
What Is Yesware Salesforce Integration (Overview & Benefits)
The Yesware Salesforce integration connects Yesware with Salesforce to create a two-way sync between your inbox and CRM. It automatically logs emails, meetings, and tasks, so you never have to enter data manually. You can access and update Salesforce records right from Gmail or Outlook, track engagement, and automate follow-ups in real time.
This integration helps sales teams work faster and maintain accurate CRM data without switching tools. With clean, synced activity, managers gain better pipeline visibility and reps save hours weekly.
According to Statista (via Kixie), the global sales automation market is expected to grow from $7.8 billion in 2019 to $16 billion by 2025, reflecting the rising demand for connected sales tools.

Now that you know what the Yesware Salesforce integration does and how it helps your team stay organized, let’s make sure you have everything ready before setting it up.
Yesware Salesforce Integration Requirements and Setup Prerequisites
Before connecting Yesware with Salesforce, it’s important to make sure your setup meets a few basic requirements. This helps avoid common sync issues later and ensures your integration works the first time you turn it on.
Let’s walk through what you’ll need.
Requirements and Compatibility
To get started, check the following points to make sure your accounts and tools are compatible:
- Use a Salesforce edition with API access, such as Enterprise or Professional with API enabled. The API is what allows Yesware to sync activities and updates automatically.
- Make sure your Yesware plan includes Salesforce integration features, since not all plans have this option.
- Confirm your organization uses either Gmail or Outlook, as these are the only email clients supported by Yesware’s Salesforce integration.
- Double-check that your Yesware and Salesforce accounts share the same user email address. This keeps your sync accurate and prevents duplicate records.
Permissions You Need Before Integrating
You’ll also need the right permissions in place to connect Yesware and Salesforce successfully:
- Your Salesforce admin should have access to Connected Apps and API settings to authorize the integration.
- A Yesware team admin must enable the Salesforce integration within the Yesware dashboard for all users.
- Each Salesforce user should have the “API Enabled” permission included in their profile or assigned permission set.
- Make sure OAuth authorization is granted between Gmail or Outlook, Yesware, and Salesforce. This allows secure data syncing across platforms.
Once these requirements and permissions are ready, you’ll be set to begin the integration process without interruptions.
Step-by-Step Yesware Salesforce Integration Tutorial
Now that your accounts and permissions are ready, let’s walk through the exact process of connecting Yesware with Salesforce. These steps ensure your integration syncs correctly across Gmail or Outlook, logging every email, meeting, and follow-up automatically.
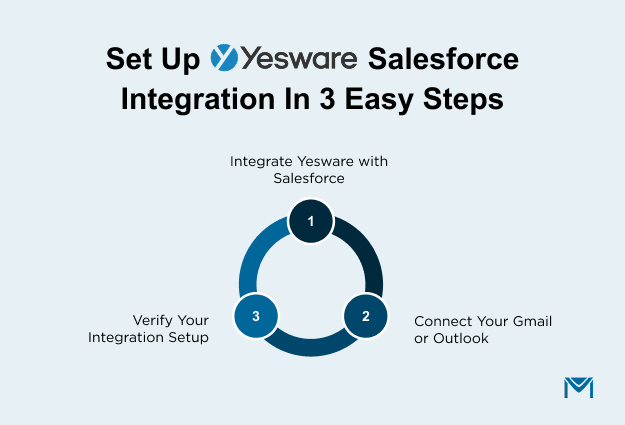
How to Integrate Yesware with Salesforce
For Gmail (Yesware for Chrome):
- In Gmail, click the Yesware menu at the top of your inbox and select Preferences to open your settings panel.
- Go to the Integrations tab and locate the Salesforce Integration section.
- Click Authenticate with Salesforce, then sign in to your Salesforce account when prompted.
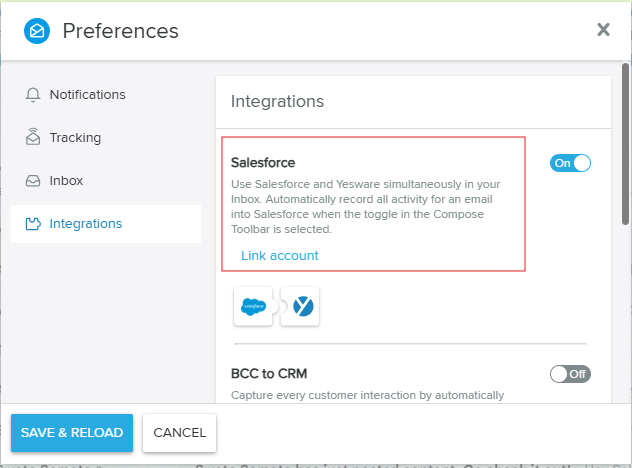
4. Approve Yesware as a Connected App by granting all requested permissions so it can sync data.
5. Once authentication is complete, click Save & Reload to finalize the integration.
6. Turn on Automatic Sync under settings so Yesware can log emails, calendar events, and engagement data in the background.
For Outlook (Yesware Add-in):
- Open Outlook and locate the Yesware Sidebar within your mailbox.
- Click the Salesforce tab inside the sidebar to begin the connection setup.
- Select Authenticate with Salesforce and log in using your Salesforce credentials.
- Approve access when prompted to allow Yesware to read and write Salesforce data.
- Confirm that Automatic Logging is enabled to ensure activities sync even if Outlook is minimized or closed.
Pro Tip: Always verify that background sync is active after setup. This ensures Yesware continues logging opens, clicks, and meetings even when you’re working outside the Gmail or Outlook window.
Connecting Gmail or Outlook Accounts
Before Salesforce can receive your Yesware data, your email client must be connected correctly.
- In Yesware Settings, confirm your Gmail or Outlook mailbox is linked to your Yesware account.
- Under CRM Preferences, select Salesforce as the default connected CRM.
- In Gmail, confirm the Salesforce Sidebar appears on the right-hand side of your inbox, allowing you to view and update Salesforce records without switching tabs.
- In Outlook, check that the Yesware Sidebar opens automatically, giving access to Salesforce contact and deal details.
- Make sure Send to Salesforce is turned on so every tracked email, meeting, and engagement automatically syncs to your CRM.
- If logging does not start automatically, click Authenticate with Salesforce again in the sidebar and reauthorize your account.
This connection ensures all your tracked communication appears under the correct lead or contact in Salesforce, helping you maintain a full engagement history.
Verifying the Integration Works
Once setup is complete, it’s important to test and confirm that Yesware is syncing data correctly with Salesforce.
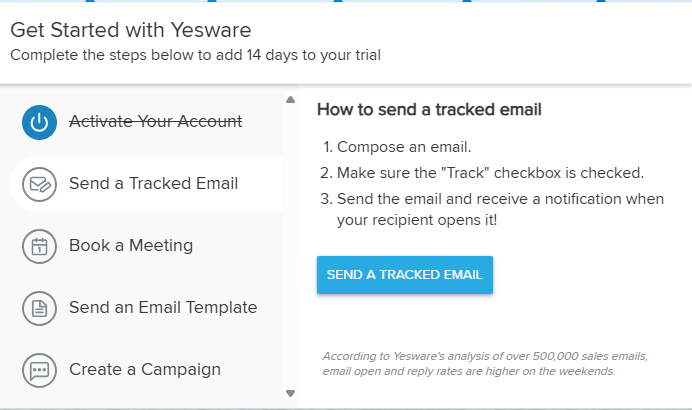
- Send a tracked test email to one of your Salesforce contacts. After sending, open that contact record in Salesforce and verify the email appears in the Activity History section.
- Open the Yesware Sidebar in Gmail or Outlook to confirm you can view and update Salesforce records directly from your inbox.
- Schedule a test meeting in Google Calendar or Outlook, and then check the related contact or opportunity in Salesforce to ensure the event appears automatically.
- Review your Salesforce dashboard to verify that email engagement data, such as opens, clicks, and replies, is being logged in real time.
- If your Salesforce organization uses multiple records with the same email address, use the Sync Selector (available in Gmail Enterprise) to choose the correct contact for logging.
- If you notice that activities are not syncing, reauthorize your Salesforce connection within Yesware settings and confirm that your Salesforce profile includes the API Enabled permission.
Once these verifications pass, your integration is officially live, and every tracked email, meeting, and task will flow into Salesforce automatically.
How to Enable Automation and Email Tracking in Yesware Salesforce Integration
Now that your integration is connected and working, it’s time to unlock what makes it truly powerful: automation and tracking. This is where Yesware starts doing the heavy lifting for you, logging every action, syncing your activity, and triggering follow-ups without you having to think twice.
Let’s go step-by-step so you can make the most of Salesforce automation and email insights.
Setting Up Yesware Salesforce Automation
Automation is the heart of this integration. Once you set it up, Yesware will automatically record emails, meetings, and engagement data into Salesforce.
Here’s how to do it the right way:
- Open Yesware Settings from your Gmail or Outlook account and go to the Salesforce Integration panel.
- Turn on Automatic Activity Logging, so every tracked email, reply, and calendar event is synced to the correct Salesforce record in real time.
![]()
- Create workflow rules to automatically update a lead or contact’s status based on recipient actions. For example, you can set a rule that marks a lead as Engaged when they open an email or click a link.
- Add follow-up triggers that automatically create Salesforce tasks when prospects don’t respond after a certain number of days. This ensures your team never drops a lead again.
- Enable data sync for Yesware Sequences, which pushes campaign engagement metrics like open rates and reply rates directly into Salesforce dashboards.
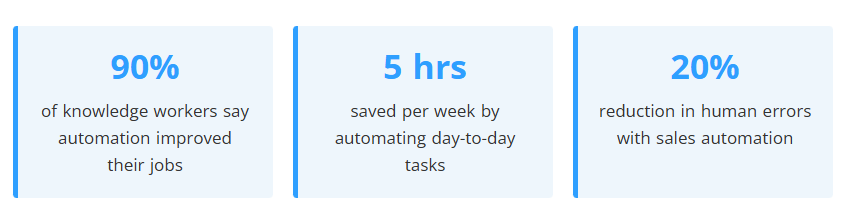
According to Kixie’s 2025 Sales Automation Report, 90% of sales professionals say automation improved their efficiency, saving about 5 hours every week and reducing errors by 20%. That’s time you can spend closing deals instead of updating CRM fields.
Start with one or two simple automation rules first. It’s better to test and refine your workflows before layering multiple triggers. This keeps your Salesforce data clean and reliable.
Enabling Email Templates, Tracking, and Calendar Sync
With automation running, you can now personalize your outreach and ensure every interaction is tracked without lifting a finger.
Here’s how to set it up effectively:
- Go to Yesware Templates and use Salesforce merge fields like {{First Name}} to personalize every message at scale. This helps you send emails that feel tailored without rewriting them each time.

- Turn on Real-Time Tracking so that Yesware automatically logs every open, click, and reply in Salesforce. You’ll instantly see who’s engaging and when.
- Sync your Google or Outlook calendar with Salesforce to automatically log all meetings, follow-ups, and reschedules under the right contacts and opportunities.
- Use Yesware Campaigns to send follow-up sequences that match your deal stages in Salesforce. For example, you can schedule reminder emails to trigger automatically when a prospect moves from “Interested” to “Negotiation.”
If your team manages larger campaigns or bulk sends, you might also want to explore MassMailer, a Salesforce-native solution for sending bulk emails and automating workflows directly within the CRM.
It complements Yesware perfectly by covering high-volume outreach needs.
Exploring MassMailer as a Salesforce Email Automation Alternative
While Yesware focuses on personalized one-to-one engagement, many sales and marketing teams also need to handle high-volume outreach directly from Salesforce. That’s where MassMailer comes in, a native Salesforce app built to send bulk emails, manage campaign automation, and ensure all activities stay synced within your CRM.
Let’s explore how it complements Yesware, what makes it different, and when it’s the right fit.
How MassMailer Complements Yesware Salesforce Integration
MassMailer extends the value of your Yesware–Salesforce integration by covering the bulk side of email automation.
- MassMailer is built natively on Salesforce, which means all campaigns, templates, and reports live directly inside your CRM without requiring any external tools.
- It allows teams to send large-scale email campaigns from Salesforce, using your existing contact and lead records without hitting standard sending limits.
- Unlike Yesware, which focuses on personalized tracking and outreach, MassMailer is designed to handle bulk campaigns, newsletter-style sends, and workflow-driven automations at scale.
- One Salesforce user on Reddit shared that MassMailer helped them overcome the standard 5,000-email sending limit in Salesforce. However, they also observed that poor configuration or lack of domain authentication could cause messages to land in spam folders.
- This highlights the importance of setting up SPF, DKIM, and DMARC records properly and maintaining healthy sender practices to ensure strong email deliverability when scaling outreach.
- By combining Yesware’s personal engagement tracking with MassMailer’s high-volume delivery, teams can manage both one-to-one and one-to-many communications in a single CRM environment.
Use Yesware for targeted outreach (prospecting, follow-ups, deal progress) and MassMailer for large audience sends like event invitations, product updates, or nurture campaigns.
Key Features of MassMailer for Salesforce Users
MassMailer offers several advanced features that make it a strong companion to Yesware for Salesforce users.
- The platform provides native Salesforce integration, allowing you to create, send, and report on campaigns entirely within Salesforce, no API connectors or third-party sync tools required.
- You can send unlimited emails using Salesforce contacts, leads, or custom objects, eliminating the daily or batch limits that normally apply to standard Salesforce email tools.
- MassMailer includes detailed email analytics, such as opens, clicks, bounces, and unsubscribes, ensuring full visibility into campaign performance and compliance.
- It supports drip campaigns, dynamic templates, and recipient segmentation, helping you build multi-step workflows that reach the right audience at the right time.
- The solution includes deliverability and validation tools that help reduce bounce rates and maintain a healthy sender reputation for long-term scalability.
Example: If your team needs to send 50,000 customer announcements or follow-up sequences tied to Salesforce triggers, MassMailer automates the process while ensuring that all activity logs remain accessible in CRM reports.
Comparing MassMailer and Yesware for Salesforce Automation
Both Yesware and MassMailer strengthen your Salesforce ecosystem, but in different ways. Here’s a quick side-by-side view to help you decide which tool fits your workflow best.
| Feature / Use Case | Yesware | MassMailer |
|---|---|---|
| Primary Users | Ideal for sales reps and account executives focused on one-to-one engagement and follow-ups. | Best for marketing, operations, and SDR teams handling high-volume outreach. |
| Core Focus | Provides personalized email tracking, meeting scheduling, and real-time engagement analytics from Gmail or Outlook. | Specializes in bulk emailing, campaign management, and workflow automation directly within Salesforce. |
| Analytics Depth | Tracks individual-level insights, email opens, replies, link clicks, and meeting activity. | Offers aggregate campaign analytics, open rates, click rates, bounces, and unsubscribes across large sends. |
| Automation Scope | Automates one-to-one workflows, such as creating follow-up tasks or updating lead status based on recipient engagement. | Automates campaign-level workflows, such as sending drip sequences or updating thousands of records simultaneously. |
| Best For | Teams that prioritize personalized engagement and detailed prospect-level tracking. | Teams that need scalable outreach, mass sends, and centralized campaign management in Salesforce. |
| Integration Style | Works through Gmail or Outlook with two-way sync to Salesforce for activity logging. | Built natively on Salesforce, eliminating the need for external connectors or third-party tools. |
| Complementary Use | Handles the micro-level engagement side of communication and CRM tracking. | Scales up communication for macro-level automation across multiple campaigns or audiences. |
Pro Tip: If your organization is already using Salesforce as its single source of truth, combining Yesware and MassMailer gives you unified reporting, consistent branding, and effortless automation at every level of outreach.
Troubleshooting & Best Practices
Even with the right setup, you might occasionally run into sync delays or logging issues between Yesware and Salesforce. Don’t worry, most problems have quick fixes.
Let’s walk through the most common ones and how to solve them.
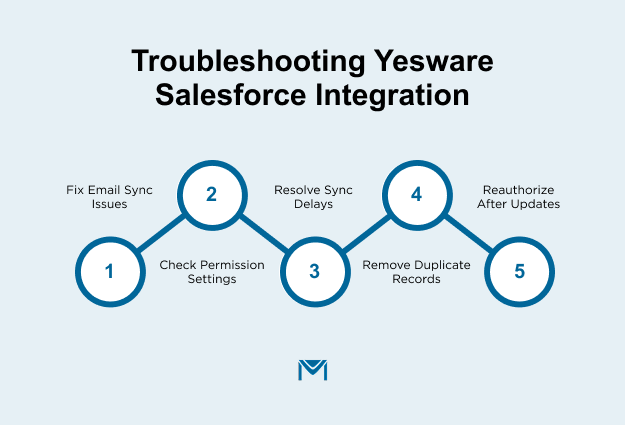
Common Setup Issues and How to Fix Them
Most integration hiccups come down to authentication, permissions, or sync configuration. Here’s how to troubleshoot each one step-by-step:
Issue 1: Emails or activities aren’t syncing to Salesforce.
Make sure your Salesforce and Yesware accounts use the same email address. Then, double-check that the “Send to Salesforce” toggle is turned on inside Yesware settings.
If everything looks right, go to Yesware → Settings → Integrations → Salesforce and click Reauthenticate to refresh your connection.
Issue 2: You’re getting authentication or permission errors.
Verify that your Salesforce profile has “API Enabled” and Connected App access for Yesware.
If you’re not an admin, ask one to review your profile permissions. After changes are made, log out and sign back in to refresh credentials.
Issue 3: Sync delays or missing recent data.
Background sync can temporarily pause if you’ve been inactive or lost session access. Open your Yesware Sidebar and make sure Automatic Logging is enabled.
You can also force a manual sync by sending a tracked test email. This usually resets the pipeline.
Issue 4: Duplicate or mismatched records appearing in Salesforce.
Check your Salesforce lead and contact records for overlapping email addresses. If multiple entries exist, use Yesware’s Sync Selector (Gmail Enterprise only) to choose the correct record before sending emails.
It’s also smart to regularly clean duplicate data using Salesforce’s Merge tool.
If syncing suddenly stops across all users, check whether your Salesforce admin recently changed Connected App policies or OAuth scopes. Reauthorization may be required after Salesforce security updates.
Ensuring Data Sync and Email Logging Work Smoothly
Once your integration is up and running, a few ongoing habits can help keep your data clean and reliable:
- Conduct a quick weekly sync audit to make sure all tracked activities, emails, meetings, and calls appear correctly in Salesforce.
- Keep your Salesforce and Yesware versions updated to avoid conflicts caused by older app releases or browser extensions.
- Standardize naming conventions for leads, opportunities, and campaigns, so logged data matches the right records consistently.
- Encourage your team to use the Yesware Sidebar for all outreach. This keeps activity logging consistent and ensures every message is tied to the right contact.
- Review your Yesware activity reports regularly to catch anomalies, such as untracked replies or missing events. Spotting these early prevents reporting gaps later.
If you notice incomplete or inconsistent tracking, clear your browser cache and reload Yesware. Browser extensions can occasionally store outdated sync tokens that cause temporary issues.
Conclusion
By integrating Yesware with Salesforce, you’ve eliminated manual tracking and gained full visibility into every email, meeting, and deal. Real-time sync keeps your CRM accurate, while automation ensures no lead or follow-up slips through the cracks.
If you’re running large-scale campaigns, explore MassMailer, a native Salesforce solution for bulk emailing, workflow automation, and campaign reporting. Together, Yesware and MassMailer create a complete sales communication ecosystem.
Ready to optimize your Salesforce outreach? Try MassMailer today to send smarter, scale faster, and make every message count.
Frequently Asked Questions
Which Salesforce editions and permissions are required for Yesware?
How do I use templates and merge fields with Salesforce data?
How do I create automation rules or follow-up tasks from Yesware events?
How secure is the Yesware Salesforce integration, and what data is synced?
How does Yesware compare to Salesforce-native bulk email tools like MassMailer?
Start Your Free Trial Today
Experience MassMailer the easiest way to send personalized emails from Salesforce.
Related Blogs
Salesforce Native Email App: A CRM-First Email Strategy
How to Integrate SendGrid with Salesforce for Better Email Automation
MassMailer Resources


MassMailer Glossary
About the Author

Siva Devaki 
Siva Devaki is the founder of MassMailer Inc., a tool that helps Salesforce users optimize email marketing. A passionate advocate for email marketing, Siva writes and hosts podcasts on the topic, sharing insights to help businesses drive revenue and enhance customer engagement through Salesforce email automation and tracking.