


Table of Contents
Introduction
Email marketing has always been the dark horse of outreach in business circles. While nobody wants to admit it, it is actually quite an effective tool to get your target audience’s attention.
With that said, have you ever faced a situation where you went from a 15% email open rate to a 5% rate overnight? If the answer is yes, your IP address may have been blacklisted by the receiving servers.
This happens sometimes. In fact, according to Statista, about 47.3% of the total marketing emails in 2020 were reported as spam. Spam mail is one of the red flags that can get your IPs blacklisted on the receiving servers.
If you are facing a blacklisting issue, read this blog. You will learn how to remove your IP from the Microsoft blacklist. However, do keep in mind that these methods do not trump practicingemail marketing hygiene.
Common causes Salesforce email gets blacklisted by Microsoft
Before diving into the solution, here is a quick recap of the multiple reasons why Microsoft might be blacklisting your IP address.
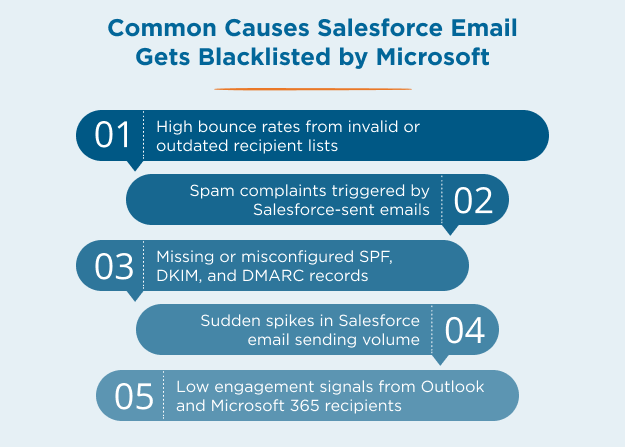
1. High bounce rates from invalid or outdated recipient lists
High bounce rates are one of the strongest negative signals Microsoft uses to classify a sender as untrustworthy. When Salesforce emails repeatedly hit inactive or decommissioned Outlook addresses, Microsoft's spam filters interpret this as evidence of poor data hygiene or unsolicited sending.
This often happens when CRM records aren’t regularly updated, or email automation tools are sent to outdated lists without verification.
In Salesforce, hard bounces return specific codes like 5.1.1 or 5.4.1, indicating unknown users or policy blocks. If a pattern of bounces emerges across Microsoft domains (such as @outlook.com or @microsoft365.com), it can lead to IP reputation damage and eventual blocklisting.
Enterprise teams relying on marketing automation or triggered notifications should prioritize periodic list cleaning and suppression logic for inactive or unverified contacts to avoid this issue.
2. Spam complaints triggered by Salesforce-sent emails
Microsoft’s filtering systems heavily weigh user-reported spam complaints. When recipients click “Report as spam” in Outlook or Microsoft 365, that feedback directly influences the sender's reputation, even if the emails are technically legitimate.
In Salesforce-driven campaigns, this can happen when content feels irrelevant, frequency is too high, or opt-in consent is unclear.
Unlike bounce rates, which indicate delivery failure, spam complaints suggest that delivery succeeded but engagement failed. Microsoft treats consistent complaints from even a small percentage of recipients as a major red flag.
This is particularly damaging when Salesforce sends emails through shared IP addresses, as one sender’s behavior can affect the entire IP pool. To mitigate this, teams should monitor unsubscribe and complaint rates closely and avoid reusing templates that previously triggered negative engagement.
3. Missing or misconfigured SPF, DKIM, and DMARC records
Authentication failures are one of the most common technical reasons Salesforce emails get blocked or filtered by Microsoft. If your SPF, DKIM, or DMARC records are not properly set up or are misaligned with your Salesforce sending domain, Microsoft cannot verify that the email originated from a trusted source.
This is especially relevant for Salesforce instances sending from a custom domain like @yourcompany.com while routing through Salesforce's infrastructure.
If your domain's DNS records don’t authorize Salesforce to send on your behalf, the message will fail SPF or DKIM checks, and Microsoft will either reject it outright or route it to spam.
These issues are often overlooked during initial Salesforce configuration or domain migration projects. Administrators should verify that all authentication protocols are correctly configured using tools like DMARC Analyzer, MXToolbox, or Google Postmaster Tools.
Aligning these records is foundational to improving sender reputation and avoiding blacklist triggers.
4. Sudden spikes in Salesforce email sending volume
Microsoft flags abnormal sending patterns, especially sudden surges in volume, as suspicious. Salesforce campaigns, triggered alerts, or changes in automation logic can inadvertently flood inboxes, especially if testing environments are pushed to production without throttling.
For example, launching a large-scale outreach sequence without warming up the IP or gradually increasing send volume can mimic spam-like behavior.
Microsoft’s systems are tuned to detect unusual bursts in traffic, particularly from new or low-reputation senders. This is why Salesforce recommends IP warm-up schedules and staggered email batch logic when scaling outbound communication.
If these spikes correlate with user complaints or poor engagement, the risk of blacklisting multiplies.
To prevent this, teams should plan for controlled volume ramps and monitor delivery performance in near real time, especially after workflow changes or major campaign launches.
5. Low engagement signals from Outlook and Microsoft 365 recipients
Microsoft evaluates how recipients interact with your emails beyond just complaints or bounces. Signals like open rates, reply frequency, and time spent on the message help Microsoft judge whether your emails are wanted.
If a large portion of your Salesforce-sent emails go unopened or are deleted immediately, that sends a clear negative signal.
This behavioral feedback loop means that even technically “successful” deliveries can hurt the sender's reputation if engagement is weak.
For Salesforce users, this often results from overusing generic templates, failing to personalize subject lines, or not segmenting audiences properly. Over time, Microsoft’s filters adapt, and low-performing emails are deprioritized or blocked altogether.
The solution is not only technical but strategic: test subject lines for Microsoft users, tailor content for Outlook inboxes, and avoid mass sends that aren’t grounded in user intent. Even transactional emails should be optimized for clarity, relevance, and actionability to sustain reputation.
Knowing these reasons makes it easier to understand why your email marketing isn't performing the way it should. This is your first step in checking for the probable causes for blacklisting and IP blacklist removal.
Step-by-Step Guide: Check Salesforce Email IP or Domain Blacklist Status
If your Salesforce emails are consistently landing in Microsoft spam folders or failing to reach inboxes at all, your domain or IP address may be blacklisted.
Microsoft Outlook and Office 365 use internal sender reputation systems that silently filter or reject traffic based on multiple factors, including bounce rates, spam complaints, authentication issues, and engagement history.
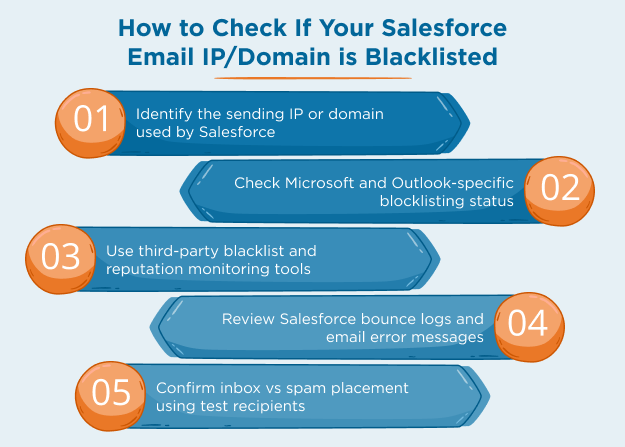
Step 1: Check if your Salesforce IP or domain is blacklisted
Before attempting removal, you need to confirm whether Microsoft is actively filtering your messages and whether the issue is tied to your IP address or sending domain.
Start with email header analysis:
- Open a copy of an affected email and inspect the Return-Path, From, and Received headers.
- Determine if Salesforce is sending on a shared IP (used by multiple customers) or a dedicated IP (assigned to your org).
- Confirm that your sending domain is authenticated with SPF, DKIM, and DMARC.
Check for Microsoft-specific bounce codes:
Look in your Salesforce bounce logs, or MassMailer reports for errors like:
- 550 5.7.1: Message rejected due to spam characteristics
- 451 4.7.500: Temporary rejection tied to poor sender reputation
- 550 5.7.606: SmartScreen block triggered by trust issues
Step 2: Contact Microsoft for clarification or manual delisting
If your diagnostic tests point to Microsoft-specific blocking, the next step is to contact them directly. This is especially helpful if:
- Your emails bounce with 5.x error codes related to filtering
- You’ve already resolved list hygiene or authentication issues
- You want clarification before initiating delisting
Option A: Email Microsoft directly
Send an email to: delist@messaging.microsoft.com
Include:
- Your Salesforce sending IP and/or domain
- Sample error messages or bounce codes
- A summary of the steps you’ve taken to correct the issue
Microsoft typically responds within 24 to 48 hours. Make sure your request is technical and factual. Vague complaints or blame-shifting tend to be ignored or rejected.
Option B: Use Microsoft SNDS (Smart Network Data Services)
If you're using a dedicated IP, register it athttps://postmaster.live.com/snds. SNDS helps you monitor:
- Complaint rates
- Email traffic volumes
- Reputation-related issues flagged by Microsoft
This insight is especially useful for enterprise senders managing their own IPs or for post-removal reputation tracking.
Step 3: Use Microsoft’s self-service delisting portal
If your IP is confirmed to be blacklisted, and you’ve addressed the root cause (e.g., spam complaints, bounce spikes, unauthenticated sending), use Microsoft’s automated delisting system:
Steps to use the Microsoft Delisting Portal:
- Go tohttps://sender.office.com
- Enter the IP address shown in the bounce logs
- Complete the CAPTCHA and form fields
- Microsoft will send a confirmation link to the email you provide
- Open the confirmation email and click “Confirm your email address.”
- You’ll be returned to the portal where you can click “Delist IP Address.”
Once submitted, Microsoft usually processes the request within 24 hours, provided no ongoing spam or abuse activity is detected.
Important reminder:
If your IP was compromised (e.g., by a hacked Salesforce integration or misconfigured workflow), Microsoft may relist it quickly after delisting. Always audit your sending practices before reapplying.
Step 4: Monitor IP reputation
Delisting is only the beginning. To prevent repeat issues, build and maintain a strong sender reputation across Microsoft and other ISPs:
1. Authenticate every email sent via Salesforce:
- Ensure your domain DNS records correctly include Salesforce IPs in SPF
- Enable DKIM signing and enforce DMARC with a monitoring policy
2. Avoid high-risk behaviors that trigger Microsoft filters:
- Don’t use cold-purchased lists or outdated CRM data
- Suppress inactive Outlook and Hotmail recipients after multiple bounces
- Monitor campaign frequency and avoid sending spikes without warming
3. Warm up new IPs gradually:
If switching to a dedicated IP, send small batches at first, then ramp up volume based on engagement rates. Microsoft watches for sudden, high-volume surges from unknown senders.
4. Track complaint, bounce, and open rates over time:
Use tools like SNDS, Google Postmaster Tools, and your ESP’s analytics dashboard. A dip in engagement from Microsoft domains can be an early warning sign of filtering or spam placement.
5. Use MassMailer to monitor IP & domain reputation from Salesforce:
For Salesforce users, maintaining sender reputation across platforms like Microsoft 365 requires more than authentication and clean lists. It requires real-time visibility into your IP and domain health.
MassMailer Email Monitor is a Salesforce-native tool designed to help you do just that. It lets you:
- Track your IP and domain reputation across major blacklist databases
- Get alerts for issues tied to DKIM, SPF, or DMARC misalignment
- Detect if any links in your email point to blacklisted domains
- Preview content for spam triggers or formatting issues before sending
Since it works inside Salesforce, you don’t need to switch platforms to manage your sender health. It’s a practical way to detect early warning signs before Microsoft filters take action and to ensure your remediation efforts (like delisting) stick.
How to remove Salesforce IP/Domain from Microsoft blacklist?
If you did everything right and followed email marketing best practices, your IP can be easily delisted by following this guide. Basically, there are two ways you can remove an IP from Microsoft's blacklist:
- By contacting Microsoft through email
- By using the Microsoft delisting service
1. By Emailing Microsoft
If your business was blacklisted for sending emails to Hotmail and/or other Live domains, you can use this simple method for IP blacklist removal. Send an email to delist@messaging.microsoft.com
You can place your request to have your IPs delisted from the Microsoft server blacklists. You will receive a response within 48 hours of sending the email. However, if it does take longer, you can resend the email.
Do note that this method only applies if you have been mailing to Hotmail/Live domains. For all other domains, you need to adopt the second method.
2. By Filling Out the Delisting Service
Microsoft’s delisting service is available for email marketers who have been wrongfully blacklisted for some reason.
It is best to ensure that your mail servers haven’t been compromised by cyberattacks before you fill out the delisting form. Compromised servers do get delisted, but end up back on the blacklist sometime later because of suspicious activity detection by Microsoft.
Once you have ascertained that your mail servers are secure, follow the steps below to remove your IP from
- Step 1: Fill out the captcha code and submit the form. Microsoft will send you a confirmation email to the address that you filled out earlier.
- Step 2: You now need to open this email address and find the email from Microsoft. If you don’t find it in your inbox, try looking in the junk or spam folders as well.
- Step 3: Open this email, and click on the “Confirm your email address” link in the email. You will be navigated to the delisting portal again when you click on the link.
- Step 4: This window will contain the IP address of your mail server that was blocked. To remove this IP from the blacklist, just select the IP and click on the “Delist IP Address” button.
It takes about 24 hours for Microsoft to work on your request and remove the IP from its blacklists.
Ways to Prevent Future Blacklisting
Delisting your Salesforce IP or domain from Microsoft’s blacklist is only a short-term fix.
Without changes to your sending practices and infrastructure, your emails risk being flagged again, especially by Microsoft 365 and Outlook, which rely on dynamic sender reputation models.
Below are proven practices to keep your emails out of the spam folder and your domain off future blocklists.
1. Maintain strong email authentication
Most Salesforce email blocks occur because Microsoft sees unauthenticated or suspicious sender signals. To avoid this, confirm that your domain is correctly aligned with all three core protocols:
- SPF: Add Salesforce’s sending IPs to your domain’s SPF record. Failing SPF is a red flag for spoofing.
- DKIM: Enable DKIM signing in your Salesforce org to cryptographically prove message integrity.
- DMARC: Enforce a DMARC policy with either p=none (monitoring) or p=quarantine/reject for protection. Ensure SPF or DKIM aligns with the visible “From” domain.
- DNS hygiene: Routinely check for expired DNS records or typos in host entries, which often go unnoticed during platform changes.
Microsoft’s filtering engine (including SmartScreen and Exchange Online Protection) deprioritizes or blocks messages that don’t meet basic authentication thresholds even before analyzing content.
2. Clean your Salesforce contact data regularly
Many blacklisting incidents start with outdated or unpermissioned lists. Microsoft’s systems penalize senders who:
- Use cold contact lists purchased from third parties
- Continue sending to users after repeated hard bounces
- Ignore spam complaint patterns from Outlook or Hotmail recipients
To avoid these traps:
- Set up bounce handling rules in Salesforce to suppress undeliverable addresses
- Use engagement-based filters to remove inactive Microsoft recipients
- Use email verification tools to check domain validity before sending campaigns
- Monitor Microsoft-specific bounce codes (like 550 5.7.1) that indicate a filtering or reputation issue
Repeated sends to bad data don’t just affect a single contact. It damages your IP and domain reputation across the board.
3. Gradually warm up new IPs or domains
If you’ve recently switched to a dedicated IP in Salesforce or have been delisted from a Microsoft blacklist, ramping up volume too quickly will get you flagged again. Microsoft flags unfamiliar senders who:
- Suddenly send to a large volume of recipients
- Display low open rates and high delete-without-read signals
- Lack consistent sending history or domain age
Instead, follow a structured warm-up plan:
- Start with 50–100 daily sends to your most engaged Outlook/Office 365 users
- Slowly double volume every 2–3 days, watching delivery and engagement metrics
- Avoid promotional sends until inbox placement stabilizes
Warm-up isn’t just for new IPs. Any sender recovering from blacklist removal must rebuild trust from scratch, especially with Microsoft, which relies heavily on user behavior signals.
4. Monitor sender reputation across platforms
Microsoft doesn’t provide a single dashboard for sender reputation, but these tools can help you track critical metrics:
- Microsoft SNDS (Smart Network Data Services): Offers IP reputation feedback, complaint rates, and spam trap hits from Outlook.com
- Salesforce email logs: Check for delivery failures with codes like “550 5.7.1” or “554 5.2.0” indicating policy blocks
- Postmark or third-party ESPs: Supplement native Salesforce reporting with deliverability dashboards
Track these metrics weekly to spot trends. A slow drop in open rates or a sudden bounce spike from Microsoft domains often signals you're on a soft block, which is a precursor to full blacklisting.
5. Use MassMailer to monitor email reputation inside Salesforce
Microsoft tracks your sending behavior, infrastructure compliance, and engagement signals over time. That’s why avoiding future blacklisting means more than fixing one mistake.
It requires proactive email reputation management, and MassMailer is purpose-built for that right inside Salesforce.
MassMailer Email Monitor helps Salesforce teams prevent blacklisting and spam folder issues before they happen. Here’s how it works:
1. Check deliverability before sending
MassMailer analyzes every outgoing email for red flags that Microsoft’s filters are trained to catch, including spammy content, broken formatting, or poor sender alignment.
- Highlight risky phrases that may trigger spam filters
- Preview email structure and design issues before launch
- Validate links and attachments to ensure none point to flagged domains
2. Catch authentication and DNS issues early
MassMailer scans your SPF, DKIM, and DMARC setup to make sure your domain and IP are fully compliant. If anything’s misconfigured, like a missing DKIM record or outdated SPF, you’ll know before your emails are rejected.
- Verify that all sending domains are authenticated properly
- Monitor DNS health and domain alignment for each campaign
- Avoid “550 5.7.1” errors and reputation damage from failed validation
3. Monitor domain and IP reputation in real time
MassMailer tracks the health of your Salesforce sending environment, including Microsoft-specific signals, and alerts you to early signs of trouble.
- Get notified if your IP or domain is trending toward blocklists
- Monitor inbox placement trends for Microsoft 365 and Outlook
- Proactively manage sender reputation, instead of reacting to damage
4. Reduce bounces, spam complaints, and unsubscribes
With built-in tools for email verification, automated bounce handling, and unsubscribe management, MassMailer helps clean your lists and preserve deliverability.
- Eliminate invalid or risky addresses before sending
- Automatically suppress hard bounces and complaint-generating contacts
- Maintain sender trust by respecting consent and opt-out rules
Most Microsoft blacklisting incidents come from a slow buildup of issues, not one bad send. With MassMailer, you don’t just fix problems after they happen. You actively prevent blocks, maintain domain trust, and reach inboxes more consistently.
Conclusion
Blacklisting can happen to anyone, and it can happen even when you are using bulk email marketing tools that help you reach a wide audience at the same time.
You can make sure that your IPs don't get blacklisted by using MassMailer for bulk emailing. Our servers are reputable and well-configured and do not have any security or compromise issues. This will help you stay clear of Microsoft's blacklists. To know more about MassMailer, get on a free trial today.
If, however, Microsoft has blacklisted your mail servers for whatever reason, you can simply contact them via email or fill out the delisting portal forms to remove your IP from Microsoft's blacklist.
Frequently Asked Questions
1. Can Microsoft block Salesforce shared IPs even if my domain is clean?
2. How long does it take to get delisted from Microsoft’s blacklist?
3. Does setting up SPF and DKIM prevent Microsoft blacklisting?
4. What Microsoft error codes indicate blacklist-related issues?
5. Should I use a dedicated IP for Salesforce to avoid blacklisting?
6. What’s the difference between IP blacklisting and domain blacklisting?
Start Your Free Trial Today
Experience MassMailer the easiest way to send personalized emails from Salesforce.
Related Blogs
MassMailer Resources


MassMailer Glossary
About the Author

Siva Devaki 
Siva Devaki is the founder of MassMailer Inc., a tool that helps Salesforce users optimize email marketing. A passionate advocate for email marketing, Siva writes and hosts podcasts on the topic, sharing insights to help businesses drive revenue and enhance customer engagement through Salesforce email automation and tracking.