


Table of Contents
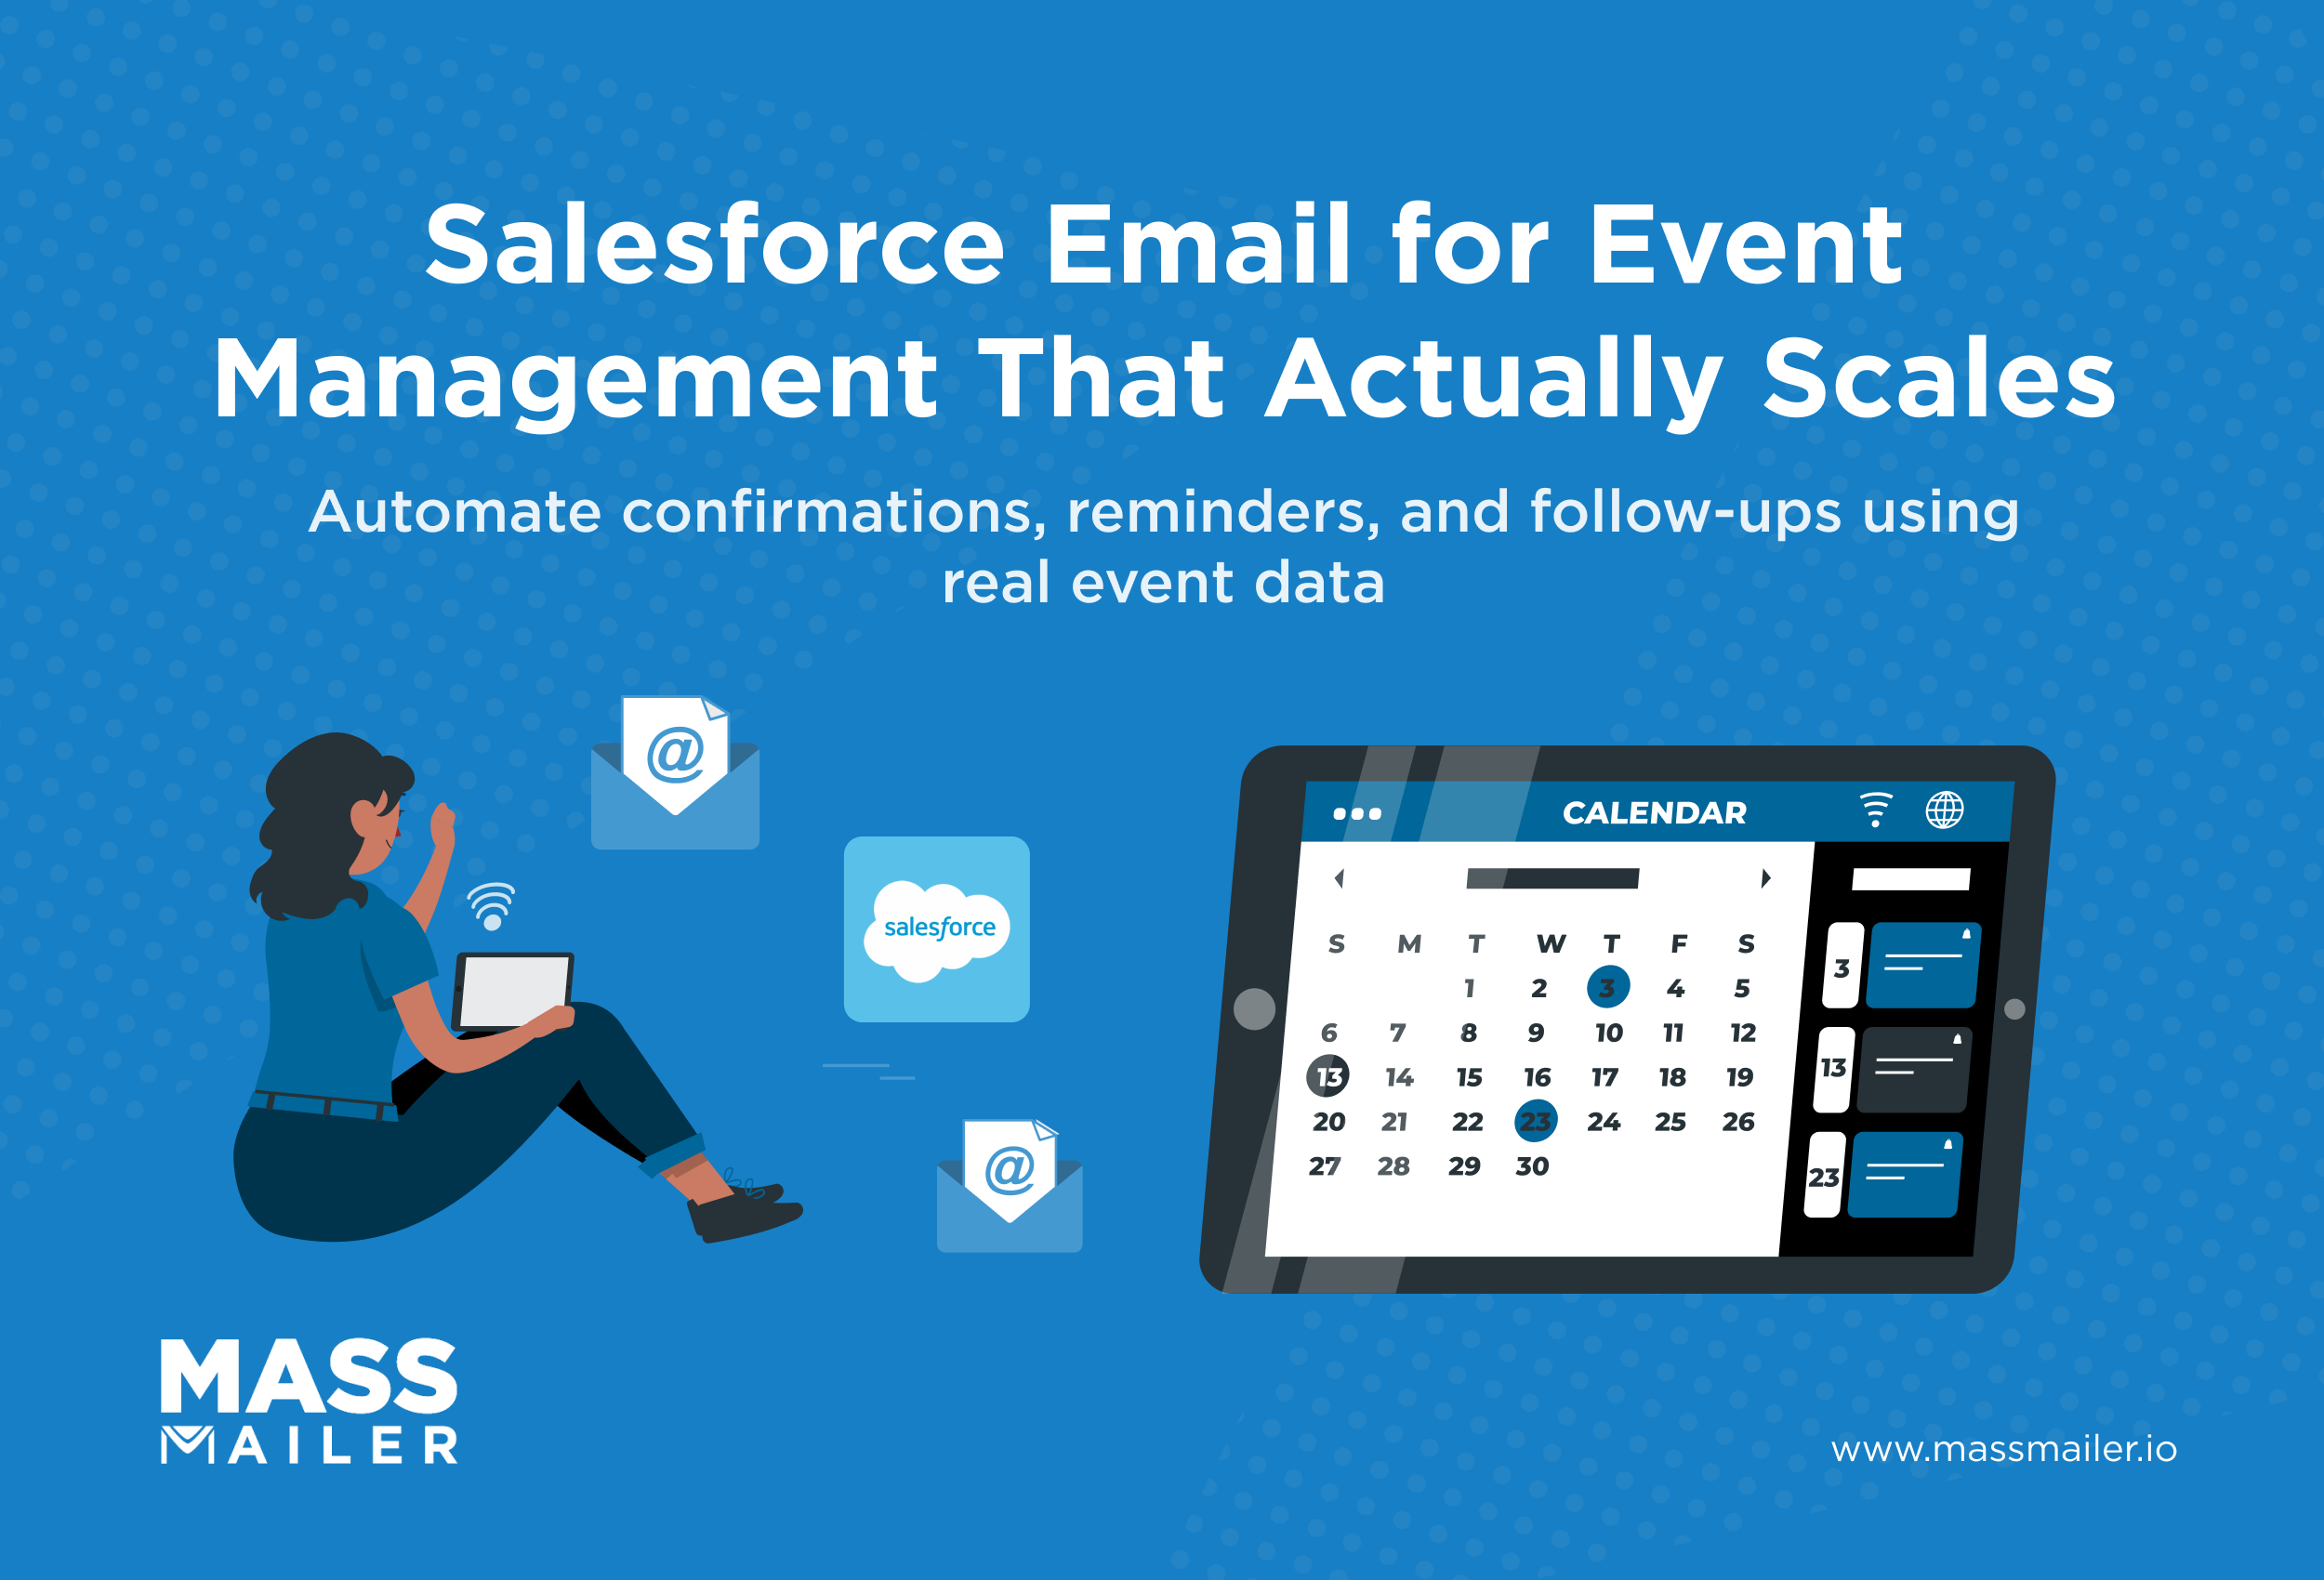
Introduction
A sales rep spends nearly an hour each day rewriting the same kind of emails: follow-ups, reminders, and onboarding notes. By the end of the week, that’s a full workday lost to repetitive typing. I’ve seen this happen often: messages vary in tone, important details get missed, and the brand voice feels inconsistent across the team.
This is exactly the problem Salesforce email templates are built to solve. With the right setup, you can create reusable, branded, and personalized templates that save time and keep every message aligned with your company’s identity.
Whether it’s a renewal reminder, a support response, or a welcome email for a new lead, templates ensure speed and accuracy without sacrificing personalization.
In this guide, I’ll walk you through how to create an email template in Salesforce, both in Lightning and Classic. You’ll also learn how to build template folders for better organization, use admin controls to manage permissions, and even scale your communication with MassMailer for bulk sending and analytics.
By the end, you’ll know how to turn Salesforce into a reliable email automation hub, saving hours of manual effort while making sure your team communicates with consistency and impact.
How to Create an Email Template in Salesforce
Creating an email template in Salesforce is straightforward once you know where to look. The process starts by choosing whether you’re working in Salesforce Lightning or Salesforce Classic, then selecting the right template type and customizing it with merge fields for personalization. Finally, templates are saved in folders, making them easy to reuse, test, and share across your team.
To create an email template in Salesforce, go to Setup > Email Templates > New Template, select a type (Lightning, Text, HTML, Custom, or Visualforce), add a subject and body, insert merge fields for personalization, save, and test the template.
Here’s a high-level step-by-step outline for both interfaces:
- Open Setup and search for Email Templates.
- Click New Template.
- Enter required details like template name, subject, related object, and folder.
- Design the content using Lightning Builder or Classic editor.
- Insert merge fields for dynamic personalization.
- Save, preview, and send a test email before using the template.
You can build your email templates directly in Salesforce with no extra coding knowledge needed. MassMailer Email Template Builder gives you the features and customization your organization needs, which can be used to create email templates quickly and effectively.
In the following sections, we’ll break down each step in detail, explore the different template types, and explain how to automate their use inside Salesforce workflows.
Why Use Salesforce Email Templates?
Writing every email from scratch slows down workflows and risks inconsistency. Salesforce email templates solve both problems by letting you reuse content that is pre-approved, branded, and ready to personalize.
Instead of worrying about missed details or formatting errors, your team can focus on actual conversations.
The main benefits include:
- Time savings: According to McKinsey, employees spend about 28% of their workweek managing email, much of it repetitive and low-value communication. Templates help reduce this burden by eliminating redundant typing.
- Brand consistency: Every email follows the same tone, formatting, and design, ensuring your company appears professional and reliable. This is especially critical in industries like SaaS, consulting, or financial services.
- Automation at scale: Templates can integrate with Flows, Process Builder, and Email Alerts to trigger automated customer communication, such as a welcome email sent immediately after a lead enters Salesforce.
- Personalization at scale: Merge fields allow dynamic insertion of details like a contact’s first name or company, so each message feels personal without extra typing.
Common use cases include:
- Sales follow-ups
- Onboarding campaigns
- Customer support replies
- Renewal and billing notifications
For example, a SaaS company can automate renewal reminders using templates, ensuring no contract opportunity is missed while keeping every message consistent and timely.
Types of Email Templates in Salesforce
Salesforce offers several types of email templates to fit different use cases, ranging from quick text messages to fully branded, automated communications. Choosing the right template depends on your team’s goals, technical expertise, and whether you’re using Lightning or Classic.
- Lightning Email Templates are the most popular today because of their drag-and-drop builder and responsive design. They’re user-friendly, require no coding, and are ideal for sales and marketing teams that want to quickly create polished, branded messages.
- Text Templates are the simplest option: best for short, transactional communication like support updates or system alerts. They don’t support images or formatting, but deliver speed and clarity.
- HTML with Letterhead (Classic) allows companies to maintain consistent branding by applying predesigned letterheads across multiple templates. It’s great for branded communications but limited in flexibility compared to Lightning.
- Custom HTML Templates give you full control over design and formatting, allowing you to add custom styling, layouts, or embedded images. However, they require some knowledge of HTML.
- Visualforce Templates are the most advanced option, enabling developers to build dynamic, data-driven email templates that pull in information across multiple objects. They’re powerful but best suited for specialized workflows.
By knowing which type to use, you can balance speed, personalization, and branding to match the communication needs of your team.
Prerequisites & Permissions
Before you start building email templates in Salesforce, a few setup steps and permissions need to be in place. Without these, you may not even see the template options inside Lightning or Classic. Getting this right upfront ensures smooth collaboration across teams and avoids common errors later.
First, enable Lightning Email Templates in Setup. Salesforce continues to prioritize Lightning over Classic, and this toggle unlocks the drag-and-drop builder.
Alongside this, make sure Enhanced Folder Sharing is turned on so templates can be organized, shared, or restricted based on team needs.
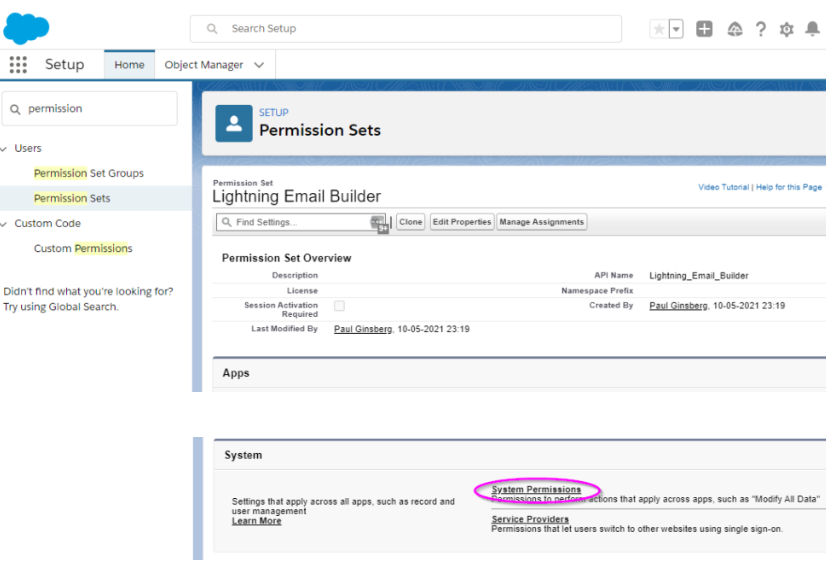
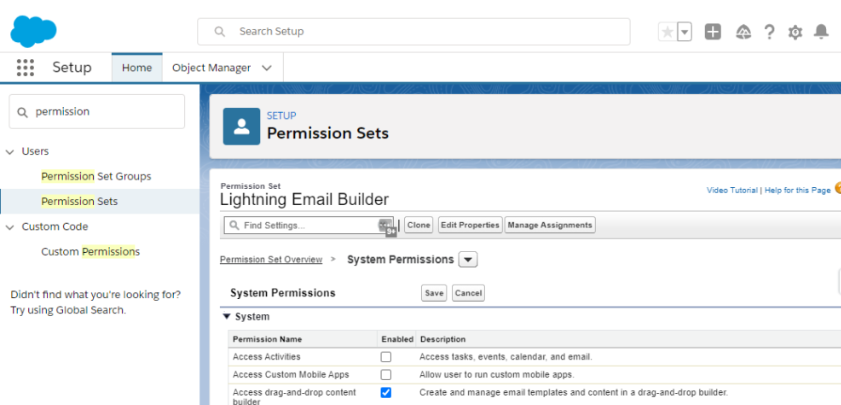
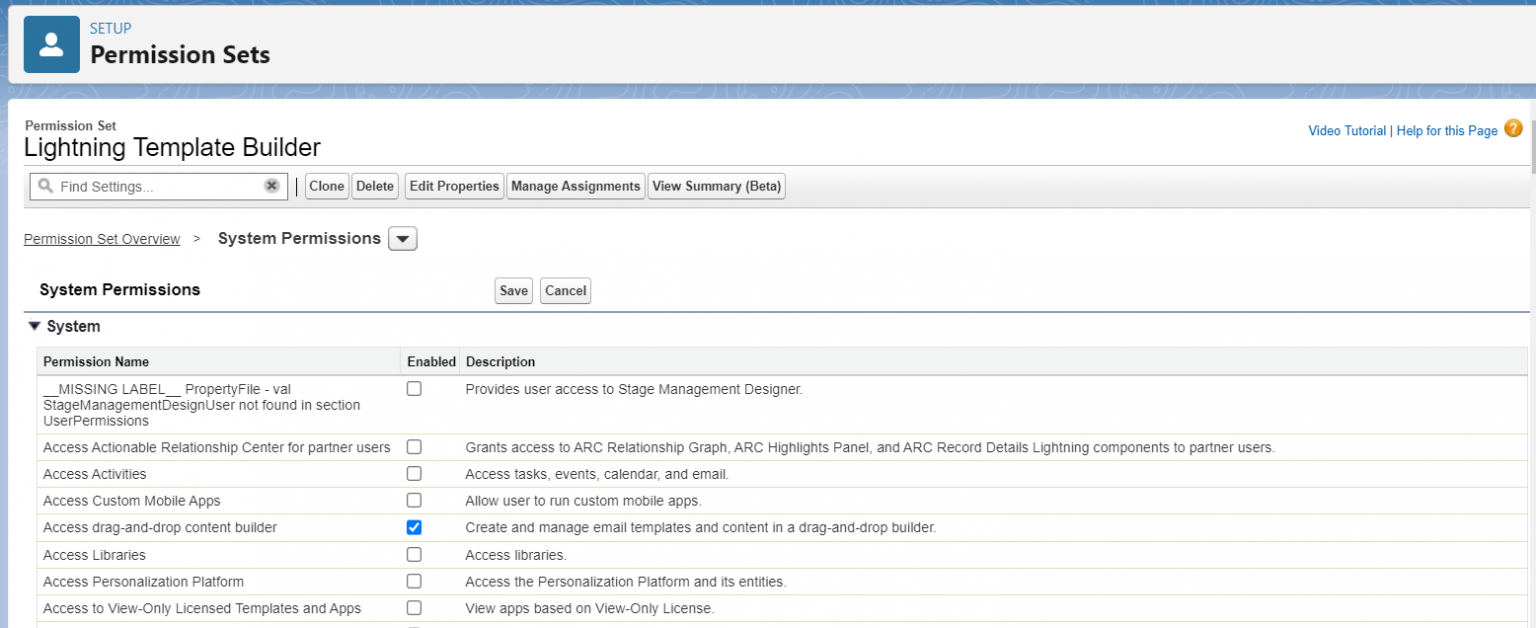
Next, assign the permission set called “Access drag-and-drop content builder.” This gives users the ability to design templates using Lightning’s components. Keep in mind that permission changes may take up to 15 minutes to reflect.
It’s also important to confirm folder visibility and sharing rules. For example, marketing may need templates for campaigns, while support might require separate templates for service updates. With proper folder access, each team works within its own space while admins maintain governance.
Finally, know Salesforce’s limits:
- The number of templates you can create varies by edition.
- Attachment sizes are capped, and overly large files may not send.
- Merge fields are restricted by object type, and cross-object usage has limitations.
Getting these prerequisites in place ensures that when you build, test, and scale templates, they are accessible, secure, and compliant with Salesforce rules.
How to Create an Email Template in Salesforce Lightning
Salesforce Lightning makes template creation simple with its drag-and-drop builder and modern UI. The process is straightforward, but it requires the right permissions and setup to work seamlessly.
Here’s how you can create an email template in Salesforce Lightning:
1. Enable Lightning Email Templates & Folder Sharing
Go to Setup → Feature Settings → Email → Lightning Email Templates.
Enable the toggle and make sure Enhanced Folder Sharing is active. Without this, your team won’t be able to store and organize templates effectively. Assign the “Access drag-and-drop content builder” permission set to users who need it.
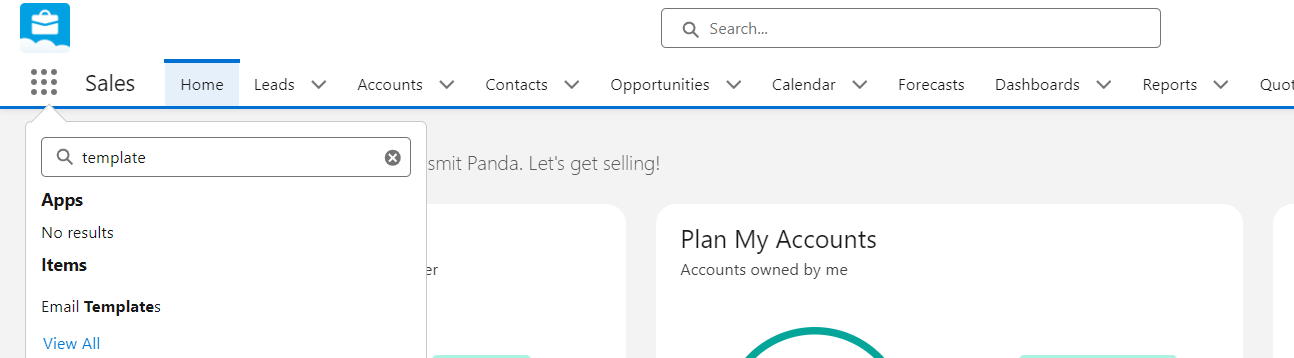
2. Navigate to Email Templates
From the App Launcher, search for “Email Templates.” This opens the template dashboard. If you don’t see the option, confirm that permissions and feature toggles are properly set.
3. Fill in Template Metadata
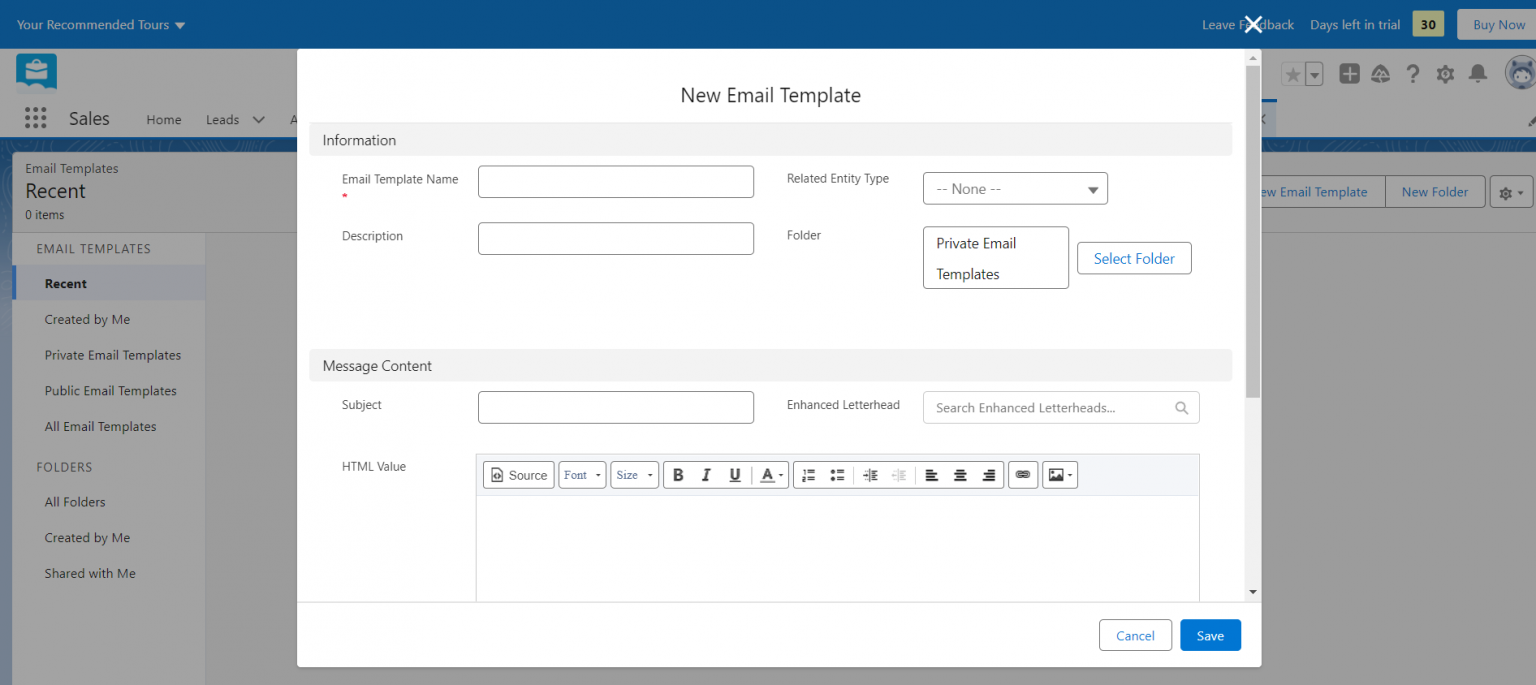
Click New Email Template and complete the required fields:
- Name: Internal reference for your team.
- Subject: The customer-facing email subject line.
- Related Entity: Object like Lead, Contact, or Opportunity for merge fields.
- Folder: Where the template is stored for access and sharing.
Linking the correct object is essential: otherwise, merge fields like [!Contact.FirstName] won’t populate correctly.
4. Use the Lightning Email Template Builder
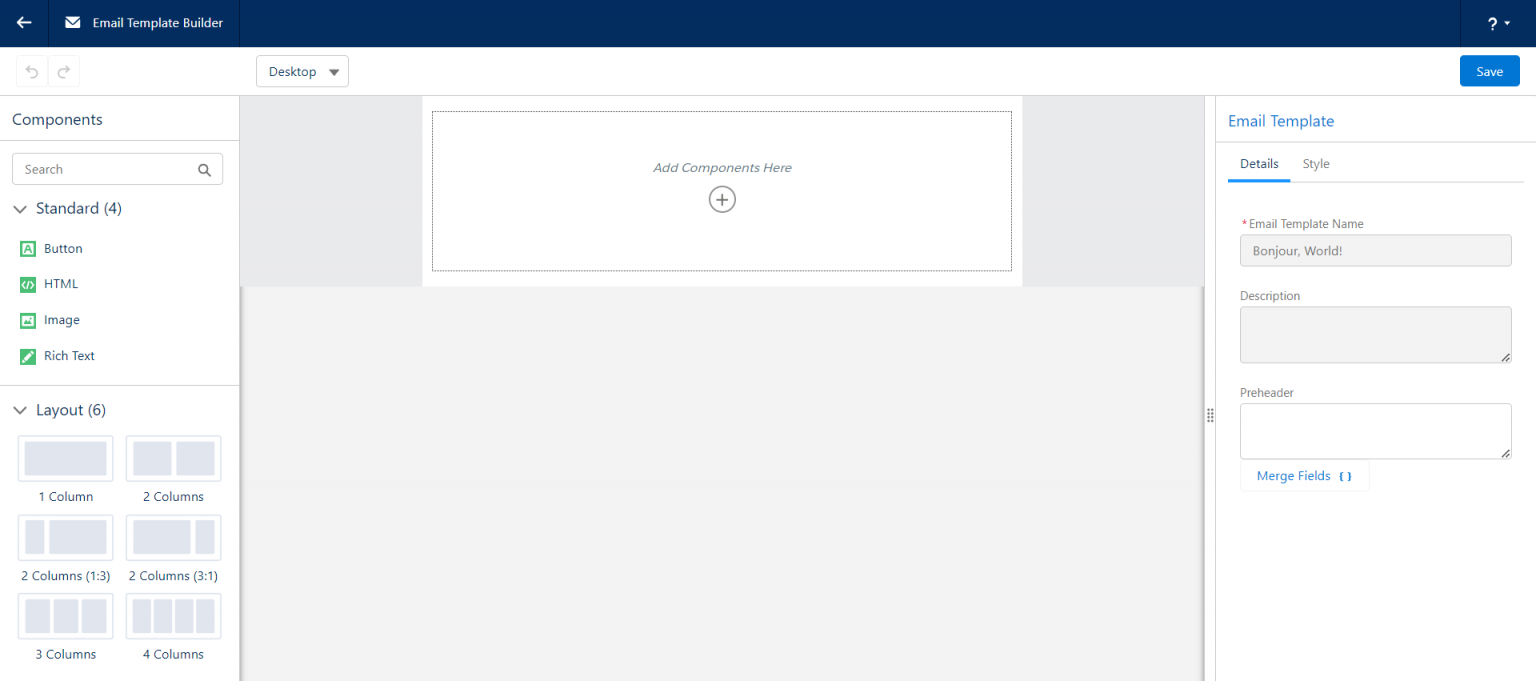
Open the drag-and-drop builder to design the template. You can add content blocks such as:
- Text blocks for main body content.
- Images for banners or logos.
- Buttons with links to CTAs.
- Dividers for spacing and layout.
You can also adjust fonts, colors, and layouts. Use the mobile preview option to confirm your design renders well across devices.
5. Insert Merge Fields & Personalization
Click inside a text block and insert merge fields like {!Contact.FirstName}. These personalize the email at scale.
Keep in mind:
- Cross-object merge fields are limited.
- Always use fallback text (e.g., “Hello Customer”) to prevent blank values.
6. Save, Preview & Test
Click Save and use Preview mode to review the template. Send a test email to yourself or your team to confirm formatting, personalization, and rendering across email clients such as Gmail, Outlook, and Apple Mail.
With these steps complete, your Lightning template is ready to use in campaigns, workflows, and automated processes.
How to Create an Email Template in Salesforce Classic
Even though Salesforce Lightning is now the standard, many organizations continue to use Salesforce Classic because of legacy workflows, integrations, or user familiarity. Classic still provides a reliable way to create reusable templates for sales, service, and marketing teams.
The process is slightly different from Lightning and involves more structured options for building templates.
1. Navigate to Classic Email Templates
From Setup, go to Communication Templates → Email Templates.
This section lists all existing templates. You’ll find the “New Template” button, which allows you to start creating one from scratch.
2. Choose a Template Type
Salesforce Classic gives you four distinct template options:
- Text Templates: The simplest format, used for quick and clear communication. Best for internal reminders or system-triggered notifications where design is not important.
- HTML with Letterhead: Designed for consistent branding. Your organization’s logo, colors, and header/footer are pulled from a predefined letterhead, ensuring every email looks professional.
- Custom HTML Templates: Perfect for marketers or admins with HTML skills. This option gives you complete control over layout, styles, and formatting. It’s often used for newsletters or promotional campaigns.
- Visualforce Templates: A developer-focused choice, best for highly dynamic templates. For example, a Visualforce template can pull in multiple related records and display them in a single email (ideal for complex account or order summaries).
This flexibility allows both non-technical users (via text or letterhead templates) and technical teams (via HTML or Visualforce) to build templates suited to their needs.
3. Build the Template
Once you’ve chosen a type:
- With Text or Letterhead templates, you can use the WYSIWYG editor to enter content directly and apply basic formatting.
- For Custom HTML, you’ll paste your HTML code into the editor. Images can be hosted in Salesforce Files/Documents and linked via their public URL.
- With Visualforce, you’ll need developer input to configure the markup and logic behind the template.
This stage is where you set the tone and branding of your communication. For example, customer success teams often rely on branded templates to send onboarding instructions, while sales teams may prefer short text templates for follow-ups.
4. Insert Merge Fields
Dynamic personalization is one of the biggest advantages of Salesforce templates. Using merge fields, you can automatically pull data from records. Examples include:
- [!Contact.FirstName] → Inserts the recipient’s first name.
- {!Lead.Company} → Inserts the company name.
- {!Case.Subject} → Inserts the case subject line.
Merge fields ensure every message feels tailored, without requiring manual edits. This is particularly powerful in campaigns and workflow automation, where templates may be sent to hundreds or thousands of recipients at once.
5. Save & Test
After building the template, click Save and then use the “Send Test and Verify Merge Fields” option. Testing is crucial to:
- Confirm that merge fields display correctly.
- Ensure images and HTML render properly across email clients (Gmail, Outlook, Apple Mail).
- Validate branding consistency before the template goes live.
For example, a support team may send test cases to ensure escalation notifications display the right case details, avoiding confusion during real incidents.
Why Use Classic Templates?
Although Classic lacks Lightning’s drag-and-drop builder, many organizations still rely on it for:
- Legacy compatibility: Older Salesforce editions and workflows are designed around Classic templates.
- Developer flexibility: Visualforce templates allow advanced customization unmatched by Lightning’s simplified builder.
- Standardized processes: Teams already trained in Classic may prefer not to migrate to Lightning immediately.
In practice, a hybrid approach is common; organizations use Lightning for simple, branded campaigns and Classic for advanced or legacy-driven use cases.
How to Create an Email Template Folder in Salesforce Lightning
Once you’ve built a few templates, organization becomes essential. Without a proper folder structure, your sales or support teams may struggle to find the right template when they need it most. Salesforce Lightning solves this with Email Template Folders, which allow admins and users to store, categorize, and share templates securely.
Why Folders Matter
- Centralized storage: Keep templates organized by department (Sales, Marketing, Support).
- Controlled access: Use folder permissions to decide who can view, edit, or send from templates.
- Scalability: As your organization grows, a folder system prevents confusion and duplication.
For example, a marketing team may have a folder dedicated to campaigns, while sales teams use another for lead follow-ups.
Steps to Create a New Folder
- Navigate to App Launcher → Email Templates.
- In the Email Templates page, click the “New Folder” button.
- Enter a Folder Name that clearly identifies its purpose (e.g., “Sales Follow-Ups” or “Support Responses”).
- Configure Sharing Settings:
- Private: Only you can access the folder.
- Public: Visible to everyone in your org.
- Custom Access: Share with specific users, roles, or groups.
With Enhanced Folder Sharing, admins can provide granular access, so a sales manager, for instance, may edit templates, while sales reps can only use them.
Best Practices for Folder Organization
- Segment by Function: Create dedicated folders for Sales, Marketing, and Support.
- Name Clearly: Avoid vague names like “Misc Templates.” Instead, use labels like “Renewal Notices” or “Onboarding Emails.”
- Limit Access: Give edit rights only to admins or managers to prevent accidental changes.
- Review Regularly: Archive outdated templates to avoid clutter.
A well-organized folder system not only saves time but also ensures brand consistency and compliance. In many regulated industries, governance teams use folder-level permissions to make sure only approved templates are used in customer communication.
Create Email Templates as an Administrator (Use Cases)
Administrators play a critical role in ensuring that Salesforce email templates are not just created, but also aligned with automation, governance, and scalability needs across the organization.
Unlike end-users, admins can design templates to integrate directly into workflows, approvals, and case escalations, helping teams communicate consistently without manual effort.
Automating Workflows with Templates
Admins often connect templates with Flows, Process Builder, and Workflow Rules to automate repetitive communication. For example, a “Welcome Email” template can be automatically triggered whenever a new lead enters Salesforce. This ensures immediate engagement without requiring sales reps to send emails manually.
Assigning Templates to Key Processes
- Flows: Templates can be embedded in automated journeys, such as sending follow-up reminders after a demo is completed.
- Email Alerts in Approvals: During approval processes, admins configure alerts that use pre-approved templates, ensuring stakeholders receive consistent updates.
- Case Escalations: Support teams rely on templates linked to escalation rules. When a high-priority case isn’t resolved in time, the system automatically sends an escalation email with case details.
Example in Action
Let’s say a SaaS company wants to reduce manual effort in customer onboarding. An admin can:
- Create a Lightning email template with merge fields for {!Contact.FirstName} and {!Account.Company}.
- Configure a Flow to automatically send this template when a new customer record is created.
- Store the template in a “Customer Success” folder accessible to the success team.
This ensures every new customer receives a personalized welcome email instantly, while the customer success team saves hours of repetitive work each week.
Why Admin-Created Templates Matter
- Consistency: Admins ensure that templates follow brand and compliance standards.
- Efficiency: Automated workflows reduce manual email tasks for sales and service teams.
- Scalability: As the organization grows, admins can manage folders, permissions, and automation centrally.
Admin-created templates act as the backbone of Salesforce email automation, enabling communication that is fast, compliant, and highly scalable.
How to Use MassMailer with Salesforce Email Templates
While Salesforce email templates are powerful, they come with certain limitations, such as daily send limits, restricted tracking, and limited analytics. This is where MassMailer, a native Salesforce app, extends functionality.
MassMailer allows you to send emails at scale, track performance, and unlock advanced features, all while using the same templates you create in Salesforce.
What is MassMailer?
MassMailer is a Salesforce-native email solution designed for bulk and transactional email campaigns. Unlike Salesforce’s native email feature, which caps daily email sends (typically 5,000 per org per day), MassMailer allows unlimited sending and advanced deliverability options.
Integration with Salesforce Templates
The best part is that you don’t need to start from scratch. MassMailer integrates directly with Salesforce email templates:
- Template Selection: When creating a MassMailer campaign, you can pick from existing Lightning or Classic templates stored in folders.
- Merge Field Support: Templates maintain personalization tokens like {!Contact.FirstName} or {!Lead. Company}.
- Folder Access: Admins can configure folder permissions so only approved templates are used in bulk campaigns.
Benefits of Using MassMailer with Salesforce Templates
- Bulk Sending: Send thousands of emails in one go without hitting Salesforce’s daily limit.
- Tracking & Analytics: Measure open rates, clicks, bounces, and unsubscribes directly inside Salesforce.
- Deliverability Control: Features like domain authentication, bounce management, and spam compliance improve inbox placement.
- Use Cases:
- Sales teams sending nurture sequences at scale.
- Marketing teams that are running event promotions.
- Support teams who are sending proactive system updates.
E.g., Suppose a university admissions team wants to email 20,000 applicants with updates about enrollment deadlines. Using only Salesforce, they’d quickly hit daily sending limits.
MassMailer can use Salesforce’s native email templates and template folders to store new and custom designs. This mix of MassMailer and Salesforce makes it easy to create attractive, professional emails that can be sent through MassMailer for Salesforce.
MassMailer vs. Native Salesforce Templates
- Salesforce Native: Great for small-scale workflows, approval alerts, or one-to-one emails.
- MassMailer: Ideal for high-volume campaigns, advanced analytics, and compliance needs.
By combining Salesforce email templates with MassMailer’s scale and tracking, organizations can achieve the best of both worlds: consistency and automation with advanced reach and insights.
Final Thoughts
Creating an email template in Salesforce is more than just a technical step; it’s a way to build consistency, efficiency, and personalization into every customer interaction. Whether you’re using Lightning for its drag-and-drop builder or Classic for its HTML and Visualforce flexibility, templates help your teams save time and maintain brand standards.
When paired with folders and admin oversight, they become an organized, scalable system that supports both daily communication and long-term governance. Adding MassMailer into the mix removes the barriers of send limits and introduces advanced analytics, giving your sales, marketing, and support teams the power to operate at scale.
Key takeaways to remember:
- Set up properly: Enable Lightning templates, folder sharing, and permissions before you begin.
- Choose the right type: Match the template type (Text, Lightning, Custom HTML, Visualforce) to your use case.
- Personalize smartly: Use merge fields with fallback text to scale meaningful communication.
- Test before launch: Always preview and send test emails to catch formatting or personalization issues.
- Automate with care: Let admins connect templates to workflows, approvals, and escalations for efficiency.
- Scale with MassMailer: Use it for bulk sends, analytics, and campaign tracking.
If you’re just getting started, begin with a basic Lightning email template. As your processes mature, you can explore Classic customization, admin-led automation, and tools like MassMailer to extend your capabilities.
So, the next time your team is spending hours writing the same email over and over, ask yourself: Could this be solved with a Salesforce email template? Chances are, the answer is yes, and the solution will save your team time while keeping your communication professional and consistent.
Frequently Asked Questions
What are the steps to create an email template in Salesforce Lightning?
How do I create an email template in Salesforce Classic?
How do I insert merge fields into Salesforce email templates?
Can administrators create email templates for all users?
How do I create and organize email template folders in Salesforce Lightning?
How do I test and preview an email template in Salesforce?
Start Your Free Trial Today
Experience MassMailer the easiest way to send personalized emails from Salesforce.
Related Blogs

MassMailer Resources


MassMailer Glossary
About the Author

Siva Devaki 
Siva Devaki is the founder of MassMailer Inc., a tool that helps Salesforce users optimize email marketing. A passionate advocate for email marketing, Siva writes and hosts podcasts on the topic, sharing insights to help businesses drive revenue and enhance customer engagement through Salesforce email automation and tracking.