


Table of Contents
Introduction
What if a single channel could return 36 dollars for every 1 dollar spent, as reported by Hostinger in 2023? Email continues to deliver that kind of performance, which makes the way you create and manage emails inside Salesforce more important than ever. Many teams still rely on the Classic email editor, and that often leads to slow formatting, inconsistent layouts, and messages that feel difficult to update.
The Salesforce Lightning Email Builder offers a more practical option. Its drag-and-drop interface helps teams create responsive, branded templates without coding. It supports merge fields, mobile-friendly layouts, and consistent styling that works across devices.
This guide walks through how to set up the Salesforce Lightning Email Builder, create and customise templates, and automate sends through tools such as Salesforce Flow. It also includes best practices and real-world examples to help you design professional, data-driven emails that support sales, marketing, and customer communication inside Salesforce.
What is the Salesforce Lightning Email Builder?
The Salesforce Lightning Email Builder is a visual, drag-and-drop editor that helps teams create responsive, branded email templates inside Salesforce without writing code. The builder uses structured layouts, reusable components, and merge fields that allow teams to personalize messages with real Salesforce data. This approach makes template creation faster and more consistent across sales, service, and marketing teams.
McKinsey’s Technology Trends Outlook 2023 notes that low- and no-code design tools can increase productivity by 20 to 30 percent, which aligns with the efficiency gains teams experience when they move from the Classic email editor to Lightning. The updated builder produces cleaner layouts, reduces formatting errors, and shortens production cycles for customer communication.
Before exploring how to use the builder, it helps to understand how it compares to the Classic editor. This quick reference table shows the key differences.
Comparison of Classic Email Editor and Salesforce Lightning Email Builder
| Capability | Classic Email Editor | Lightning Email Builder |
|---|---|---|
| Design experience | Text and HTML-based | Visual drag-and-drop builder |
| Mobile responsiveness | Requires manual adjustments | Responsive layouts by default |
| Branding consistency | Harder to maintain | Centralized assets and styling |
| Support for automation | Limited | Works with Flow, Email Alerts, and one-to-one sends |
| Personalization | Supports merge fields | Supports merge fields with cleaner rendering |
Teams often pair Lightning Email Templates with a Salesforce-native sending app when they need higher-volume outreach or improved deliverability. MassMailer supports Lightning Email Templates, which help teams scale without redesigning layouts or moving outside Salesforce.
This foundation sets up the next section, where we walk through how to build your first Lightning Email Template with steps you can follow immediately.
Salesforce Lightning Email Builder features and benefits
The Salesforce Lightning Email Builder includes visual tools, structured layouts, and reusable components that help teams design emails quickly and maintain consistent communication inside Salesforce. These features reduce manual formatting, improve accuracy, and support automated workflows across sales, service, and marketing teams.
Key features of the Salesforce Lightning Email Builder
The Salesforce Lightning Email Builder includes core features that help teams design templates faster, maintain consistent communication, and reduce manual formatting work. These features support both individual outreach and automated workflows inside Salesforce.
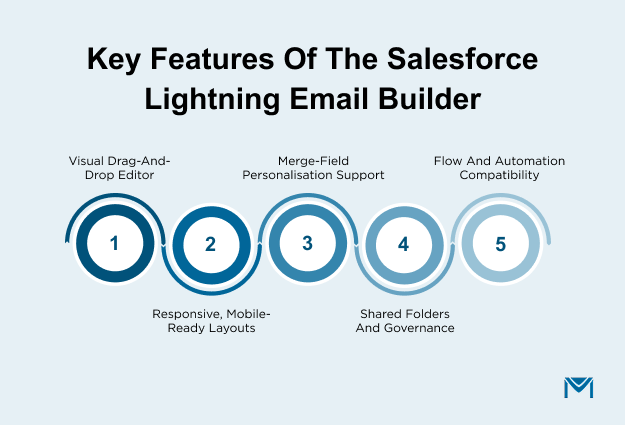
1. Visual drag-and-drop editor
The builder replaces code-heavy workflows with a simple editor that lets teams add text blocks, buttons, images, and rows with a click. This supports faster template creation and reduces the need for design or HTML support.
2. Responsive layout system
The builder uses structured rows and columns that adjust automatically across devices. This gives teams a reliable way to maintain readability on desktop and mobile without manual testing.
3. Merge-field support for personalization
Users can insert merge fields from leads, contacts, accounts, or cases. These fields pull live data into the message and help teams maintain context across onboarding workflows, customer updates, and sales follow-ups.
4. Shared folders and access control
Teams can store templates in shared folders with controlled access. This improves brand consistency, prevents version issues, and supports cross-team collaboration.
5. Compatibility with Salesforce automation
The builder works with Flow, Email Alerts, and one-to-one sends. This allows teams to reuse the same template for personalized messages and automated communication without rebuilding layouts.
Benefits of using the Salesforce Lightning Email Builder
These features create practical benefits that improve efficiency, strengthen branding, and support long-term content maintenance across teams. Each benefit connects directly to how teams shape communication inside Salesforce.
1. Faster template creation
Teams build templates faster because they no longer format elements manually. Lightning Email Builder uses modular, drag-and-drop components that automatically apply layout rules, spacing, and styles, reducing the need for manual HTML adjustments or troubleshooting.
2. Improved brand consistency
Shared folders, reusable components, and standardized styling allow teams to maintain consistent messaging across campaigns. This reduces off-brand emails and strengthens customer trust.
3. Cleaner personalization with fewer errors
Merge fields work more reliably because the builder uses structured fields tied to Salesforce records. This reduces formatting problems and helps teams deliver personalized messages at scale.
4. Better support for automated workflows
Templates can be used across lead routing flows, onboarding sequences, and case updates. This helps teams create repeatable workflows that save time and support customer engagement.
5. Easier maintenance across teams
Because layouts stay consistent, teams update templates faster and maintain a single source of truth. This supports long-term content governance and reduces dependency on developers.
Teams that use the Salesforce Lightning Email Builder for design often need higher-volume sending, stronger deliverability control, or performance tracking. MassMailer supports Lightning Email Templates, which allow teams to scale outreach inside Salesforce without rebuilding designs.
This creates a practical workflow for organizations that want efficient template creation and reliable campaign delivery.
Set up requirements and user access for Salesforce Lightning Email Builder
Setting up the Salesforce Lightning Email Builder involves a few configuration steps that ensure teams can create, edit, and share templates without interruptions. The process includes confirming edition support, enabling enhanced folders, and assigning the correct permissions to users. These steps establish a clear structure for template governance, which is important for long-term consistency and collaboration.
1. Confirm edition support and feature availability
The Lightning Email Builder is available in Salesforce Lightning Experience for Enterprise, Unlimited, and Performance editions. You can confirm availability with a quick check inside Setup.
Steps to verify support
- Open Setup, then search for Email Template Builder.
- Check that Lightning Email Template Builder appears.
- Confirm that your org uses Lightning Experience, not Classic.
- Ensure that Enhanced Folders and Sharing are active.
- Confirm that the user profile includes Email Templates and Email Folders access.
These checks validate that your org supports the builder and prevent early access issues.
2. Enable enhanced folders and sharing
Enhanced folders keep templates organized and ensure the right teams can access approved content. This structure also supports template governance, which Gartner highlights as a leading factor in effective digital content operations.
Steps to configure folders
- Go to Setup, then search for Lightning Email Templates.
- Select Enhanced Folders and Sharing, then click Enable.
- Set folder access levels for each team.
- Create clear naming conventions, such as Marketing Templates or Service Notifications.
- Assign a template owner to maintain the folder structure.
A structured folder system reduces duplication, improves clarity, and helps teams follow approved brand guidelines.
3. Assign permissions for the visual builder
Only users with specific permissions can open the drag-and-drop editor. Without these settings, they can view templates but cannot edit them.
Steps to grant access
- Open Permission Sets in Setup.
- Create a new set or update an existing one.
- Enable the Access drag-and-drop content builder.
- Assign the permission set to users who need editing access.
- Verify that users can access Email Templates, Email Content, and Email Folders from the App Launcher.
If users cannot see the “Edit in Builder” button, the issue usually involves folder access or missing permissions rather than a system error.
4. Common setup challenges and fixes
Even with the correct setup, some users run into small issues when they first enable the Salesforce Lightning Email Builder. Most of these problems are simple configuration gaps that can be fixed quickly once you know what to look for.
The table below lists the most common setup challenges and how to resolve them.
| Issue | Likely cause | Quick fix |
|---|---|---|
| “Edit in Builder” button not visible | Missing permission or inactive folder sharing | Enable Access drag-and-drop content builder and Enhanced Sharing |
| Template not visible for a user | Folder not shared or user lacks access | Recheck folder-sharing settings and update access levels |
| Merge fields unavailable | Object not linked to the template | Confirm the related entity under template settings and re-save the template |
These are common setup issues most teams face during initial configuration, and resolving them early prevents access interruptions later.
Once setup is complete, your team can start building templates directly in the Salesforce Lightning Email Builder. In the next section, we’ll explore how to create your first Lightning Email Template using drag-and-drop components and merge fields for personalization.
How to create your first Salesforce Lightning Email Template
You can create your first Lightning Email Template by following a clear sequence of steps inside the Salesforce Lightning Email Builder. The editor uses structured components and a visual layout system that helps teams design templates efficiently and maintain consistent communication.
Step 1: Open the Email Templates tab
Start by navigating to the template workspace inside Salesforce.
Steps
- Open the App Launcher, then search for Email Templates to access the correct workspace.
- Select New Email Template to begin creating a new design.
- Enter a clear name and description so teams understand the template’s purpose.
- Choose a Related Entity to ensure merge fields pull accurate data from Salesforce records.
- Select a folder that aligns with your team’s sharing and governance structure.
- Click Save, then choose Edit in Builder to access the drag-and-drop editor.
Assigning the related entity at the start ensures data fields populate correctly in automated workflows.
Step 2: Use the drag-and-drop editor
The Lightning Email Builder uses visual components that help teams design emails without manual formatting. Deloitte’s 2023 research found that structured creation tools reduce rework time, which aligns with the builder’s goal of simplifying layout decisions.
Components you can add
- You can add text blocks to write subject lines, introductions, or detailed message content.
- You can add image blocks to display logos, banners, or visual elements stored in Salesforce CMS.
- You can add buttons that guide readers toward actions such as booking a meeting or viewing a page.
- You can add single-column or multi-column rows to structure the layout.
- You can add dividers to separate sections for clearer scanning.
- You can add spacers to control vertical spacing in your layout.
- You can add footer sections to display compliance information or contact details.
Steps to build your layout
- Drag a Row onto the canvas to define the structure of each section.
- Add components such as Text, Image, or Button elements inside the row.
- Write your content and format it using the options in the style panel.
- Upload approved images to maintain consistent branding.
- Add a button and link it to the relevant page or Salesforce record.
- Adjust color, spacing, and alignment to match your brand guidelines.
This approach helps teams build clean, mobile-responsive templates that remain easy to maintain.
Step 3: Insert merge fields for personalization
Merge fields help teams personalize messages with live Salesforce data.
Steps
- Click inside a text block to open the formatting options.
- Select the Merge Field to choose the object you want to reference.
- Choose the specific field, such as first name or company name.
- Insert the field so Salesforce can populate it during sending.
- Add a fallback value to avoid showing empty text.
- Preview the template with sample records to verify accuracy.
This process supports personalized communication without creating multiple template versions.
Step 4: Save and activate the template
Once the design is complete, you can activate the template so teams can use it across Salesforce.
Steps
- Click Save to store your changes.
- Click Activate when the template is ready to use.
- Test the template in a Flow or Email Alert to confirm that it renders correctly.
Teams often use a simple checklist to ensure templates meet brand, accessibility, and functional requirements before activating them.
How MassMailer supports Lightning email templates
Teams that design email templates using the Salesforce Lightning Email Builder often reach sending limits when they scale outreach. MassMailer supports Lightning Email Templates directly, which allows teams to design templates once, then use them for high-volume communication inside Salesforce without rebuilding content.
How to customize templates for branding and personalization
You can customize Lightning Email Templates by using structured styling, consistent layout choices, and personalized fields that pull live Salesforce data. These customization options help teams maintain brand trust, improve readability, and send messages that stay relevant across different customer journeys.
1. Apply brand styling and consistent formatting
Brand consistency strengthens trust, and the Salesforce Lightning Email Builder gives teams the tools to match approved styles without manual formatting.
Ways to apply brand styling
- You can set text styles by choosing heading sizes, body text, and link colors that match your brand guidelines.
- You can upload approved brand images from Salesforce CMS to ensure that logos and banners remain consistent across campaigns.
- You can adjust layout spacing by using padding, margins, and dividers to create a clean and balanced structure.
- You can choose button colors, shapes, and alignments to match your brand system and improve click clarity.
- You can preview desktop and mobile versions to confirm that your template renders correctly across devices.
According to the Forrester report, fewer than 35% of organizations say they are advanced in all stages of the content lifecycle, underscoring how many still struggle with consistent, error-free content operations.
2. Use merge fields for accurate personalization
Merge fields allow teams to personalize messages using the data stored on lead, contact, account, or case records. This improves message relevance and supports automated workflows inside Salesforce.
Steps to personalize content
- Click inside a text block to open formatting options.
- Select the Merge Field to access available Salesforce objects.
- Choose the specific field, such as first name, company name, or account owner.
- Insert the field so Salesforce can populate the data during sending.
- Add a fallback value to avoid empty text if a field is blank.
- Preview the template with sample data to confirm accuracy.
This process helps teams communicate with customers in a more contextual way without creating separate templates.
3. Add conditional content when needed
Conditional content helps teams show different messages to different groups without building multiple templates. Salesforce supports this through data-driven visibility settings.
Ways to apply conditional content
- You can show or hide sections based on record attributes, such as region, product type, or lifecycle stage.
- You can create separate message blocks for new leads and returning customers by using simple visibility rules.
- You can manage regional offers or service updates using location-based visibility settings.
- You can simplify automation by reducing the number of templates Flow needs to reference.
This approach improves relevance and reduces template duplication across teams.
4. Optimize images for performance
Well-optimized images improve readability and reduce loading issues on mobile devices.
Image best practices
- You can keep image file sizes small so emails load quickly across mobile and desktop.
- You can add alt text to make content accessible for users with screen readers.
- You can maintain uniform aspect ratios so images scale cleanly across devices.
- You can store approved images in Salesforce CMS to avoid outdated or inconsistent visuals.
This supports a smoother reading experience and reduces layout issues during testing.
How MassMailer supports advanced customization in Salesforce Lightning Email Builder
Teams that design branded templates often need to test, send, and optimize messages at a larger scale. MassMailer supports Lightning Email Templates and keeps custom styling intact during high-volume sends.
Watch the video on How do I send a high volume email campaign in Salesforce using MassMailer?
This helps teams maintain consistent branding while gaining broader sending capacity, stronger deliverability, and performance tracking inside Salesforce.
How to preview and test Salesforce Lightning Email Builder
You can preview and test Lightning Email Templates to confirm that layout, styling, and personalization work correctly across devices. The Salesforce Lightning Email Builder includes built-in tools that help teams validate content before sending it through automation or one-to-one messages. This step reduces formatting issues, improves accessibility, and supports reliable customer communication.
1. Use desktop and mobile previews
The Lightning Email Builder includes preview modes that show how your template renders on desktop and mobile screens. Most readers open messages on mobile, which makes this preview an important step in the review process.
Steps to use preview modes
- Click Preview in the upper-right corner of the builder.
- Select Desktop to check spacing, alignment, and overall layout.
- Switch to Mobile to confirm that columns stack correctly.
- Scroll through the entire email to check text readability.
- Review images to confirm they scale cleanly on smaller screens.
- Test all buttons and links to confirm they function as expected.
This process reduces layout problems that often appear when templates move from design to automation.
2. Validate merge fields with sample data
Merge fields can create errors if records contain missing or inconsistent values. Salesforce includes a simple preview tool that helps teams check personalization before activating the template.
Steps to validate merge fields
- Open Preview and select View as Recipient.
- Choose a real sales record, such as a lead or contact.
- Check that fields such as first name, company, or owner display correctly.
- Confirm that fallback values appear when data is missing.
- Test multiple records to review different data combinations.
- Adjust the message if long names or unusual formatting disrupt the layout.
3. Review accessibility elements
Accessible templates perform better because they support broader readability and compliance requirements.
Accessibility checks to perform
- You can confirm that alt text appears for images so screen readers can interpret the content.
- You can check that button labels describe the action clearly.
- You can use a consistent font size and spacing to improve readability.
- You can choose text colors that meet contrast guidelines for accessibility.
- You can avoid images that contain essential text, which improves clarity on mobile.
These steps create a smoother experience for readers who rely on assistive tools.
4. Send internal test emails
Sending a test email helps teams review how the template behaves in real inboxes, such as Outlook or Gmail.
Steps to send internal tests
- Click Send Test Email from the builder or template page.
- Enter your internal testing addresses.
- Review the message in multiple inbox providers.
- Check how the subject line and preheader text appear.
- Confirm that images load correctly and that links track as expected.
- Share the test email with reviewers for approval.
Testing across inbox providers helps teams avoid formatting inconsistencies that appear outside the Salesforce environment.
5. Test the template inside a Flow or Email Alert
Real automation testing confirms that the template works when triggered by Salesforce processes.
Steps to test in automation
- Create a sample Flow that sends the template.
- Choose a test record with clean data.
- Trigger the Flow manually.
- Review the received email for formatting and personalization accuracy.
- Repeat the test with different conditions.
- Update the template if inconsistencies appear.
This helps teams avoid issues during live customer communication.
How to automate emails using Salesforce Lightning Email Builder
You can automate Lightning Email Templates inside Salesforce to send timely and personalized messages without manual work. This automation helps teams share consistent information, reduce response delays, and support repeatable communication across the entire customer lifecycle.
1. Send templates through Email Alerts
Email Alerts offer the simplest way to automate Lightning Email Templates.
Steps
- Create a Lightning Email Template and save it in the correct folder.
- Open Setup and create a new Email Alert.
- Select the Lightning Email Template as the message.
- Choose the recipient fields, such as Contact, Lead, or Case Owner.
- Add the Email Alert to Workflow Rules or Process Builder.
- Activate the automation and test it with real records.
This method works well for operational notifications, status updates, and quick responses that follow predictable rules.
2. Use Salesforce Flow to build advanced automation
Salesforce Flow offers the most control over automated communication. Flow can handle logic, schedules, loops, conditional paths, and multi-step journeys.
Steps
- Create a Record-Triggered Flow for the object you need.
- Define the conditions that should launch the email.
- Add the Send Email action and choose your Lightning Email Template.
- Map merge fields to relevant record data.
- Add decision elements to personalise messages for different segments.
- Test the Flow with sample records to confirm accuracy.
- Activate the Flow after validation.
Flow helps teams automate onboarding messages, lead-qualification updates, renewal reminders, and customer service communication.
3. Schedule templates using a Scheduled Flow
You can send Lightning Email Templates at specific times using a Scheduled Flow.
Steps
- Create a new Scheduled Flow in Setup.
- Select the object and schedule, such as daily or weekly.
- Add conditions that filter eligible records.
- Add the Send Email action and attach your Lightning Email Template.
- Run a test schedule to confirm timing and recipient accuracy.
This approach supports recurring communication, such as weekly summaries or monthly reminders.
4. Use Apex for specialized automation when needed
Development teams can trigger Lightning Email Templates through Apex when the workflow requires custom logic that Flow cannot handle easily. This option should only be used when the requirements exceed no-code capabilities.
Extend automation with MassMailer
MassMailer enhances Salesforce automation by supporting high-volume sends, advanced deliverability controls, and performance tracking. Teams can use the same Lightning Email Templates and send campaigns directly from Salesforce without rebuilding content.
MassMailer works with Flows, Email Alerts, and custom triggers, which help teams scale communication without hitting Salesforce send limits.
Limitations of the Salesforce Lightning Email Builder
The Salesforce Lightning Email Builder includes several limitations that affect design control, personalisation, analytics, and scalability. These constraints matter most for teams that run complex templates or high-volume communication.
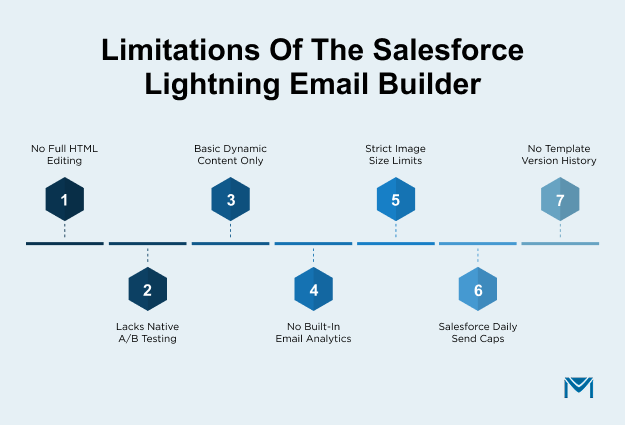
- It does not support full HTML editing, which restricts advanced layouts and custom code.
- It does not offer native A/B testing for subject lines, layouts, or calls-to-action.
- It supports only basic dynamic content and does not allow complex rules or behavioral logic.
- It does not track opens, clicks, or bounces for emails sent through Flow or Email Alerts.
- It imposes image and file-size limits, which can affect loading speed and mobile rendering.
- It follows Salesforce's daily send limits, which prevent high-volume campaigns.
- It does not include template version history, which increases the risk of losing earlier drafts.
Ways teams address these gaps
- They switch to Classic HTML templates when full code control is essential.
- They use Flow logic or external tools to run controlled A/B tests.
- They manage personalization inside Flow or use rule-based marketing tools.
- They add analytics through a Salesforce-native application that supports tracking.
- They compress images and test every template in mobile view.
- They use a high-volume Salesforce app, such as MassMailer, when they scale outbound communication.
- They duplicate templates to maintain manual version control.
These constraints help teams understand when the Salesforce Lightning Email Builder is enough and when additional tools can support more advanced needs.
Conclusion
The Salesforce Lightning Email Builder gives teams a faster, cleaner way to create personalized, on-brand emails directly inside the CRM. From drag-and-drop components to automated sending through Flow, it streamlines the entire messaging workflow and helps you focus on what matters most: engaging prospects and moving leads through the funnel.
With email continuing to deliver one of the highest returns of any digital channel, having the right tools and processes in place can make a measurable difference in your lead-generation performance.
If your team is looking to scale outreach, improve deliverability, or turn your Lightning Email Templates into high-volume lead-gen campaigns, pairing Salesforce with a purpose-built solution like MassMailer can give you the sending power and visibility you need to grow.
Ready to generate more leads with smarter, scalable Salesforce emails? Explore how MassMailer can help you reach more prospects and convert more opportunities, without leaving Salesforce.
Frequently Asked Questions
1. Can I use Lightning Email Templates for bulk email campaigns in Salesforce?
2. How do I track email opens and clicks for Lightning Email Templates?
3. Can I personalise Lightning Email Templates with dynamic content based on user behaviour?
4. Are Lightning Email Templates supported in Salesforce Campaigns?
5. Can I schedule Lightning Email Templates to send at a specific time?
6. How do I manage template version control in Lightning Email Builder?
Start Your Free Trial Today
Experience MassMailer the easiest way to send personalized emails from Salesforce.
Related Blogs
MassMailer Resources


About the Author

Siva Devaki 
Siva Devaki is the founder of MassMailer Inc., a tool that helps Salesforce users optimize email marketing. A passionate advocate for email marketing, Siva writes and hosts podcasts on the topic, sharing insights to help businesses drive revenue and enhance customer engagement through Salesforce email automation and tracking.