


Table of Contents
Although Salesforce offers over 200 standard objects, there are instances where organizations may require bespoke objects to help them address the information storage unique to their business. This is where custom objects come into play.
Anyone involved with mass email campaigns knows the importance and the impact personalization can have on its success.
If you are usingMassMailerto manage these campaigns, you may wonder how to tap into this customized data stored in custom objects. Well, good news—it’s simpler than you think, and this blog will walk you through how.
What Are Custom Objects In Salesforce?
Simply put,objects in the Salesforceecosystem are like tables in a database, where records are stored as rows and fields as columns.
Salesforce offers several standard objects—accounts, contacts, opportunities, and leads, to name a few—which, by default, can store the most common forms of data used in a CRM. That said, as we touched upon earlier, unique data that businesses often rely ondon’tfit into these predefined categories, and hence, youare providedwith the option to create custom objects in Salesforce.
For example, a university might need to create custom objects like students and professors to storeinformation unique to them. Similarly, an event planner may require a custom object to store information based on venues.
Custom objects,just likeSalesforce'sstandard objects, are fully functional and can include customizable fields, relationships, and layouts.
How to Enable Custom Objects on Massmailer: A Step-by-Step Guide
MassMailer allows you to send emails directly from these custom objects, but you need to enable and configure the custom objects in MassMailer.
The following steps will show you how:
Step 1: Open MassMailer Setup
To enable custom objects, you must first get to the MassMailer Setup tab within MassMailer Lightning. To do this, go to the App Launcher by clicking on the grid icon in the top-left corner, search for 'MassMailer,' and select it from the results.
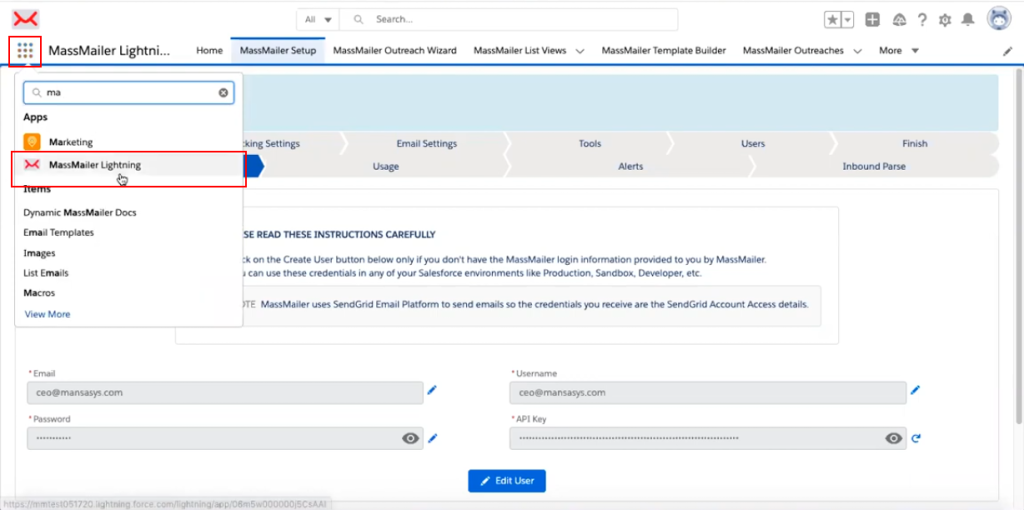
This will open up MassMailer Lightning's primary interface and this is where you will find the MassMailer Setup Tab. This is your control panel for all MassMailer configurations.
Note: If you are new to MassMailer and want to know more about the various tabs in MassMailer, read this blog—MassMailer Tabs Explained.
Step 2: Access The Object Settings Tab
In order to enable a custom object in MassMailer, you will need to access the 'Object Settings' tab. You will find this under the 'Email Settings' tab on the MassMailer Lightning interface.

Here, you will find a list of objects already enabled in MassMailer. However, since we’re working with a new custom object, we will need to add it manually.
Step 3: Select and Configure the Custom Object
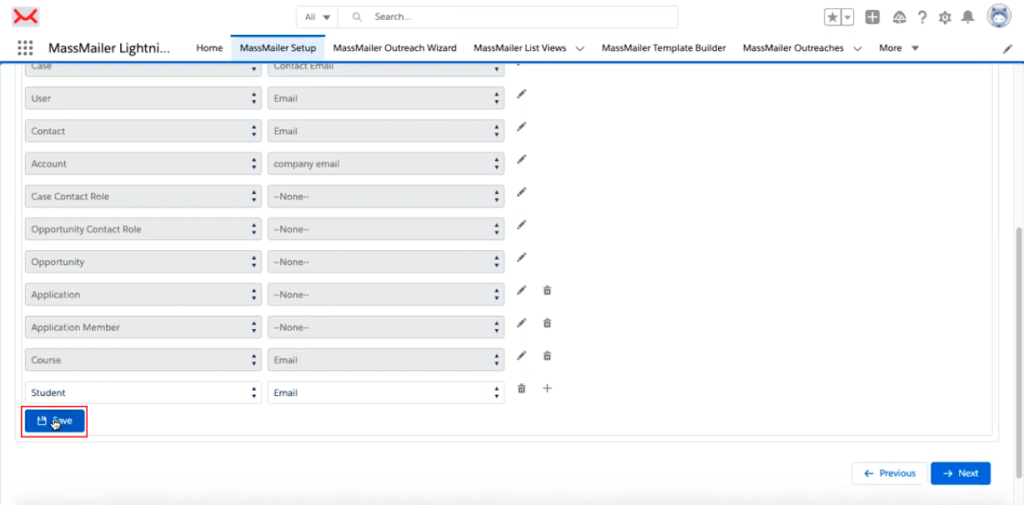
To add a custom object, scroll all the way down and click on the '+' icon to bring up the selection menu.
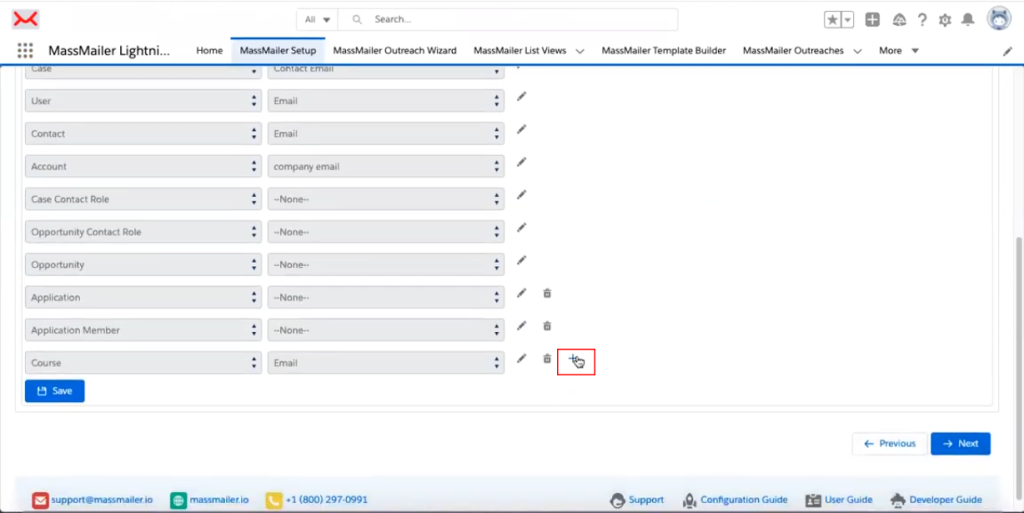
From there, choose the custom object you want to enable from the drop-down list. For the purpose of this demonstration, we are going to choose the custom object named 'Student.'.
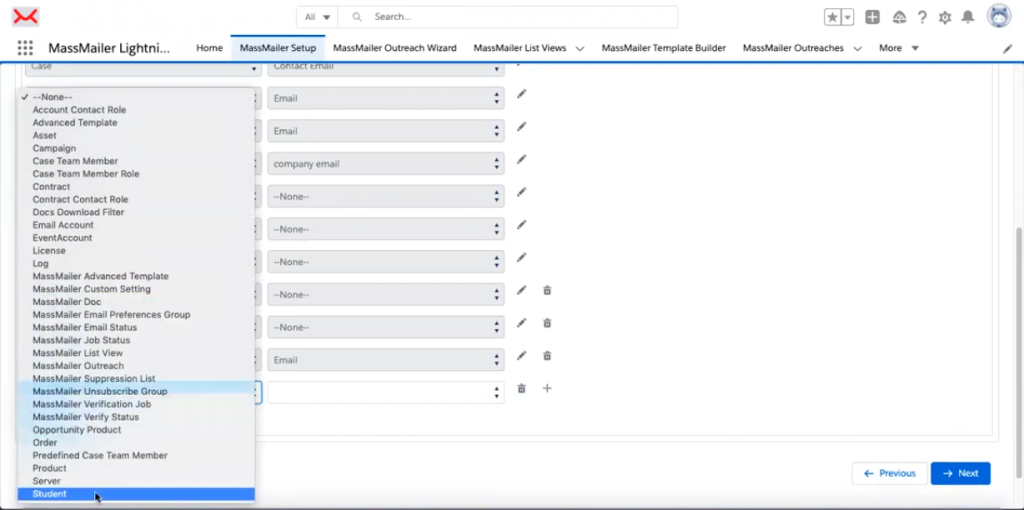
If the custom object includes an email field (e.g., “Student Email”), select it from the available fields and click 'Save.'.
Note: It’s okay if the custom object doesn’t have an email field. MassMailer can still work with the object, but you’ll need to handle email addresses separately.
Once you click 'Save,'MassMailer will take care ofthe backend processes for you.It will automatically create custom buttons, lookups, and relationships tied to this specific object on both the Lightning and Classic Salesforce/MassMailer layouts.
This part may take a minute or two, depending on the complexity of your Salesforce environment.
Step 4: Update the Custom Object’s Page Layout
Now that the backend configuration is complete, it’s time to update the custom object’s page layout to make the MassMailer functionalities visible. Navigate to the 'Page Layouts' section for your custom object in Salesforce.
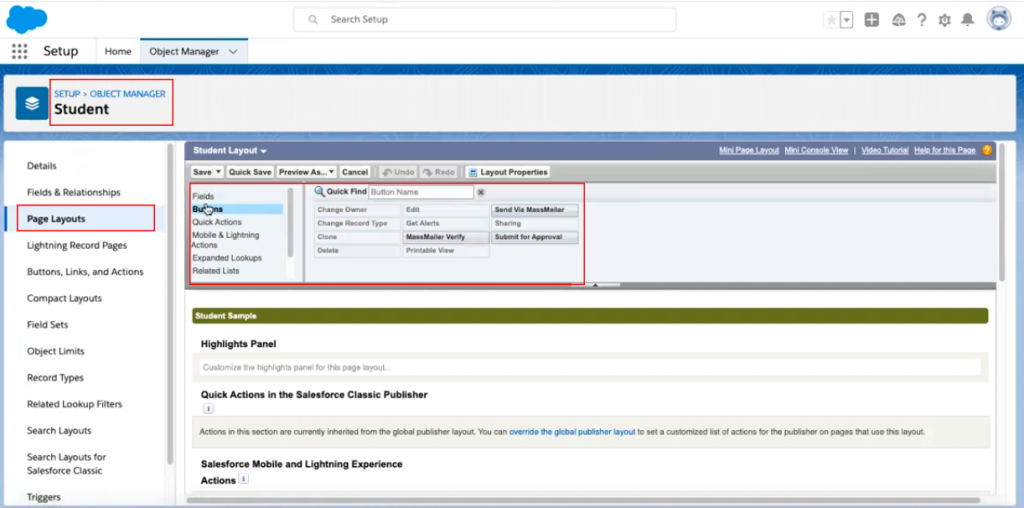
Open the layout editor for the object and drag the following buttons into the layout:
- MassMailer Verify
- Send via MassMailer
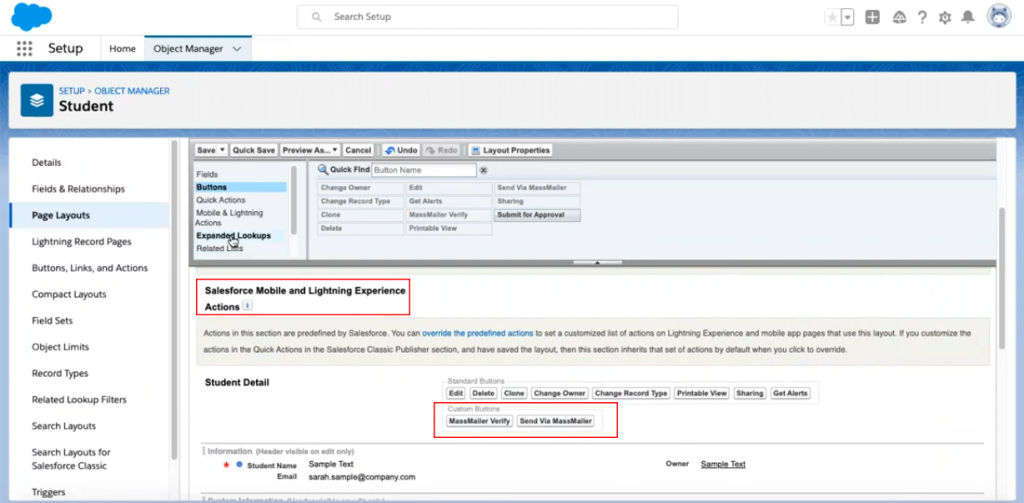
For Salesforce Lightning, make sure to place these buttons in the Salesforce Mobile and Lightning Experience Actions section. This will ensure compatibility with Lightning users. Add MassMailer-related lists, if any, like so.
Click 'Save' to confirm the changes.
Guide on How to Enable Any Custom Object in MassMailer
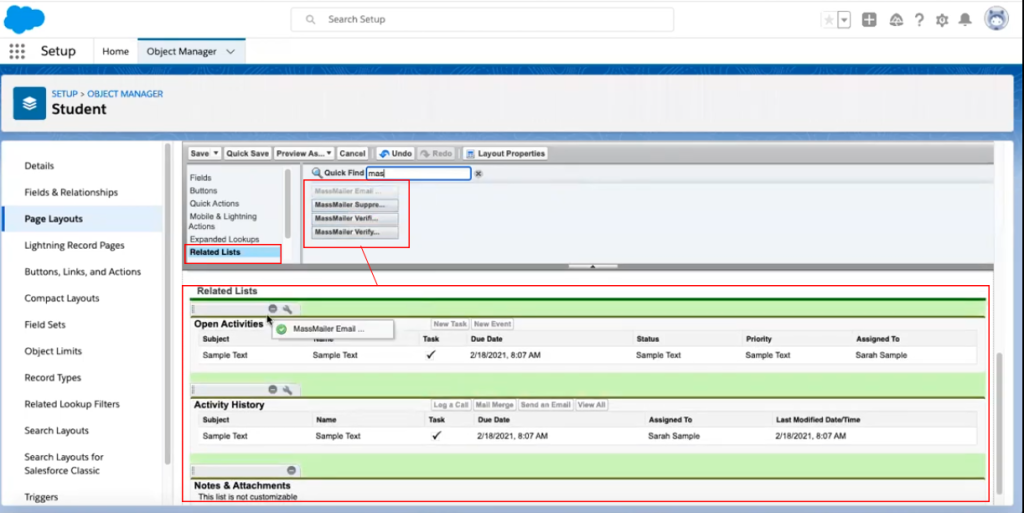
Step 5: Configure Search Layouts
Search layouts control what buttons and actions are visible in list views, and we need to configure these two. To do so, go to the 'Search Layouts'section for your custom object, locate the 'Default Layout,' and click 'Edit.'
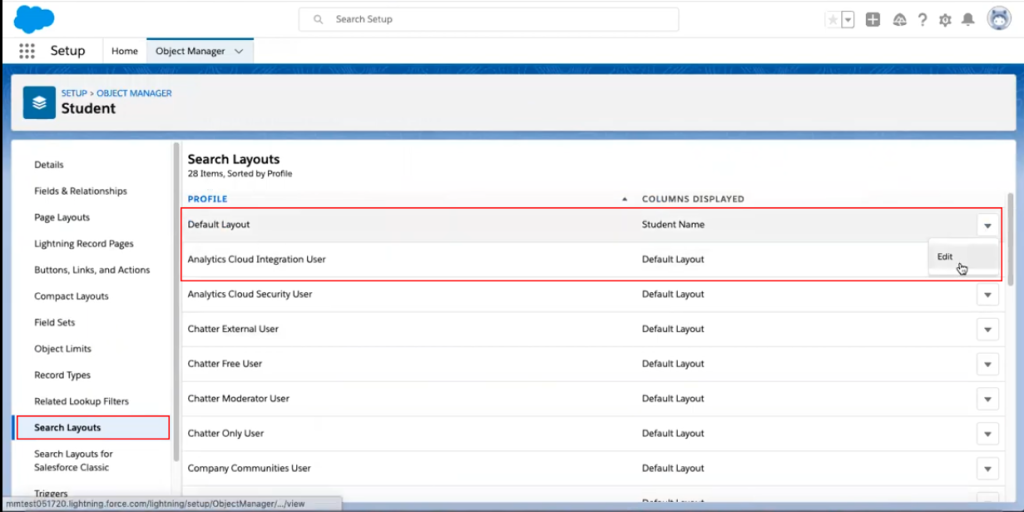
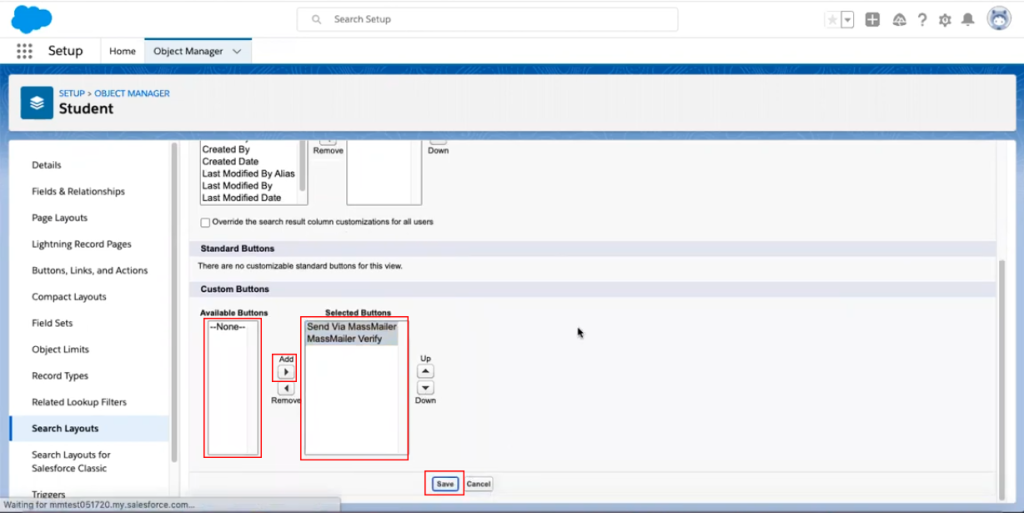
Then, scroll down to the bottom of the page and head to the 'Custom Buttons' section. Add all the buttons you need from the 'Available Buttons'section on the left to the 'Selected Buttons'section and then click save.
Note:If your organization uses Salesforce Classic, repeat these steps for Classic layoutsas well.
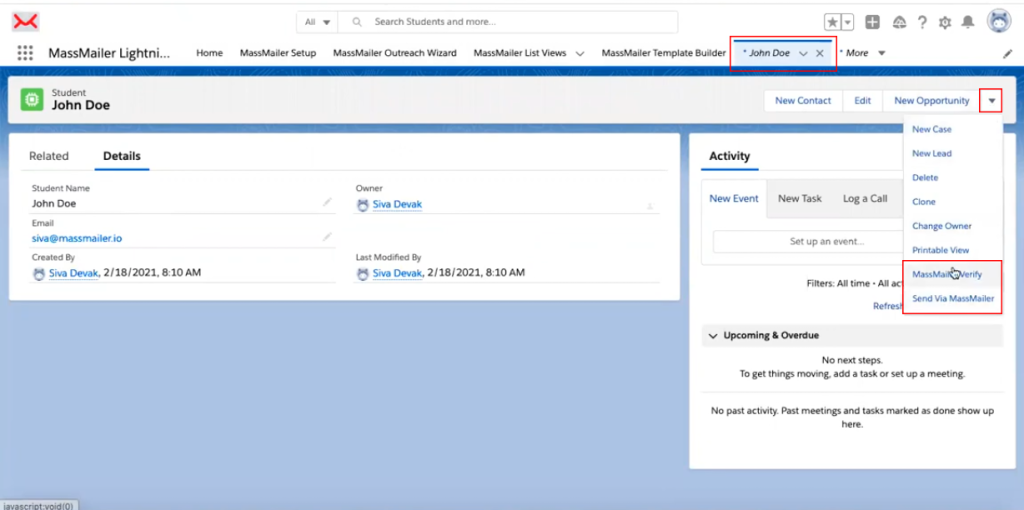
Step 6: Verify the Setup
Now, before you use this custom object within MassMailer, it's best to double-check that everything is as it should be. To do so, open any record in your custom object, in this case, Student (if you don't have a record, create one), and look for the MassMailer Verify and Send via the MassMailer buttons as shown below.
Head to the list view for the same custom object and ensure these buttons are visible there, too.
Step 7: Test the Custom Object
Now it's time to test the integration! Click 'Send via MassMailer'to send a test email.Thisshould open the Outreach Wizard, automatically recognizing your custom object and target audience.
Follow the rest of the steps in the Outreach Wizard to send out a test email.If you're unsure about any part of the process,refer to this guidefor detailed instructions. You can also test bulk email functionality by selecting multiple records and clicking the 'Send via MassMailer' button.
Summing It Up
And there you have it—a step-by-step walkthrough on enabling, setting up, and testing custom objects' functionality in MassMailer. They can open up a world of possibilities for your email campaigns from within the Salesforce ecosystem by targeting the data that matters most to your business.
If you're new to MassMailer,you're missing outon one of the most efficient tools for managing email campaigns within Salesforce.MassMaileris a robust, Salesforce-native applicationdesigned to simplify and enhanceemail communication.
It eliminates Salesforce's email limitations, allowing you to send unlimited emails and manage mass personalized campaigns. In short, it is a must-have for organizations looking to streamline their email outreach.
Don't miss out on streamlining your email outreach—start your free 15-day trialnow!
Start Your Free Trial Today
Experience MassMailer the easiest way to send personalized emails from Salesforce.
Related Blogs
MassMailer Resources


MassMailer Glossary
About the Author

Siva Devaki 
Siva Devaki is the founder of MassMailer Inc., a tool that helps Salesforce users optimize email marketing. A passionate advocate for email marketing, Siva writes and hosts podcasts on the topic, sharing insights to help businesses drive revenue and enhance customer engagement through Salesforce email automation and tracking.