


Table of Contents
Introduction
If you manage emails in Salesforce, you have probably faced a moment where someone says, “I unsubscribed last week, but I still got an email.” It creates stress for you, frustration for them, and questions for the whole team. Most of the time, the issue comes back to one thing. Not everyone understands how the Salesforce email opt out field works or what it controls.
This guide is to help you avoid those situations. We explain what the field actually controls, what it ignores, and how to set it up the right way. We also show practical ways to automate updates, track opt-out trends, and keep every connected system in sync. These are the same steps teams use when they want a clear, reliable process that respects customer preferences and reduces manual cleanup.
Ready to build a smoother workflow that supports your marketing and compliance efforts? Let’s get started.
What the Salesforce email opt out field does
The Salesforce email opt out field tells Salesforce that a Lead or Contact no longer wants to receive marketing email. When the field is checked, Salesforce removes that person from standard mass email sends and treats the record as suppressed for marketing purposes. This gives your team a reliable way to honor communication preferences and maintain consistent consent data across your systems.
How Salesforce handles individual email opt out
Salesforce includes the email opt out field on every Lead and Contact record, and the system reads it as a marketing-suppression instruction.
Here is what happens when the field is checked:
- Salesforce removes the record from list emails and campaign sends that rely on standard Salesforce email functions.
- Connected platforms that map to the field treat the value as an unsubscribe indicator when the sync rules support it.
- Products such as MassMailer and Account Engagement read the field and exclude opted-out records from their marketing sends.
This creates a single, predictable point of control for marketing opt-outs inside Salesforce.
What the email opt out field does not block
The Salesforce email opt out field only controls marketing email, so it does not stop every type of communication. Salesforce separates marketing messages from operational or service-related messages.
Below is a clear breakdown.
Emails typically blocked:
- Salesforce excludes the record from mass emails sent through list views.
- Salesforce removes the record from campaign email sends.
- Connected marketing tools that sync to the field suppress the record during their own sends.
Emails not blocked:
- Salesforce still allows users to send one-to-one emails from the record page.
- Salesforce continues to send workflow or approval emails because they support internal or service processes.
- Salesforce sends case auto-responses because they serve as operational communication.
- External marketing platforms continue sending emails unless they sync their unsubscribe logic with this field.
This distinction helps teams understand why a person may still receive certain messages even after opting out of marketing emails.
Common misconceptions about email opt out
These misunderstandings appear frequently when teams manage communication preferences in Salesforce.
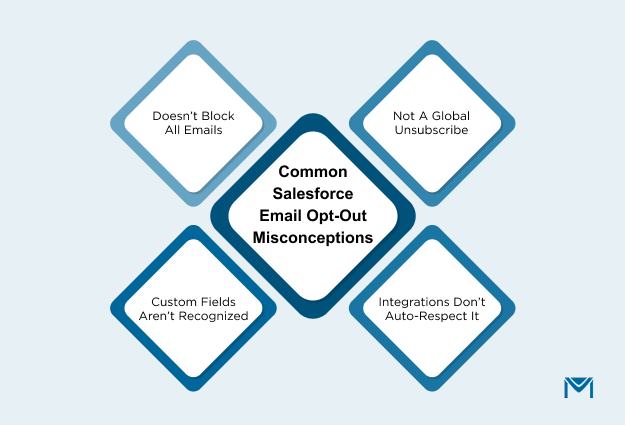
- The Salesforce email opt out field does not stop every type of email because it only governs marketing messages.
- The field does not act as a global unsubscribe across all systems unless every connected platform syncs to it.
- The field is not automatically respected by all marketing tools unless the integration maps to the standard Salesforce field.
- A custom opt-out field does not replace the standard field, because Salesforce features and integrations look for the standard value first.
Teams that understand these details reduce errors, prevent accidental sends, and maintain cleaner communication-preference data across the ecosystem.
How to enable and configure the Salesforce email opt out field
To configure the Salesforce email opt out field correctly, you need to make it visible, editable, and easy for your team to find. A McKinsey study found that 70 percent of consumers believe the companies they interact with protect their data, so a clear opt-out setup supports that expectation and helps you respect each person’s communication preferences.
Once you do that, the field becomes a consistent suppression signal for marketing email across Salesforce and any connected tools that rely on it.
1. Update field-level security and permissions
Salesforce hides the email opt out field for many profiles by default. If a user cannot see or update the field, your opt-out data becomes unreliable. The fix is simple and only takes a few minutes.
Steps:
- Go to Setup, then open Object Manager, then select Contact.
- Select Fields and Relationships, then open the Email Opt Out field.
- Choose Field-Level Security.
- Turn on Visible for every profile that needs to view the field.
- Turn off Read-Only for profiles that should update it, such as sales and marketing.
- Save your changes, then repeat the same steps for the Lead object.
Best practices:
- Allow edit access for sales and marketing, because they handle most unsubscribe requests.
- Allow read access for support, because they need visibility during case work.
- Give integration users the right access level so connected platforms sync unsubscribe data correctly.
A clean permission setup prevents manual errors and ensures the Salesforce email opt out field reflects the actual preference of the person on the record.
2. Add the email opt out checkbox to page layouts
Once permissions are correct, you need to place the checkbox where your team will notice it. When the field sits in a low-visibility section, people forget to update it, and opt-out requests get missed.
Steps:
- Go to Object Manager, select Contact, then open Page Layouts.
- Choose the layout your team uses most.
- Drag the Email Opt Out field into a visible section near the top of the page.
- Save the layout, then repeat the steps on Lead layouts.
Best practices:
- Group the field with other communication-preference fields so users review them together.
- Add simple help text that explains what the field controls and what it does not control.
- Test the layout with a few sales and marketing users to confirm placement.
A well-placed opt-out field reduces errors, improves data accuracy, and ensures teams update preferences immediately when a person requests it.
How Salesforce uses the Salesforce email opt out field for mass email suppression
Salesforce uses the Salesforce email opt out field to decide whether a Lead or Contact should receive marketing emails. When the checkbox is selected, Salesforce suppresses that record from standard mass email sends so you do not contact someone who has chosen to opt out.
1. How does standard Salesforce mass email respect opt-out status
Salesforce automatically removes opted-out records from any list, email, or campaign send that uses native Salesforce email features.
Key behaviors:
- Salesforce removes any Lead or Contact with Email Opt Out selected from the final recipient list during a mass email send.
- Salesforce carries the Email Opt Out value from Lead to Contact during lead conversion, so the suppression remains accurate.
- Salesforce allows Flow and other automation tools to update the field when a person unsubscribes through a form or preference page.
Best practices:
- You should create report filters that exclude records where Email Opt Out equals true to prevent mistakes.
- You should avoid building parallel custom opt-out fields because they break the standard suppression logic.
- You should run a test campaign to confirm that Salesforce consistently excludes opted-out recipients.
2. How Marketing Cloud and Account Engagement use the opt-out field
Marketing Cloud and Account Engagement both sync with the Salesforce email opt out field, but each platform handles the data slightly differently.
Marketing Cloud:
- Marketing Cloud maps the Salesforce email opt out field to subscriber status through Marketing Cloud Connect, which ensures consistent suppression across both systems.
- Marketing Cloud updates Salesforce when a subscriber clicks an unsubscribe link, which keeps the CRM record accurate.
- Marketing Cloud requires the connector user to have field-level access to Email Opt Out for the sync to process correctly.
Account Engagement:
- Account Engagement maps its Opted Out field to the Salesforce Email Opt Out field so both systems reflect a person’s unsubscribe choice.
- Account Engagement allows you to configure field-sync behavior, which determines whether Salesforce or Account Engagement controls the final value.
- Account Engagement updates the Salesforce field when someone unsubscribes from an email or preference center managed by the platform.
Integration best practices:
- You should verify that connector profiles in both platforms can view and edit the Email Opt Out field.
- You should review field mappings to ensure both systems rely on the same source of truth for unsubscribe data.
- You should test a full unsubscribe path and confirm that Salesforce updates the Email Opt Out field immediately and accurately.
With the right configuration and integrations, the Salesforce email opt out field becomes the foundation for accurate suppression logic across your entire email ecosystem.
How to automate email opt-out updates in Salesforce
You can automate Salesforce email opt out updates with two main building blocks. You can use Flow Builder to update the Email Opt Out field when an unsubscribe action occurs, and you can use unsubscribe links in your email templates that trigger those flows or related services.
This reduces manual work, keeps consent data accurate, and supports the kind of clear preference management that firms like Tealium highlight as key to customer trust.
1. Build an opt-out flow with Flow Builder
Flow Builder lets you update the Email Opt Out field without code. You create a flow that listens for an unsubscribe signal, then sets the field to true on the related Lead or Contact.
To build a record-triggered opt-out flow:
- Go to Setup, select Flows, then click New Flow.
- Choose Record-triggered flow, then set the object to Contact or Lead.
- Configure the trigger to run when a record is created or updated.
- Add entry conditions that match your unsubscribe logic, such as “Unsubscribe source field is not blank” or “Custom unsubscribe flag equals true.”
- Add an Update records element that sets Email Opt Out to true on the same record.
- Optionally add a Create records or Action element to log an activity, notify marketing, or write an audit note.
- Save the flow, activate it, then test it with a sample unsubscribe event.
Common real-world triggers for this flow include:
- A web-to-lead or web-to-contact form that collects unsubscribe requests.
- A connected preference-center page that writes to a specific field.
- A campaign-response field that signals “unsubscribe” from a marketing email.
You can also use a simple screen flow for internal teams. In that case, you create a screen with a checkbox for “Customer requested email opt out” and a text field for “Reason.” When a user submits the screen from a quick action, the flow sets Email Opt Out to true and records the reason for compliance review.
2. Create unsubscribe links in email templates that update the field
Unsubscribe links connect the person’s action back to Salesforce. Your goal is to give a clear one-click path that updates the Email Opt Out field quickly and reliably.
You can handle this in two main ways.
1. Use a hosted unsubscribe or preference page
- You link from your Salesforce, MassMailer, or Marketing Cloud email template to an unsubscribe or preference page.
- The page captures the person’s choice and submits it to Salesforce through a form, API call, or connected app.
- A record-triggered flow in Salesforce receives that data and sets Email Opt Out to true on the Lead or Contact.
This pattern works well with tools that already provide a hosted unsubscribe page, because you only need to complete the field mapping and the flow.
2. Use a mailto link with an email service
- You add a mailto link in the email template that sends a message to a special unsubscribe address.
- You configure a Salesforce email service and an Apex email handler to receive that message.
- The handler reads the ContactId or LeadId in the body, then updates Email Opt Out to true on the matching record.
For example, a basic mailto link can look like this:
mailto:unsubscribe@yourdomain.salesforce.com?subject=Unsubscribe&body=ContactId={!Contact.Id}
Your development team can then wire the email service and handler so that this message leads to a field update and an audit entry.
User-experience best practices for unsubscribe links:
- You should place the unsubscribe link in a clear, consistent location in every marketing email.
- You should send the person to a simple page that confirms the change without requiring a login.
- You should process the update quickly so the Salesforce email opt out status reflects their choice before the next send.
When your flows and unsubscribe links work together, you create a smooth, low-friction process that keeps the Email Opt Out field accurate without constant manual updates.
How to report on email opt-out status in Salesforce
To report on Salesforce email opt out status, you need two things. You need clear reports that show who has opted out, and you need simple dashboards that show how opt-outs change over time. This gives you a quick view of database health, campaign performance, and compliance risk.
1. Build opt-out reports and dashboards
The fastest way to see who has opted out in Salesforce is to create a simple Lead or Contact report that filters on the Email Opt Out field.
To build a basic opt-out report:
- Go to Reports, then click New report.
- Select either Contacts and Accounts or Leads as the report type.
- Add a filter where Email Opt Out equals true.
- Add key columns, such as Name, Email, Owner, Last Modified Date, and Created Date.
- Add optional fields, such as Opt-out reason, Last campaign, and Last email activity, if you track them.
- Save and run the report, then share it with marketing, sales, and compliance stakeholders.
This report gives you a live list of everyone who should not receive marketing emails.
You can turn that report into a dashboard that leadership can read in seconds.
Useful dashboard components include:
- A total count of opted-out Leads and Contacts so you can see scale at a glance.
- A percentage of opted-out records compared to your total mailable database size.
- A monthly trend chart that shows new opt-outs over time, which helps you spot spikes.
Email benchmarking from providers such as Litmus shows that unsubscribe rates above 1 to 2 percent can signal list or content issues, so monitoring these metrics in Salesforce helps you act before problems grow.
2. Track email opt-out trends and compliance
Once you can see who opted out, the next step is to track how opt-outs change, and how well your process respects those choices across tools.
You can start with a small set of practical metrics.
Core trend and performance metrics:
- The number of new Salesforce email opt out updates per month, so you can see if certain periods or campaigns drive more unsubscribes.
- The opt-out count per campaign so you can identify messages that trigger higher-than-normal unsubscribe volume.
- The opt-out rate per campaign, which you can calculate by dividing opt-outs by total sends, so you can compare performance across campaigns.
These metrics help you refine targeting, adjust frequency, and improve content. Gartner and other research firms point out that organizations that treat consent and preference data as a strategic input often achieve better engagement and lower complaint rates, which supports both deliverability and growth.
You can also use a simple compliance checklist inside Salesforce as part of your regular reviews.
Practical compliance checklist:
- You should confirm that all records with Email Opt Out selected are excluded from marketing lists and journeys.
- You should verify that external email tools are syncing unsubscribe events back to Salesforce correctly.
- You should review a sample of recent campaigns to ensure no opted-out records appear in the final send lists.
- You should track opt-out field changes, either with field history tracking or a dedicated audit object, so you can answer questions about who changed what and when.
When you report on opt-outs in a structured way, the Salesforce email opt out field becomes more than a checkbox. It becomes a source of actionable insights for deliverability, audience strategy, and compliance.
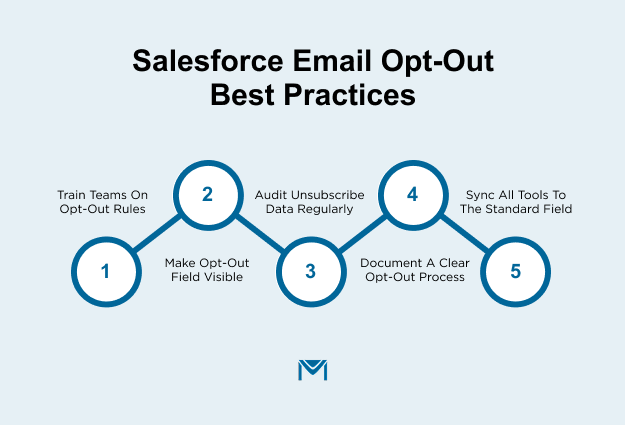
Best practices for managing email opt-out in Salesforce
Strong results from the Salesforce email opt out field come from more than configuration. You need clear habits, shared understanding, and consistent sync across every tool that sends email. These best practices help your team treat the field as a trusted, system-wide signal rather than just another checkbox.
1. Improve data hygiene and team adoption
Your opt-out process is only as strong as the way people use it every day. I recommend turning the Salesforce email opt out field into a visible, well-understood part of your workflow.
Practical steps:
- You should train sales, marketing, and support teams on what the Salesforce email opt out field does, what it does not do, and when they must update it.
- You should make the field easy to see on Lead and Contact layouts, and include it in the core reports your teams use.
- You should run regular audits that compare recent unsubscribe requests, complaint tickets, and form submissions against the Email Opt Out status.
- You should document a simple process that explains how to handle opt-in requests, how to manage manual overrides, and how you record reasons in notes or audit logs.
- You should include the field in onboarding materials and refreshers, so new team members do not invent their own way of tracking opt-outs.
When everyone understands the field and sees it during daily work, your opt-out data stays clean and reliable.
2. Ensure opt-out sync across integrated tools
If you use tools such as Account Engagement, Marketing Cloud, MassMailer, or other email platforms, you need a shared view of unsubscribe status. The Salesforce email opt out field should sit at the center of that view.
Integration checklist:
- You should confirm that every connected email or marketing tool can read and, when appropriate, update the Salesforce email opt out field.
- You should avoid creating duplicate opt-out fields for the same purpose, and reserve custom fields only for clearly separate channels or regions.
- You should review field mappings so each system knows exactly which Salesforce field represents email opt out.
- You should define sync rules that cover frequency, direction, and conflict resolution, so you know which system wins if values differ.
- You should test end-to-end unsubscribe flows regularly and verify that a single action updates the Salesforce record and the external tool in the same way.
When you combine strong team adoption with consistent integration, the Salesforce email opt out field becomes a dependable control point for every marketing email you send.
How MassMailer supports Salesforce email opt-out workflows
MassMailer uses the Salesforce email opt out field as a first-class signal, so you do not need to juggle separate suppression lists or custom flags. When the Email Opt Out checkbox is selected on a Lead or Contact, MassMailer treats that record as opted out and automatically excludes it from every marketing send that runs through the app.
Here is how MassMailer helps you keep opt-out workflows clean and reliable:
- MassMailer reads the standard Salesforce email opt out field and removes opted-out records from campaigns automatically.
- MassMailer syncs changes in near real time, so new unsubscribes, field updates, and form submissions reflect in your send lists quickly.
- MassMailer provides built-in unsubscribe and preference links that you can drop into templates, and those actions update the matching Salesforce records.
- MassMailer works inside native Salesforce objects, so sales and marketing see the same communication-preference picture on the Lead or Contact record.
If you use Salesforce and want to simplify email opt-out compliance and automation, MassMailer integrates seamlessly and keeps the Email Opt Out field at the center of your process.
For a deeper look, you can pair this guide with a MassMailer article on Salesforce email deliverability.
Conclusion
The Salesforce email opt out field gives you a simple, reliable way to respect customer preferences, protect deliverability, and keep every system aligned. When you configure it correctly, automate updates, track trends, and keep integrations clean, you build a process that supports growth and compliance at the same time.
If you want a smoother, more automated workflow inside Salesforce, MassMailer can help you handle suppression, unsubscribe links, and real-time sync with far less effort.
If you’re ready to strengthen your email governance process and improve how your team manages communication preferences, you can explore MassMailer or reach out to see how it fits your Salesforce setup.
Frequently Asked Questions
1. How do I prevent Salesforce users from accidentally emailing opted-out contacts?
2. What is the difference between Salesforce’s Email Opt Out field and Do Not Email?
3. Can I track who changed the Email Opt Out field in Salesforce?
4. How do I update the opt-out field from an external web form?
5. Can Salesforce block mass emails to opted-out records across all business units or regions?
6. What happens if a duplicate record has a different opt-out status?
Start Your Free Trial Today
Experience MassMailer the easiest way to send personalized emails from Salesforce.
Related Blogs
Salesforce email sync: how it works and how to fix common issues
MassMailer Resources
")


MassMailer Glossary
About the Author

Siva Devaki 
Siva Devaki is the founder of MassMailer Inc., a tool that helps Salesforce users optimize email marketing. A passionate advocate for email marketing, Siva writes and hosts podcasts on the topic, sharing insights to help businesses drive revenue and enhance customer engagement through Salesforce email automation and tracking.