Table of Contents
In the current data-driven business landscape, effectively managing and leveraging your contact information is essential for thriving email marketing campaigns. Salesforce, in conjunction with MassMailer, provides an impressive solution for importing data and launching targeted email campaigns.

Salesforce stands out as a top-tier customer relationship management (CRM) platform, empowering businesses to effectively handle their customer data, streamline sales processes, and enhance marketing initiatives.
MassMailer is a native Salesforce application crafted to elevate your email marketing experience. It enables you to send mass emails without the usual restrictions that Salesforce often imposes. Integrating MassMailer with Salesforce allows you to effortlessly manage your contacts and launch extensive email campaigns straight from your CRM.
This guide will walk you through the process of importing data into Salesforce and leveraging MassMailer for your email marketing needs.
Preparing Your Data for Import

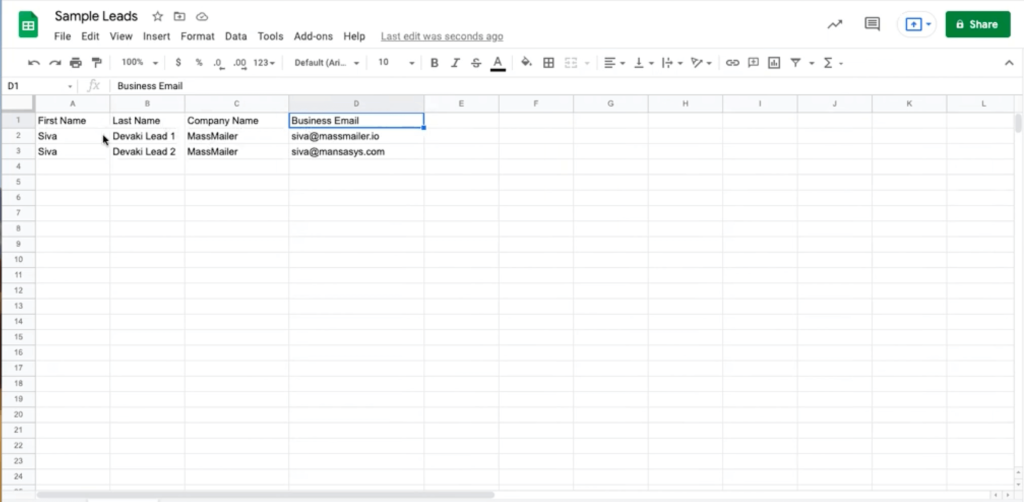
Make sure data is clean, orderly, and correctly formatted before loading into Salesforce. Your data, usually in CSV (Comma-Separated Values) format, is exactly fit for Salesforce’s import tools. However, verify that your CSV file contains columns for First Name, Last Name, Company, Email, and any other crucial information.
When you import data, ensuring your column headers match Salesforce’s field names will simplify the mapping process.
Importing Data Using Salesforce Data Import Wizard

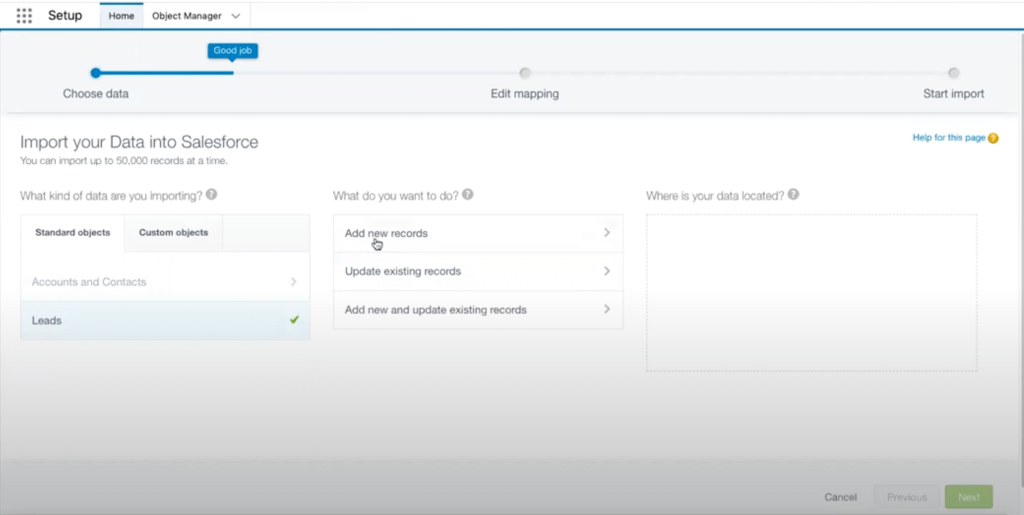
Salesforce offers a native tool called the Data Import Wizard, which makes it simple to import data into your CRM.
This tool allows you to import up to 50,000 records at a time and is compatible with a range of standard Salesforce objects, such as Leads, Contacts, Accounts, and Campaign Members.
Follow these steps to utilize the Data Import Wizard:
Step 1: Log in to your Salesforce account. Click on the Setup icon (gear icon) in the top-right corner. In the Quick Find box, type “Data Import Wizard” and select it from the results.
Step 2: Click on the Launch Wizard button. Choose the type of data you want to import (e.g., Leads, Contacts, Accounts, or Campaign Members).
Step 3: Choose to add new records, update existing records, or do both—add new records and update existing records.
Step 4: Select “Choose CSV” and pick your ready CSV file.
Step 5: The wizard will try to automatically align the columns in your CSV file with the corresponding Salesforce fields. Please review these mappings and make any necessary adjustments.
Step 6: Once you’ve confirmed the mappings, click on Start Import to begin the process.
Step 7: Check out the status of your import by clicking on View All Data Import Jobs.
Importing Data Using Salesforce Data Loader
For more complex data import needs or when dealing with larger datasets, Salesforce offers the Data Loader tool.
This client application allows you to insert, update, delete, or export Salesforce records. To use the Data Loader:
Step 1: Log in to Salesforce and navigate to the Setup area. In the Quick Find box, type “Data Loader” and select it. Follow the instructions to download and install the Data Loader application.
Step 2: Ensure your CSV file is formatted correctly, with column headers matching Salesforce field names.
Step 3: Open the Data Loader application and log in with your Salesforce credentials.
Step 4: Choose the operation you want to perform, such as Insert, Update, or Upsert.
Step 5: Select the Salesforce object you want to import data into (e.g., Lead, Contact).
Step 6: Click on Browse to select your CSV file.
Step 7: Map the columns in your CSV file to the corresponding Salesforce fields.
Step 8: Click on Finish to start the import process.
Guide on How to import data into Salesforce for emailing through MassMailer
Importing Data Using Third-Party Tools
Apart from Salesforce’s own tools, there are other applications available to help with data import tasks.
Particularly in difficult data transfer situations, tools such as Data Loader.io and Jitterbit Data Loader provide easy-to-use interfaces and may be useful additional capabilities.
- Data Loader.io: Designed as a cloud-based tool, Data Loader.io lets you import, export, and remove Salesforce data. Its free tier has restrictions on operations and record count.
- Jitterbit Data Loader: Designed as a free data migration tool, Jitterbit Data Loader lets you automatically import and export data between flat files, databases, and Salesforce.
Nonetheless, when choosing a third-party product, consider elements such as cost, usability, and particular features that are appropriate for your company.
Managing Imported Data in Salesforce

Ensuring the success of your email marketing depends mostly on establishing efficient data management techniques following data importation.
Salesforce allows you to maximize your imported data as follows:
- Organize with List Views: Create list views for simple access to your imported records. To segment and target particular groups for your email campaigns, set up a list view depending on particular criteria, such as the created date or custom data.
- Use Campaigns to Segment Audiences: Salesforce campaigns let you more precisely control your audience segments. As campaign members, you may add contacts and leads, which facilitates tracking of their MassMailer email answers. This kind of data segmenting guarantees that you are delivering the correct material to the correct audience.
- Custom Fields for Better Filtering: Think about building custom fields if you require another degree of organization. Including a “Source” feature that shows how the data was imported, for instance, helps users find and filter records more easily for next usage.
- Automate Data Cleanup: Regularly clean up your imported data by removing duplicates, updating outdated information, and ensuring accuracy. Tools like Salesforce’s Duplicate Management feature can help prevent duplicate records.
Sending Mass Emails with MassMailer

Now that you have your data in Salesforce, you’re prepared to create your email campaigns in MassMailer!
Check out this step-by-step guide:
Step 1: Choose Your Audience
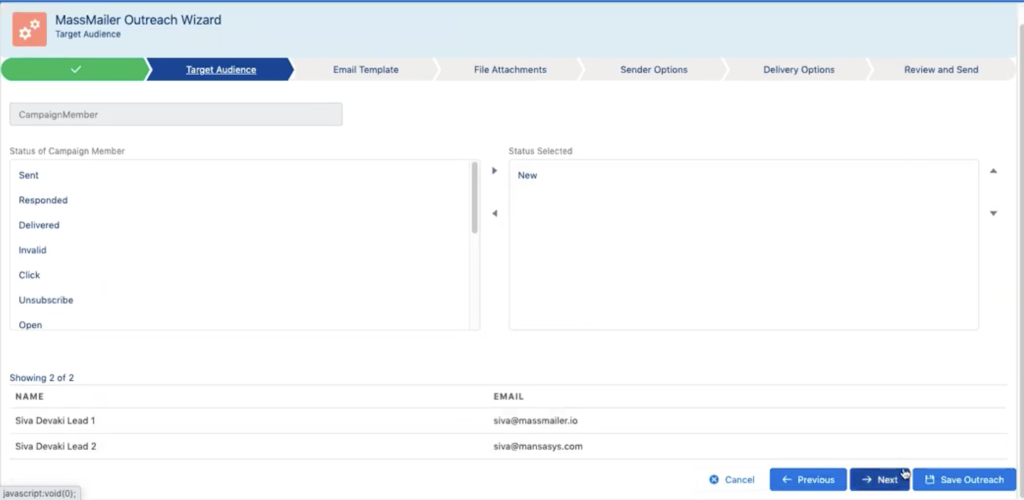
Head over to the list view or campaign, where you can find the contacts or leads you imported. Make sure your audience list is precise and organized based on your campaign objectives.
Step 2: Launch MassMailer and Select the Outreach Wizard
Navigate to MassMailer in Salesforce and choose the Outreach Wizard. Let the wizard lead you through the exciting journey of setting up and sending your email campaign!
Step 3: Select an Email Template
Pick an email template that perfectly matches your campaign goals. MassMailer provides a range of templates, or you have the option to design your own.
Step 4: Set Up Your Sending Options
MassMailer offers features to customize and schedule your emails, monitor engagement metrics, and guarantee deliverability. Select options such as scheduling, unsubscribe preferences, and tracking metrics to enhance your email campaign.
Step 5: Dispatch the Email
After setting everything up, go ahead and send the email to your chosen audience. MassMailer will take care of everything else, including monitoring opens, clicks, and various engagement metrics.
Best Practices for Importing and Managing Data in Salesforce
Implementing best practices for importing and managing data in Salesforce ensures efficiency and accuracy.
Here are some recommended tips:
Tip 1: Before importing, review and tidy your data in the CSV file to help prevent mistakes and preserve data quality.
Tip 2: Verify that your field names in the CSV file match Salesforce’s field names for flawless mapping using Consistent Field Mapping. This can save time during the import process and reduce the need for manual adjustments.
Tip 3: Plan frequent data audits of your Salesforce records. Eliminating duplication, correcting obsolete material, and guaranteeing accuracy will make your email campaigns more successful.
Tip 4: Limit data import rights to trusted users or the administrative team to avoid unintentional mistakes since data imports could affect the data quality of your CRM.
Tip 5: Create filters and list views based on criteria pertinent to your campaigns to enable you to access and handle data properly.
Conclusion
By efficiently managing MassMailer and importing data into Salesforce, you can simplify your email marketing initiatives and more easily reach your audience with customized, timely communications.
These easy steps will enable you to run coordinated, powerful campaigns straight from your CRM. Frequent data audits and email engagement metric analysis guarantee that your campaigns remain relevant and produce the greatest results.
Ready to streamline your email marketing process in Salesforce? MassMailer makes it simple to import data, manage campaigns, and track performance, all from within Salesforce.
Experience the power of MassMailer and see how it can transform your email campaigns. Start your free trial now and take the first step towards more efficient and effective email marketing in Salesforce!


 View Presentation