


Table of Contents
Introduction
“Why hasn’t the client replied yet?” your manager asks, looking right at you. You open Salesforce, check your sent emails, and there it is, the message you sent yesterday, perfectly worded and on time. But the client never got it. The email didn’t bounce. It just disappeared.
This happens more often than people realize. Emails sent from Salesforce sometimes land in spam or get filtered out before reaching the inbox. The reason usually isn’t your content; it’s that inbox providers can’t confirm if Salesforce is truly allowed to send on your behalf.
That’s where salesforce email authentication becomes essential. It tells Gmail, Outlook, and other mail services that Salesforce is verified to send messages for your domain. Without it, your emails look suspicious, even if they’re legitimate.
In this guide, you’ll learn what SPF, DKIM, and DMARC mean, how they work together, and how to set them up correctly in Salesforce. I’ll also share one simple way to keep everything authenticated so your messages stay trusted, secure, and seen by the people who matter most.
What Is Salesforce Email Authentication and Why It Matters
Salesforce email authentication is a way to verify that an email actually comes from the sender it claims to be. It uses records stored in your domain’s DNS settings to prove that your messages are real, not forged. In simple terms, it’s how Gmail, Outlook, and other inbox providers decide whether to trust your emails or push them into spam.
When you send emails through Salesforce, your messages come from Salesforce’s mail servers, but they carry your company’s domain in the “From” field. If inbox providers can’t confirm that Salesforce has permission to send on your behalf, they see that as a red flag. Messages often get filtered, quarantined, or rejected before your customers even see them.
Authentication solves this trust gap. It tells receiving mail servers that Salesforce is an approved sender for your domain. This process prevents attackers from spoofing your address, keeps your brand reputation safe, and improves the chances of your messages landing in the inbox every time.
How Inbox Providers Determine Email Trust and Deliverability
Inbox providers like Gmail, Outlook, and Yahoo don’t just look at what’s inside your message. They also check whether the sender is verified through SPF, DKIM, and DMARC. They evaluate your domain reputation, delivery consistency, and user engagement signals such as open and reply rates.
If your domain or IP has a poor track record, even an authenticated email might be filtered. Providers combine all this data to create a trust score that determines whether your email lands in the inbox or gets flagged as spam.
Risks of Sending Unauthenticated Emails from Salesforce
Without authentication, your Salesforce emails can easily fail SPF or DKIM checks, which often leads to filtering or rejection. Cybercriminals can exploit your domain to send phishing emails, damaging your credibility.
Your overall domain reputation can decline, making future campaigns less effective. Business-critical messages, invoices, updates, or customer notices might never reach the intended inbox. Over time, this lack of trust erodes brand reputation and customer confidence.
Understanding SPF, DKIM, and DMARC for Salesforce Email Authentication
SPF, DKIM, and DMARC are the three core email-authentication standards that determine whether your Salesforce emails are trusted or filtered.
Each one checks a different layer of sender identity and message integrity. When configured together, they form a secure framework that improves deliverability, protects your domain, and builds credibility with inbox providers.
1. SPF (Sender Policy Framework)
SPF tells receiving mail servers which systems are allowed to send emails for your domain. When a mailbox provider receives a message from Salesforce, it checks your domain’s SPF record stored in DNS. If Salesforce is listed there, the message passes; if not, it fails.
- Add include:_spf.salesforce.com to your existing SPF TXT record.
- Keep a single SPF record per domain to avoid evaluation errors.
- Limit the total number of “include” mechanisms to ten for compatibility.
- Use a soft-fail (~all) while testing, and switch to a hard-fail (-all) once verified.
- Validate your SPF record using tools such as MXToolbox before activating it in production.
SPF works like a security list; only approved servers can send on your behalf, keeping unverified senders out.
2. DKIM (DomainKeys Identified Mail)
DKIM adds a digital signature to every message you send so the recipient can confirm it hasn’t been altered. The signature is verified using a public key stored in your DNS.
- In Salesforce Setup, open DKIM Keys and select Create New Key.
- Choose a selector name and generate a 2048-bit key for better security.
- Publish the CNAME record in your DNS exactly as provided by Salesforce.
- Once DNS propagation completes, activate the key in Salesforce.
- Test by sending an email to Gmail or Outlook and checking for “dkim=pass” in message headers.
Organizations that maintain verified SPF, DKIM, and DMARC records consistently achieve higher inbox placement rates and significantly fewer rejections.
3. DMARC (Domain-based Message Authentication, Reporting and Conformance)
DMARC connects SPF and DKIM results and applies a policy for how receiving servers should handle failed messages. It also provides visibility into who is sending emails using your domain.
- Create a TXT record at dmarc.yourdomain.com with v=DMARC1; p=none; rua=mailto:reports@yourdomain.com.
- Start with p=none to monitor traffic safely before enforcing stricter rules.
- Move to p=quarantine, then p=reject once alignment is consistent.
- Review DMARC reports regularly to detect unauthorized senders or misaligned configurations.
- According to Deloitte’s 2024 Cybersecurity Outlook, implementing DMARC enforcement can reduce domain spoofing by more than 40 percent.
DMARC ensures that if someone tries to impersonate your domain, their emails are blocked or quarantined before reaching an inbox.
How SPF, DKIM, and DMARC Work Together in Salesforce
| Protocol | Primary Role | Key Action for Salesforce Users |
|---|---|---|
| SPF | Authorizes sending servers | Add include:_spf.salesforce.com to your DNS record |
| DKIM | Signs and verifies messages | Create and activate a DKIM key in Salesforce Setup |
| DMARC | Enforces policy and reports misuse | Publish a DMARC record and monitor reports regularly |
Together, these protocols confirm sender identity, protect message integrity, and help mailbox providers trust your Salesforce emails.
How Email Authentication Improves Salesforce Sender Reputation and Deliverability
Email authentication directly shapes how mailbox providers evaluate your Salesforce emails. When SPF, DKIM, and DMARC are properly aligned, they prove that your messages are legitimate, consistent, and secure. This verification signals reliability, a key factor that determines whether your emails reach the inbox or land in spam.
Your sender reputation works much like a credit score. The more consistently you send authenticated emails, the stronger your reputation becomes.
Salesforce’s steady rise in global revenue reflects how much businesses depend on it for customer communication and automation. In fact, Salesforce’s subscription and support revenue is projected to reach $35.78 billion by 2025, according to Cyntexa.
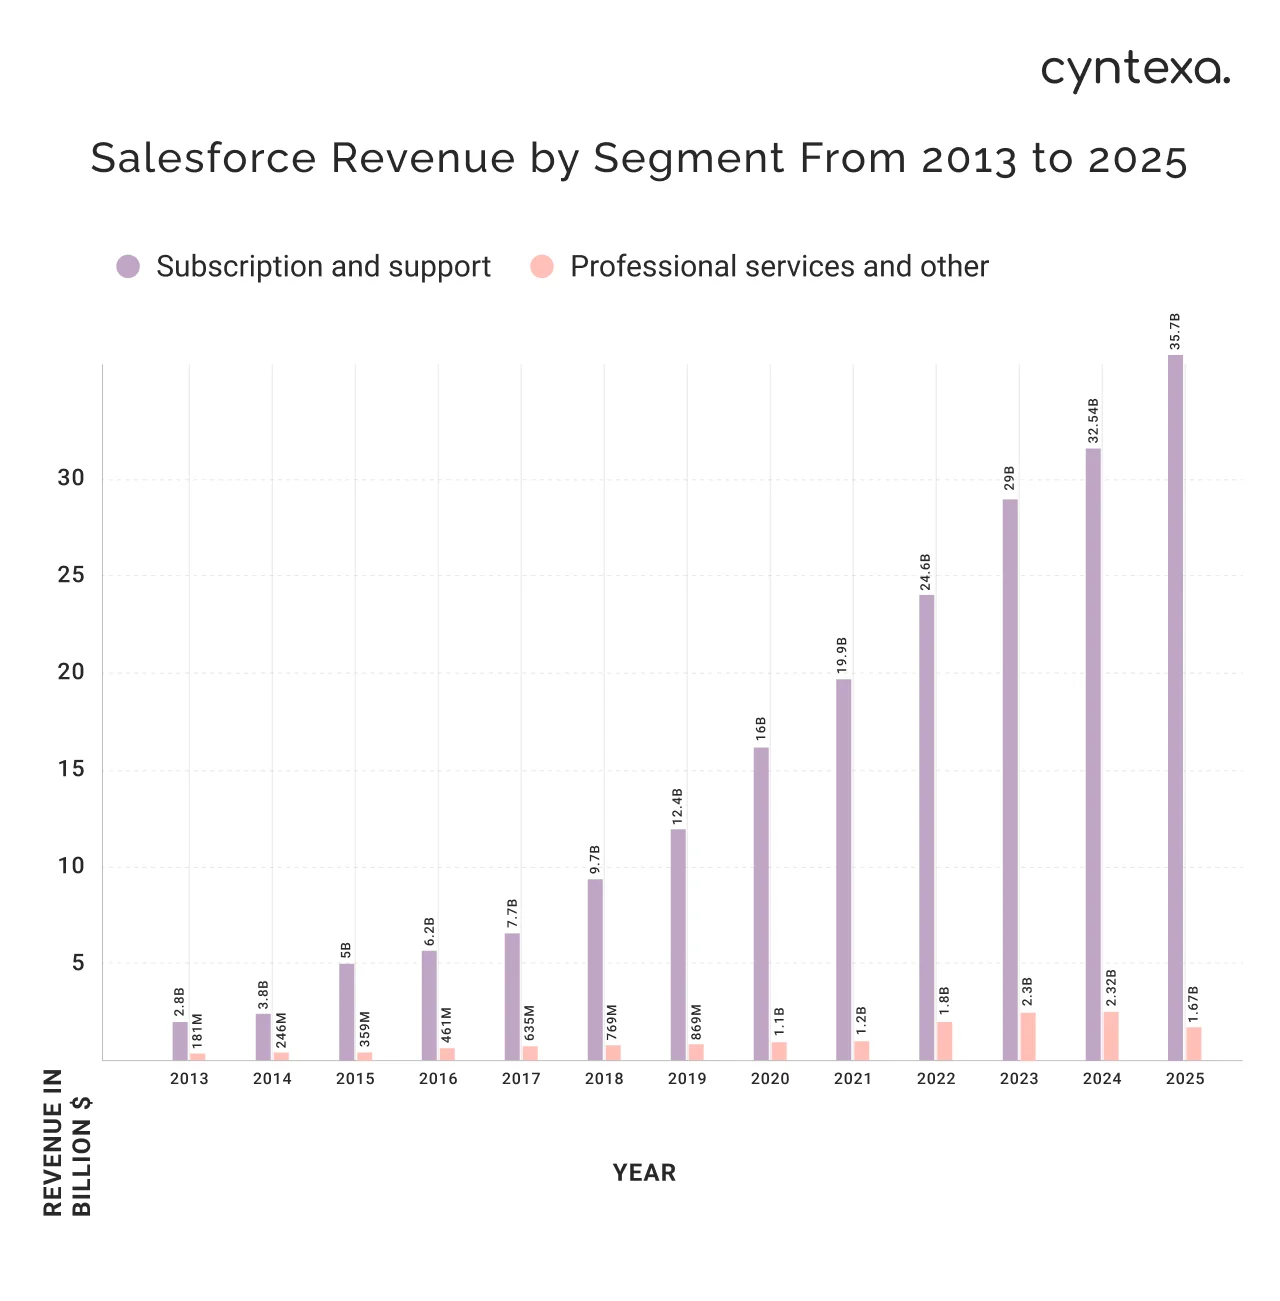
This growth highlights the scale at which Salesforce users are sending critical customer-facing messages every day.
Here’s how authentication influences sender reputation outcomes:
- SPF confirms Salesforce is recognized as a trusted sender for your domain.
- DKIM verifies message integrity throughout delivery.
- DMARC enforces both checks and prevents unauthorized use of your domain.
Together, they demonstrate transparency and reliability to mailbox providers. Over time, these consistent signals strengthen domain trust and visibility.
Key Deliverability Metrics Influenced by Authentication
Strong authentication improves the metrics that directly shape deliverability:
- Inbox placement rate: Authenticated domains are more likely to appear in the primary inbox.
- Bounce rate: Fewer rejections occur because servers recognize approved senders.
- Spam complaint rate: Recipients flag fewer messages when they come from verified sources.
- Domain reputation score: Verified domains rank higher in Gmail Postmaster Tools and similar systems.
- Engagement metrics: Authenticated messages see better open and reply rates due to increased trust.
Each of these signals reinforces the next, helping Salesforce users maintain a stable reputation and better inbox visibility over time.
Common Authentication Mistakes That Harm Salesforce Email Reputation
Even small missteps can undo the benefits of proper authentication. Frequent issues include:
- Publishing multiple SPF TXT records causes SPF evaluation errors.
- Failing to activate DKIM keys in Salesforce after adding them to DNS, causing signature failures.
- Enforcing a strict DMARC policy too early can block valid Salesforce messages.
- Using mismatched “From” domains and envelope senders breaks domain alignment.
- Sending high volumes from new or unauthenticated domains quickly lowers reputation scores.
Avoiding these pitfalls keeps your Salesforce emails authenticated, consistent, and trusted, the foundation of long-term deliverability success.
How to Set Up Email Authentication (SPF, DKIM, DMARC) in Salesforce
Configuring email authentication in Salesforce helps ensure your messages pass SPF, DKIM, and DMARC checks. Each record verifies that your emails are legitimate, authorized, and protected from tampering.
Setting them up correctly boosts inbox placement, strengthens domain reputation, and prevents unauthorized use of your brand.
The process involves three main steps:
- Add Salesforce to your SPF record.
- Generate and activate DKIM keys in Salesforce.
- Create and monitor a DMARC policy to align both.
Step 1: Configure SPF for Salesforce (Sender Policy Framework)
SPF defines which mail servers are allowed to send emails for your domain. When you send a message from Salesforce, mailbox providers check your domain’s SPF record to verify whether Salesforce is listed as an approved sender.
How to set up SPF for Salesforce:
- Sign in to your domain’s DNS management console (for example, GoDaddy, Cloudflare, or Google Domains).
- Look for your existing TXT records.
- If an SPF record already exists, add Salesforce to it: include:_spf.salesforce.com
If you’re creating a new SPF record, use: v=spf1 include:_spf.salesforce.com ~all - Make sure you have only one SPF record per domain. Multiple records cause SPF evaluation errors.
- Save the record and allow up to 48 hours for DNS propagation.
- Test your SPF record using a validation tool such as Google Admin Toolbox, CheckMX, or MXToolbox.
Pro tip: Once validated, change the soft fail (~all) to a hard fail (-all) to fully enforce authentication.
Step 2: Set Up DKIM in Salesforce (DomainKeys Identified Mail)
DKIM adds a digital signature to each email you send from Salesforce. The recipient’s server checks this signature against a public key stored in your DNS. If the signature matches, it confirms that the email hasn’t been altered and really comes from your domain.
How to configure DKIM in Salesforce:
- In Salesforce, go to Setup.
- Search for DKIM Keys in the Quick Find box.
- Select Create New Key.
- Enter a unique selector name (for example, sfdc1) and choose a 2048-bit key size for stronger encryption.
- Salesforce will generate two CNAME records — one for the key selector and one for the public key.
- Copy both CNAME records into your domain’s DNS configuration exactly as displayed.
- Wait for DNS propagation (typically within 24–48 hours).
- Return to Salesforce and click Activate next to the DKIM key once DNS verification passes.
- Test your setup by sending an email to Gmail or Outlook, then view the message headers. Look for “dkim=pass.”
Important: If the key is not activated after DNS setup, Salesforce emails will fail DKIM verification even though the record exists.
Step 3: Create and Monitor a DMARC Policy for Salesforce
DMARC (Domain-based Message Authentication, Reporting, and Conformance) works with SPF and DKIM to define how mail servers should handle messages that fail authentication. It also provides visibility into who is sending on your behalf.
To create a DMARC record:
- Go to your DNS management console.
- Add a TXT record with the following name and value:
Name: _dmarc.yourdomain.com
Value: v=DMARC1; p=none; rua=mailto:dmarc-reports@yourdomain.com - Start with p=none to collect reports without blocking mail.
- Review the aggregate DMARC reports (RUA) that you receive — they show which IPs are sending mail for your domain and whether they pass SPF and DKIM.
- Once alignment is consistent, gradually tighten your policy:
- p=quarantine to move unverified emails to spam.
- p=reject to block them completely.
- Continue monitoring to ensure legitimate Salesforce messages are not affected.
Pro tip: Use DMARC analysis tools like dmarcian or Postmark DMARC analyzer for visual reporting (if you use third-party tools, ensure they’re approved internally).
Step 4: Verify Domain Alignment for Salesforce Email
For authentication to work correctly, your “From” address must align with your authenticated domain. If your From address and envelope sender (return-path) use different domains, DMARC alignment can fail.
Checklist for proper alignment:
- Use a consistent From domain across Salesforce and your corporate domain.
- Confirm that your Salesforce organization is using verified sending domains.
- Avoid sending from personal or unverified subdomains.
- Update all templates and automations to use authenticated sender addresses.
Step 5: Test and Monitor Salesforce Email Deliverability
Once SPF, DKIM, and DMARC are live:
- Send test emails to multiple providers (Gmail, Outlook, Yahoo, etc.).
- Check message headers to ensure all three checks show “pass.”
- Review Gmail Postmaster Tools for spam rate, reputation, and feedback loop insights.
- Continue monitoring your DMARC reports weekly.
- Adjust your DNS and policy settings if you see repeated authentication failures.
Why this setup matters
When these steps are completed correctly, every email sent from Salesforce includes verifiable authentication signals. Mailbox providers can confirm your identity instantly, which leads to:
- Higher inbox placement.
- Stronger domain reputation.
- Fewer phishing attempts using your domain.
- Greater trust with customers and partners.
When implemented this way, Salesforce email authentication strengthens security and boosts deliverability performance at the same time.
How MassMailer Simplifies Secure and Authenticated Salesforce Email Sending
Setting up and maintaining SPF, DKIM, and DMARC records takes time, technical knowledge, and ongoing monitoring. For many Salesforce users, the hardest part isn’t creating the record; it’s keeping them properly aligned and up to date across different domains and systems.
That’s where MassMailer helps. It automates the most technical parts of Salesforce email authentication so your messages stay compliant, secure, and trusted at all times.
Key Features of MassMailer:
- Automated domain verification:
MassMailer automatically verifies your sending domains and checks SPF, DKIM, and DMARC alignment in real time. You’ll know immediately if a record is missing or misconfigured, no manual DNS lookups required. - Built-in deliverability insights:
The platform provides visibility into key authentication metrics such as SPF pass rates, DKIM validation status, and domain alignment trends. These insights help you identify issues early, before they affect deliverability. - Continuous monitoring and alerts:
Email authentication isn’t a one-time setup. DNS records change, policies evolve, and systems update. MassMailer monitors your configuration continuously and alerts you if something breaks, like an expired DKIM key or an invalid SPF include. - Pre-authenticated Salesforce integration:
MassMailer integrates directly with Salesforce, so every message sent through your account inherits proper authentication. You don’t have to manage external relay servers or configure custom connectors. - Deliverability optimization tools:
Beyond authentication, MassMailer provides sender reputation insights, engagement tracking, and bounce analytics, helping you understand how authentication and reputation work together to impact inbox placement.
For example, Opal Group, a global events company, improved its Salesforce email deliverability after implementing authenticated sending. With MassMailer, they could monitor domain reputation and authentication health from one dashboard. Their verified sending rate increased significantly, and bounce rates dropped after policy enforcement.
That kind of visibility and control is what makes authenticated sending sustainable. Instead of managing SPF and DKIM manually, Salesforce teams can focus on what matters: connecting with customers confidently, knowing their emails are trusted and verified.
MassMailer turns Salesforce email authentication from a technical burden into a managed, reliable process. It helps your domain stay secure, your reputation stay strong, and your messages consistently reach the inbox.
Best Practices for Ongoing Salesforce Email Deliverability and Authentication
Email authentication is not a one-time setup. Your DNS records, sending infrastructure, and business domains can change, and every change affects your sender reputation. Following these best practices keeps your Salesforce emails authenticated, secure, and consistently reaching the inbox.
- Keep SPF, DKIM, and DMARC records current: Review your DNS settings regularly, especially after adding new subdomains, marketing tools, or third-party integrations. Outdated or duplicate SPF entries, inactive DKIM keys, or incorrect DMARC policies can quickly cause alignment failures.
- Use consistent “From” domains: Stick to verified domains for all Salesforce communications. Consistency builds a reliable sender identity that mailbox providers recognize and trust over time.
- Monitor DMARC reports frequently: Schedule weekly or monthly reviews of DMARC aggregate (RUA) reports. Look for unauthorized senders, alignment gaps, or IP addresses sending on your behalf that shouldn’t be.
- Segment your audience and respect permissions: Send relevant, permission-based campaigns only to opted-in recipients. Targeted sending reduces complaints and improves engagement signals, both critical for maintaining a strong domain reputation.
- Warm up new domains and IP addresses gradually: If you add a new Salesforce domain or IP, increase sending volume slowly. Start with smaller batches, then scale up over several weeks. This gradual approach helps mailbox providers recognize your traffic as legitimate.
- Track engagement and bounce trends: Keep an eye on metrics like open rates, reply rates, and bounces. Sudden drops may indicate authentication failures or filtering issues that need quick attention.
- Revalidate after major Salesforce updates: Whenever you change sending configurations or migrate environments, recheck SPF, DKIM, and DMARC alignment to ensure everything still passes verification.
Strong deliverability depends on consistency. By maintaining authentication, monitoring results, and sending responsibly, Salesforce users can protect their domain reputation and ensure every email continues to reach its destination.
Conclusion
Email authentication might sound technical, but at its core, it’s about trust. Every time you send an email from Salesforce, you’re asking the recipient’s inbox to trust that message. When SPF, DKIM, and DMARC are set up and working together, that trust gets built automatically, and your emails make it to the inbox instead of the spam folder.
Keeping your authentication healthy is an ongoing process. Records change, tools get updated, and domains evolve. When you stay consistent and review your setup regularly, you protect both your deliverability and your brand’s credibility.
That’s where MassMailer makes a real difference. It helps Salesforce users manage authentication, monitor deliverability, and fix issues before they turn into bigger problems. Instead of juggling DNS updates and error logs, you can focus on what matters: reaching customers with confidence and keeping every message secure.
If you want to make sure every email from Salesforce is secure, verified, and trusted, try MassMailer. It’s built to simplify Salesforce email authentication so your messages reach your audience, every time.
Frequently Asked Questions
1. How do I check if my Salesforce emails are authenticated?
2. What happens if Salesforce SPF or DKIM isn’t set up correctly?
3. Does Salesforce support DMARC by default?
4. How often should I review my SPF, DKIM, and DMARC records?
5. Can I use Salesforce with multiple sending domains?
6. What’s the easiest way to manage Salesforce email authentication long-term?
Start Your Free Trial Today
Experience MassMailer the easiest way to send personalized emails from Salesforce.
Related Blogs
Salesforce Email Blacklist Removal for Gmail: Step-By-Step Fix
Salesforce Email Deliverability Trends Every Team Must Know
MassMailer Resources


About the Author

Siva Devaki 
Siva Devaki is the founder of MassMailer Inc., a tool that helps Salesforce users optimize email marketing. A passionate advocate for email marketing, Siva writes and hosts podcasts on the topic, sharing insights to help businesses drive revenue and enhance customer engagement through Salesforce email automation and tracking.