Table of Contents
Ensuring effective email verification is crucial for keeping your deliverability rates high and safeguarding your IP and domain reputation. When using Salesforce to manage your email lists and send campaigns, it’s essential to make sure your emails are valid.
MassMailer provides a seamless method to verify emails right inside Salesforce, streamlining the process and enhancing the effectiveness of your campaigns.
This article will discuss the importance of email verification and provide a step-by-step guide for using MassMailer to verify emails in Salesforce.
Why Email Verification Matters
Before we explore how MassMailer can assist you, it’s important to grasp the significance of email verification for your Salesforce data. Verifying emails guarantees that your messages connect with genuine recipients, offering several important advantages:
- Lower Bounce Rates: Sending emails to invalid or outdated addresses raises bounce rates, potentially harming your sender’s reputation.
- Safeguard Your Domain and IP Reputation: Elevated bounce rates, spam traps, and invalid emails can lead email service providers (ESPs) to mark your domain, diminishing your likelihood of landing emails in recipients’ inboxes.
- Boost Campaign Performance: Validating emails elevates the quality of your list, resulting in increased open rates, click-through rates, and overall interaction.
- Avoid Spam Traps: Sending emails to spam traps (fake email addresses designed to catch spammers) can seriously harm the sender’s reputation, resulting in blacklisting.
Consistent email verification reduces these risks, leading to more impactful and successful email marketing initiatives.
How MassMailer Simplifies Email Verification in Salesforce
MassMailer is a native Salesforce app crafted to streamline email marketing and enhance deliverability management. A standout feature is the built-in email verification tool, which enables you to validate emails at various levels—single emails, bulk lists, and even automatically during lead creation.
Key Features of MassMailer’s Email Verification
- Single and Bulk Verification: Easily verify individual email addresses or entire bulk lists straight from Salesforce objects such as Contacts, Leads, or custom objects.
- Automated Verification: Use Salesforce’s Process Builder or Flow to expedite email verification, ensuring prompt validation of new leads or contacts as soon as they enter your database.
- ZeroBounce Integration: MassMailer seamlessly integrates with ZeroBounce to boost validation efforts. It pinpoints spam traps and invalid email addresses, significantly lowering the chances of delivering to harmful or inactive addresses.
- Customizable Verification Options: Optimize your verification workflow by establishing regular email verifications and eliminating records that have already received confirmation.
- Real-Time Status Updates: MassMailer provides updates on email verification status at the object level, offering you clear insights into valid, invalid, or do-not-contact emails.
- Automated Suppression: MassMailer automatically removes invalid emails, spam traps, and do-not-email addresses, enhancing your list hygiene and boosting email deliverability.
Guide on How to Verify Emails in Salesforce Using MassMailer?
How to Verify Emails Using MassMailer
Now that you understand the importance of email verification let’s examine the steps for verifying emails in Salesforce with MassMailer.
Step 1:Verify Emails from the List View
Verifying emails directly from Salesforce’s List View is a breeze with MassMailer. Here’s how you do it:
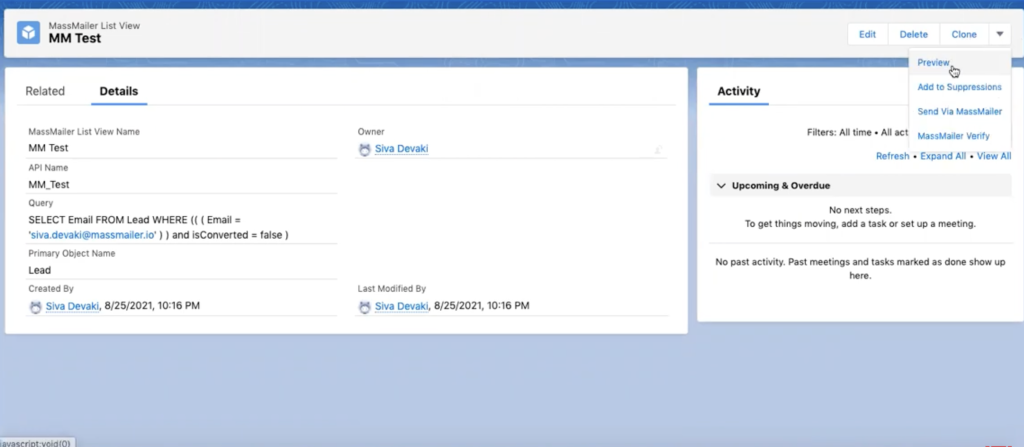
- Navigate to the List View: Launch Salesforce and navigate to the list view of the object (Contacts, Leads, or any custom object) where you want to check emails.
- Select the Records: Select the records you want to verify. You can choose to include all records in the view or just a select few, based on what you need.
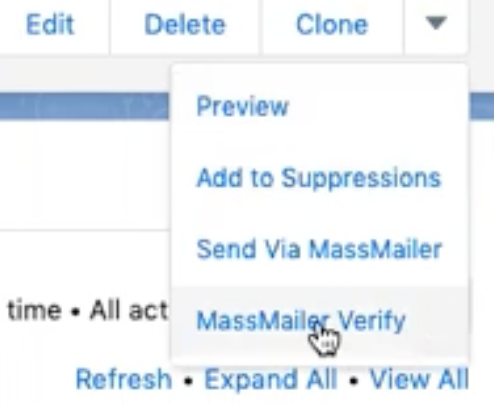
3. Click MassMailer Verify: In the MassMailer app, click on the “MassMailer Verify” button.
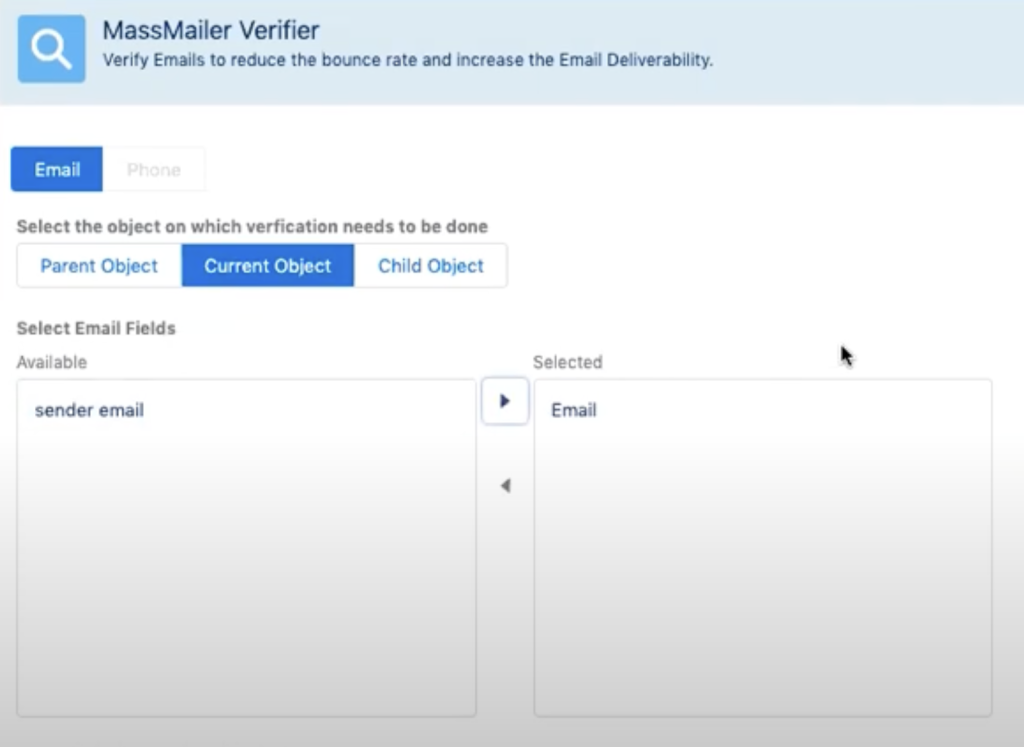
4. Select the Email Field: Select the email field you wish to validate (for example, primary email).
5. Set Verification Parameters: Use the date filter to exclude emails that have already undergone verification within a specified timeframe, focusing on new or unverified emails.
6. Submit: Click “Submit” to begin the email verification process. MassMailer will efficiently validate all selected emails in bulk.
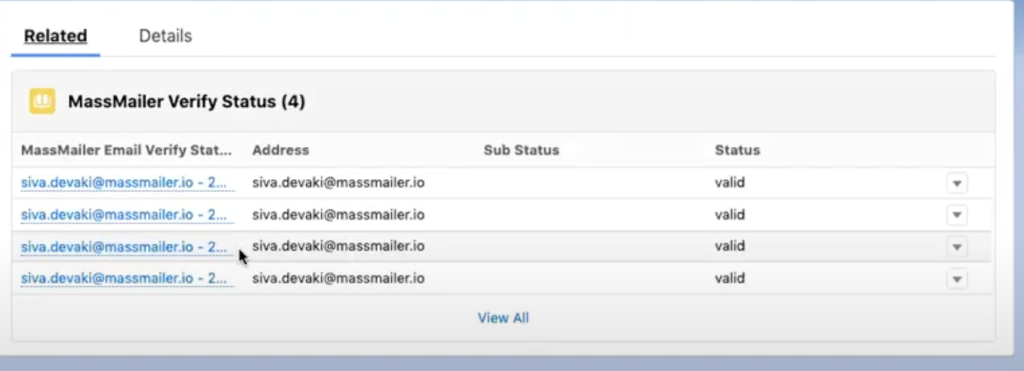
5. View the Results: After the job is done, you’ll have a clear view of which emails are valid, invalid, or need suppression (like spam traps or do-not-email addresses).
Step 2: Verify Emails from Campaigns
MassMailer allows you to verify email addresses in Salesforce campaigns, ensuring that your messages only go to valid recipients:
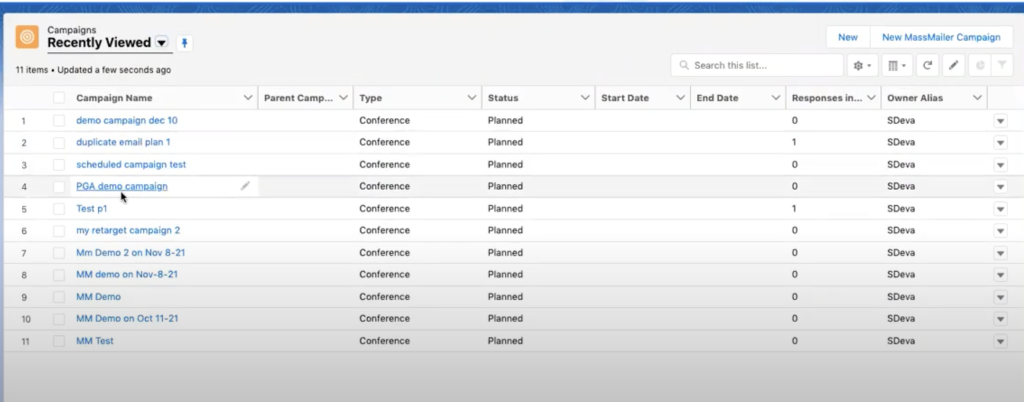
1. Open the Campaign: In Salesforce, head over to the campaign you want to verify.
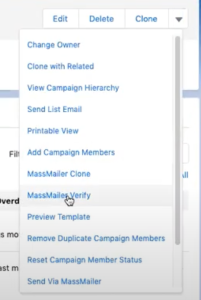
2 . Select MassMailer Verify: Click the “MassMailer Verify” button in the MassMailer app.
Check the Results: MassMailer will refresh the campaign members’ records to reflect their verification status, indicating which emails are valid or invalid.
Step 3: Automae Email Verification for New Leads
Salesforce shines with its automation capabilities, and MassMailer takes full advantage of this by offering automatic email verification:
- Set Up a Salesforce Flow or Process Builder: Use Salesforce’s automation tools to create a process that kicks in when a new lead comes in.
- Invoke MassMailer’s Apex Action: MassMailer offers a unique Apex action that you can seamlessly incorporate into your process or flow. This action automatically initiates email verification as soon as the lead enters your system.
- Monitor the Verification Status: As soon as a new lead is created, MassMailer will seamlessly verify the email and refresh the status on the lead record.
Understanding Email Verification Statuses in MassMailer
MassMailer provides detailed email verification results, which are saved directly in Salesforce. These results include:
- Valid: The email address is safe for your campaigns.
- Invalid: The email is no longer valid, and MassMailer suppresses invalid emails from future campaigns.
- Catch-All: The email domain accepts all messages sent to it. This requires caution when sending, as it could increase bounce rates.
- Spam Trap: These are fake email addresses meant to identify spammers, and sending emails to them can harm your reputation.
- Do Not Email: Any email on your do-not-email list will be automatically suppressed during campaigns.
Best Practices for Email Verification with MassMailer
To get the most out of MassMailer’s email verification feature, consider the following best practices:
- Verify Regularly: It’s a great idea to verify your emails regularly, ideally every three months, to ensure your data stays clean and up-to-date.
- Leverage the ZeroBounce Integration: With ZeroBounce integration, MassMailer enhances your protection, identifying spam traps, harmful domains, and temporary emails before they can impact your reputation.
- Suppress Invalid Emails: Automatically suppress any emails identified as invalid, spam traps, or abuse. This guarantees that your campaigns reach only legitimate contacts.
- Use Automation: Streamline your email marketing efforts by automating the verification process for new leads or contacts.
- Monitor Your Domain and IP Reputation: Consistently review your email performance metrics, particularly following major campaigns, to ensure you uphold a strong sender reputation.
Conclusion
Checking your email lists is essential for keeping your Salesforce database clean and performing at its best. MassMailer makes this process effortless, enabling you to validate emails at the object level, within campaigns, or even automate it for new leads. Regularly verifying emails helps you lower bounce rates and uphold the sender’s reputation.
Ready to improve your email deliverability and ensure your Salesforce database is free of invalid emails? Sign up for a free trial of MassMailer today!
Request for a free demo to get started!


 View Presentation