Table of Contents
Salesforce is beyond doubt the most popular CRM on the market today. Each interaction within it, especially in the context of email communication, is a potential opportunity for communication.
That said, as powerful as the platform is, and acknowledging that fact that Salesforce does offer built-in email alerts, it does fall short in a few areas:
- It cannot track opens, clicks, or other engagement metrics.
- It has limited sender options and doesn’t support dynamically changing the sender, and is limited in terms of the customization it offers.
MassMailer fills in these capability gaps and offers everything from the ability to track minute interactions and automate alerts based on them to the flexibility of adding attachments to these alerts and everything in between – all while keeping everything native to your CRM.
This blog will walk you through how you can take advantage of these features and set up automated email alerts in Salesforce using MassMailer. So, let’s get started.
How MassMailer Works With Salesforce?
To avoid reinventing the wheel, MassMailer is built on Salesforce’s existing infrastructure. At its core is an Apex class (named “Email via MassMailer”) that can be invoked directly from Salesforce Process Builder, the Salesforce Flow Builder or the Cloud Flow Designer to send email alerts.
The following screenshot shows all of the parameters of the MassMailer Apex Class.

Whenever you invoke this class, certain mandatory parameters need to be set. These are as follows:
- Record ID: Identifies the record the email is associated with (e.g., Lead ID, Contact ID, Custom Object ID).
- Template ID: The unique Salesforce ID of the email template being used. (Steps on where to find this ID will be explained in the coming sections.)
- From Name & Address: This parameter specifies the sender’s name and email and can be entered manually or set dynamically.
- To Name & Address: This parameter defines the recipient’s name and email. These values can either be hardcoded or referenced from the Lead/Contact object.
Apart from the above, the apex class also consists of the following parameters that help exchange the customizability of the automated email functionality.
- Reply-To Address: A parameter that allows defining a different email address for replies.
- Additional To Addresses: In the event multiple recipients need to be configured.
- CC & BCC: Self-explanatory.
- Suppress Activity Logging: When enabled, it allows you to prevent email events from being logged in Salesforce.
- Suppress Google Analytics Tracking: Allows you to disable Google Analytics tracking.
- IP Pool Selection: If configured, allows selecting a specific IP for sending emails.
- File Ids: Allows you to send attachments by specifying their file IDs.
- Scheduled Date Time: Allows you to schedule emails to be triggered at a specific date and time.
- Target Campaign Member Status: Enables sending emails to specific campaign members based on their status.
MassMailer supports email alerts for both standard and custom objects, ensuring that no matter how your CRM is structured, you can configure notifications as needed. It also extends functionality to campaign objects that enables you to send mass emails to campaign members.
How To Set Up Automated Email Alerts In MassMailer?
Now that we’ve covered the basics of how MassMailer enhances Salesforce’s email functionality, we can now dive into how to set up customized automated alerts in Salesforce via MassMailer.
Step 1: Create An Email Template
- The automated alerts will require a template based on which the email alerts will be drafted and sent out. To do so, you first need to navigate to the “MassMailer Template Builder” and enter all the information in the fields highlighted below.
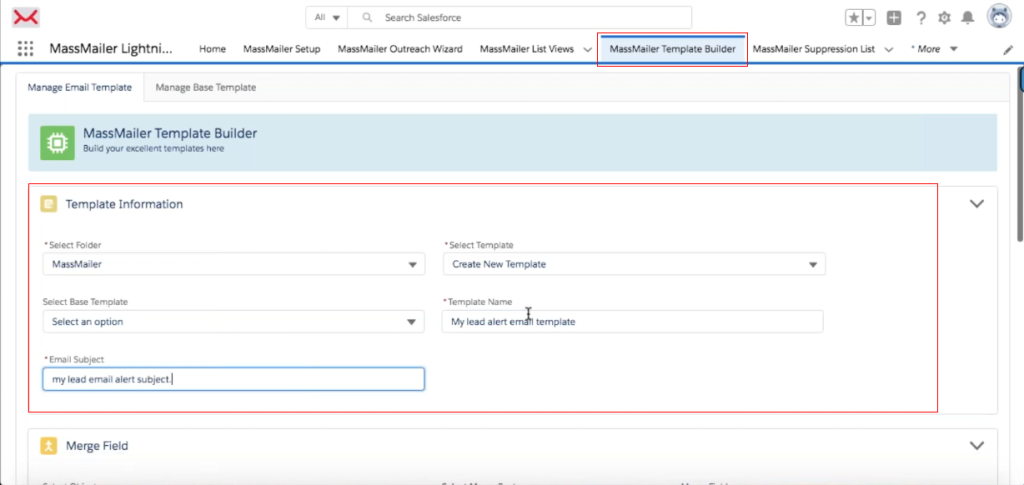
Note: For the “Select Template” field, you must choose the “Create New Template” option from the drop down list.
- Then, scroll down to the HTML editor section of this tab to create the content for the body of the email alerts that are to be sent out. You can use the drag and drop features to create one without any coding required, and can also use the “Merge Field” section to personalize elements within the email body dynamically.
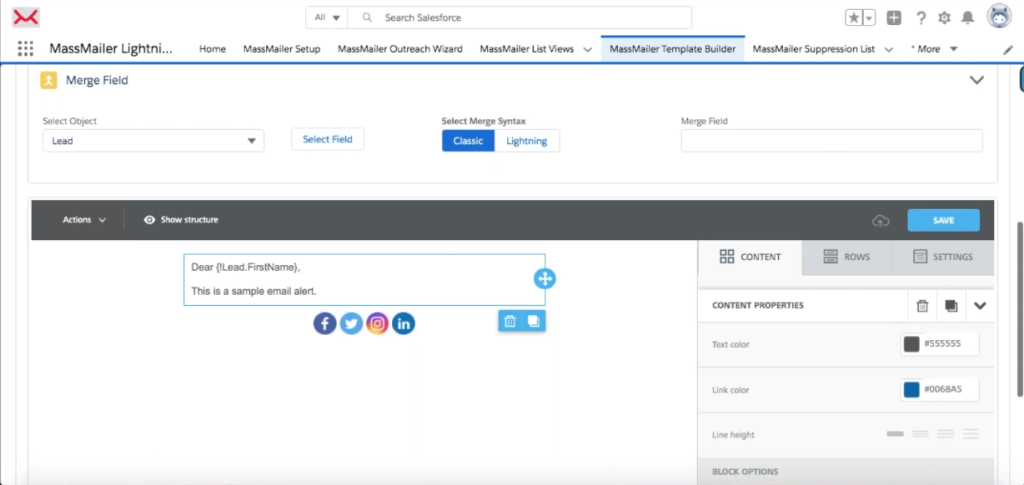
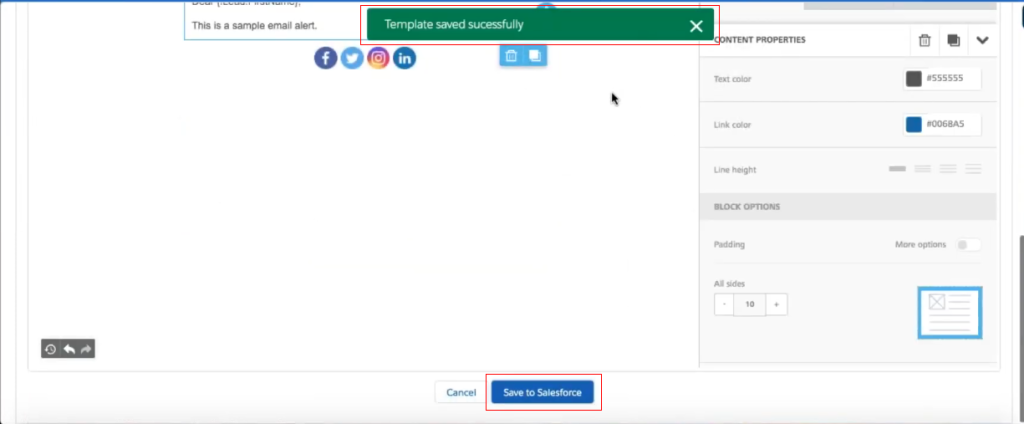
- In the above example, we have used the “Lead” object to personalize the greeting such that the first name of the lead is populated like so “Hello {!Lead.FirstName}”. Once you are satisfied with the design, click “Save to Salesforce” and you will get a confirmation for the same.
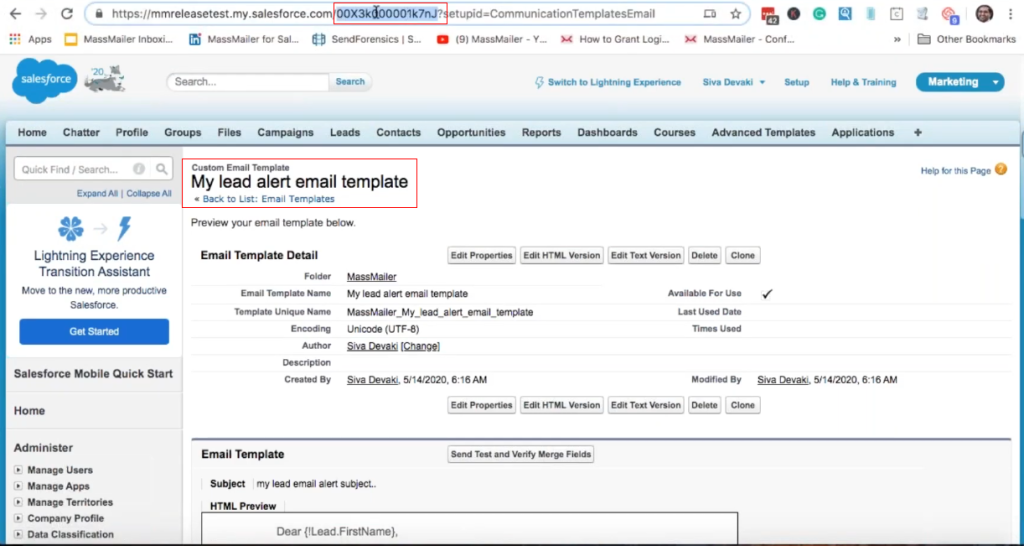
- Now, you need to retrieve the Template ID of the newly created template. For this step, if you’re using Salesforce Lightning, it’s best to switch to Salesforce Classic. Once done, go to Setup -> Email Templates and locate the template you just created, i.e, the Lead Alert Email Template.
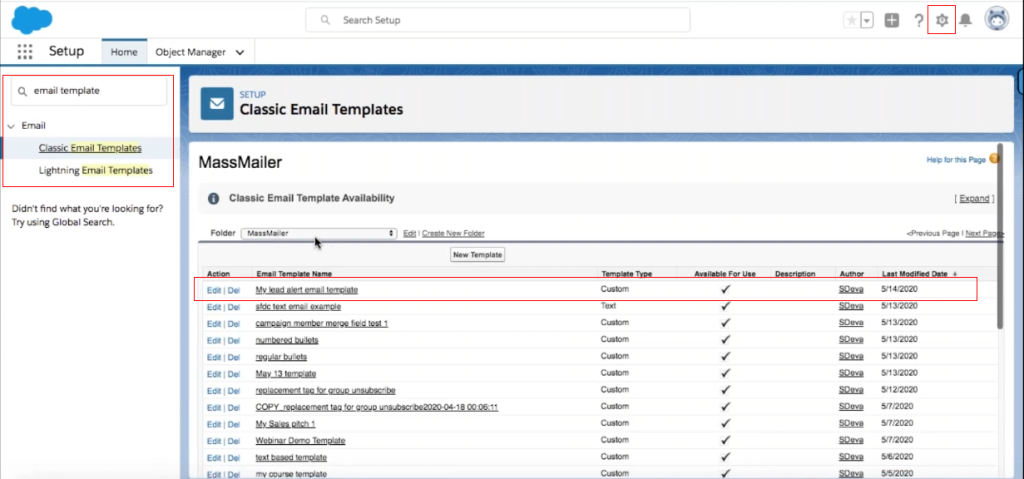
- Open it and copy the Template ID from the URL (highlighted in the screenshot below) as this will be used in the next step of the setup process.
Step 2: Configure Salesforce Process Builder To Automate Email Alerts
Now that the email template is ready, the next step is to configure Salesforce Process Builder to trigger automated email alerts when a specific event occurs. For the purpose of this blog, we will set up an email alert to be sent whenever a new lead is created with a specified lead source, i.e, the web.
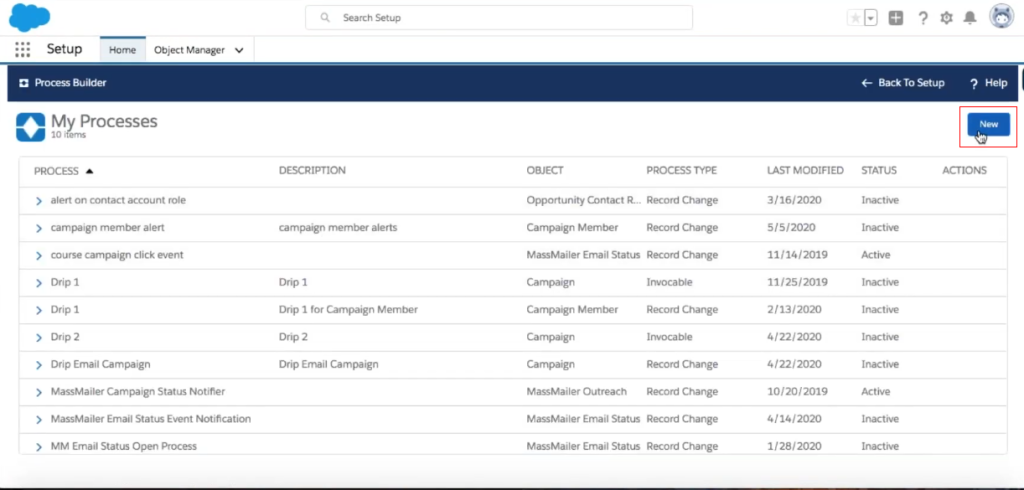
- To do so, within the same Setup tab, use the search box to locate the “Process Builder”.

- Once the Process builder loads, click “New” to create a new process.
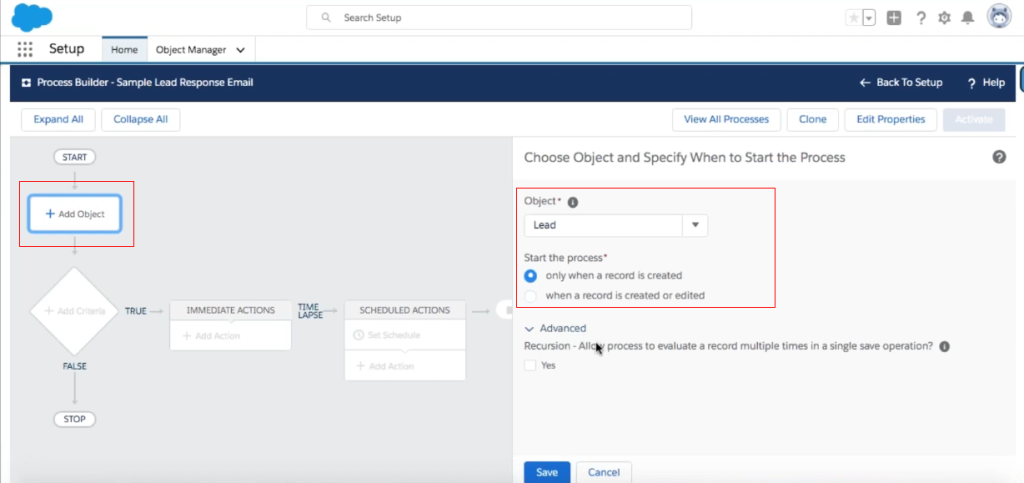
- Next, enter the values for the following fields:
- Process Name: Enter a relevant name. For this example, we will go with “Lead Response Email Alert”.
- Description: This field is optional, but adding a brief description will help in identifying what this process does in an instance.
Note: The API name is automatically generated based on the process name.
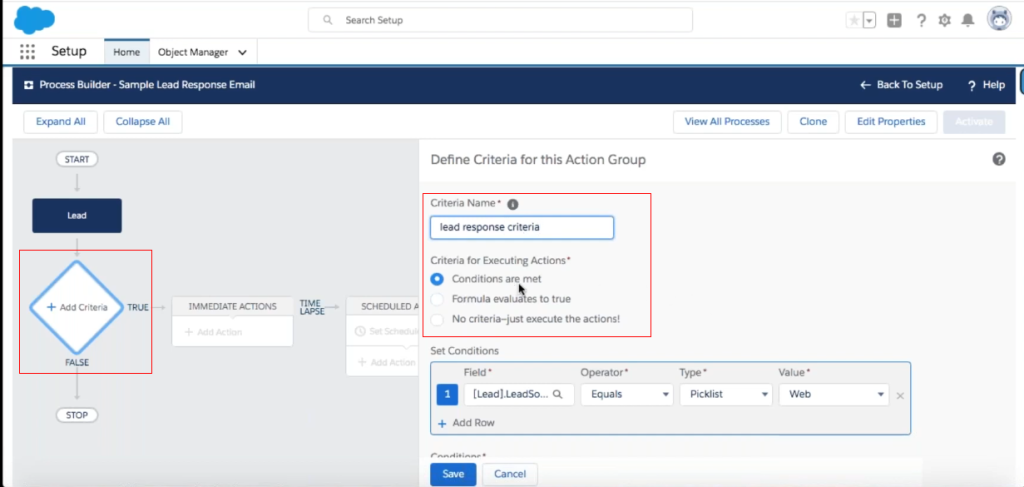
- Once done, you need to set the trigger criteria for the alert. To do so, click “Add Criteria”, and give it an apt name, and select the “Conditions are met” and add the necessary conditions. Here we are going with:
- Field: Lead Source
- Operator: Equals
- Value: Web
- Click “Save”.
- Then we proceed to defining the email alert action. Click “Add Action” and under the Action Type, select “Apex”. (Do not select “Email Alert” here as we are using MassMailer to send the alerts).
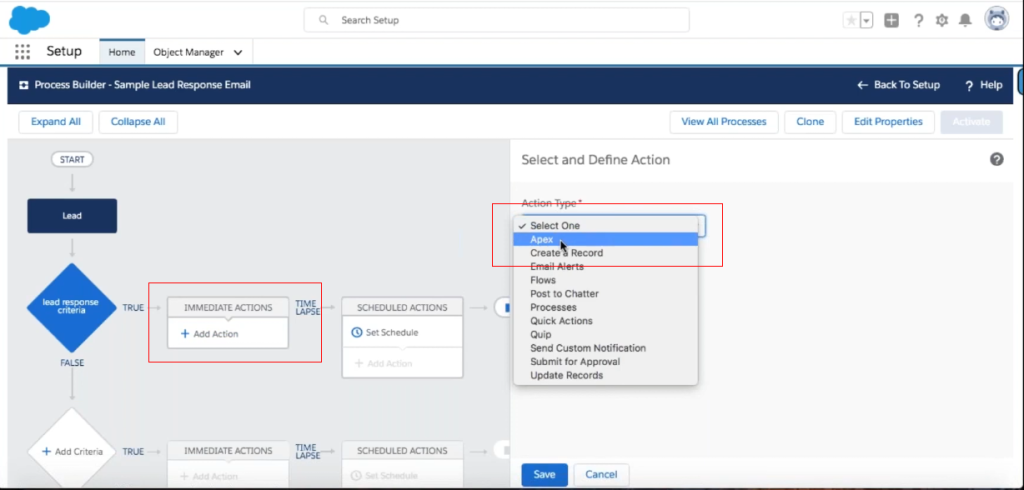
- Now, you need to define the parameters that will be used to send the email. Enter the following values into the required fields.
- Record ID: Select “Field Reference” → “Lead ID”.
- Template ID: Paste the Template ID copied from the previous step.
- From Name: Enter a name (e.g., “Sales Team”) or use a formula field.
- From Address: Enter the sender’s email address.
- To Name: Select “Field Reference” → “Lead First Name”.
- To Address: Select “Field Reference” → “Lead Email”.
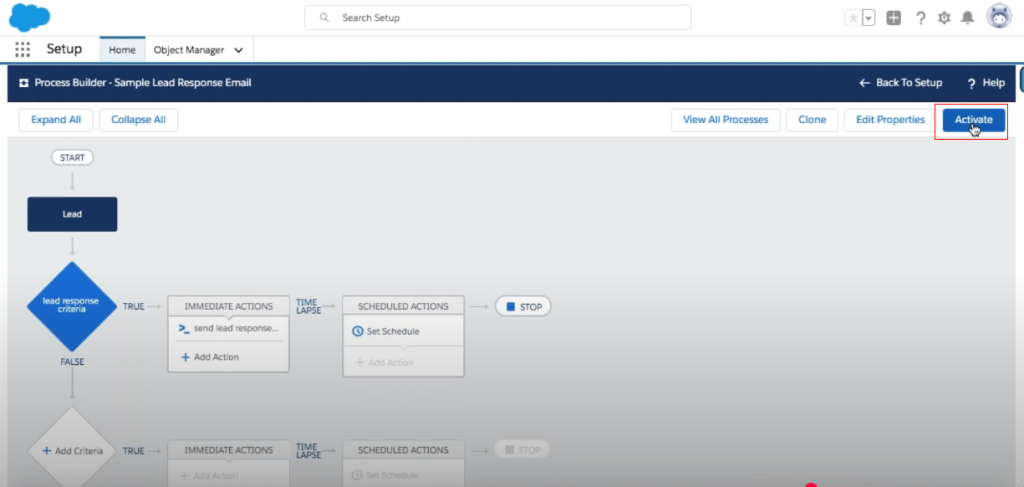
- Once done, save the process and then click “Activate” to enable it in Salesforce.
Step 3: Create a New Lead to Test the Email Alert Automation
Now that the Process Builder is configured, the final step is to test the automation by creating a new lead in Salesforce.
- Head to the “Leads” section and click “New”.
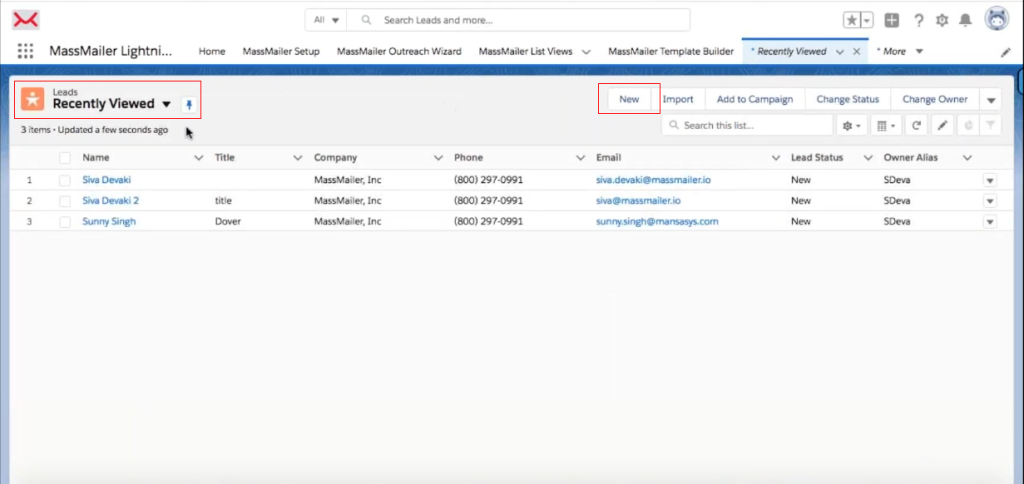
- Then, fill in the required lead information as follows, while making sure to match the criteria set in Process Builder for the purpose of the test.
- First Name & Last Name: Can be anything.
- Email Address: Enter a valid email address wherein you can verify if you received the email.

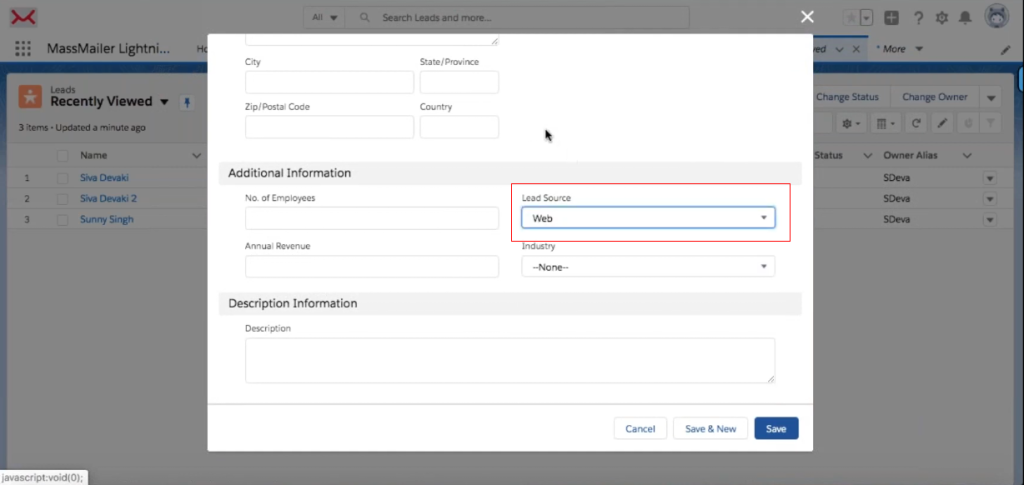
- Lead Source: Select “Web” (as this is the condition defined in Process Builder for the email alert to trigger).
- Click “Save” to create the lead. The email should have been triggered automatically. Head to your inbox to verify the same. If the email alert is in your inbox, your Salesforce email automation using MassMailer is fully operational. You can now extend this setup to other objects and customize the email triggers based on your specific requirements.
In the event the alert hasn’t reached the intended inbox, check the following:
- Go to Setup -> Process Builder and ensure the process is active.
- Navigate to MassMailer Setup -> Email Settings and verify that “Lead” is enabled.
- Open the lead record and check if the email alert action was logged.
Note: There could be a possibility that the email ends up in the spam folder, but the possibility of it happening is minimal with authenticated domains. If it does happen, read this blog on how to improve email deliverability.
Summing It Up
Automated email alerts can be a game changer for your customer outreach. While Salesforce’s built-in email alerts do provide a great starting point, they do not cut the mustard when advanced tracking or extended flexibility is needed. MassMailer fills these gaps all from within the Salesforce ecosystem.
If you too find Salesforce’s inbuilt email capabilities inadequate for your needs, MassMailer is the tool you need. It is a highly scalable and feature-rich email solution with no daily send limits, advanced email tracking, and deep Salesforce integration. It can run everything from drip campaigns to mass email campaigns at scale.
Try MassMailer free for 15 days and experience the difference, here. If you prefer a detailed walkthrough instead, schedule a demo with us.
Frequently Asked Questions
Start Your Free Trial Today
Experience MassMailer the easiest way to send personalized emails from Salesforce.
MassMailer Resources


About the Author

Siva Devaki 
Siva Devaki is the founder of MassMailer Inc., a tool that helps Salesforce users optimize email marketing. A passionate advocate for email marketing, Siva writes and hosts podcasts on the topic, sharing insights to help businesses drive revenue and enhance customer engagement through Salesforce email automation and tracking.