


Table of Contents
Introduction
If you’ve ever missed a critical customer email or spent hours manually chasing updates, you know how easy it is for things to slip through the cracks. In fast-paced sales and service teams, delays in communication can directly cost revenue and customer trust. With 80% of IT leaders warning that inefficient systems risk adding technical debt, companies can’t afford to rely on manual notifications anymore.
Adding automated email alerts to your workflow helps improve business operations and streamline regular processes. Salesforce email alerts help achieve this and more through its functionalities.
Salesforce emails are one of the most popular tools on the Salesforce Platform, helping enterprises connect better internally and externally. You can compose, send, and track emails right within the Salesforce interface using this feature.
Email alerts on Salesforce are available to everyone on the team and can also be used to communicate with customers, leads, vendors, and so on. You also get additional features and benefits to optimize business processes.
In this guide, we’ll walk through exactly how Salesforce email alerts work, how to set them up, and when you may need to go beyond the native tools.
Salesforce Email Alerts: What are They?
A Salesforce Email Alert is an automated email notification triggered when a specific event or condition occurs in Salesforce. It uses a predefined template, is sent to designated recipients, and is delivered through automation tools such as workflows, approval processes, or flows.
You can integrate email alerts into your business flows, workflow rules, and approval and entitlement processes. A Salesforce Email Alert is made up of four key parts:
- Triggering Event: The condition that fires the alert, such as record creation, updates, or approvals.
- Email Template: A predefined message (Classic or Lightning) that ensures consistent branding and content.
- Recipient(s): Users, roles, related record owners, or even external email addresses who will receive the notification.
- Automation Mechanism: The process that sends the alert, usually via Workflow Rules, Flows, or Process Builder.
Salesforce email can be accessed through the invocable Actions REST API endpoint. For a business requiring extensive communication through email, whether among employees or with prospects, Salesforce Email Alerts are a perfect solution.
Where Salesforce Email Alerts Are Used
Salesforce email Alerts can be embedded in multiple Salesforce automation tools:
- Workflow Rules – Send notifications when records meet defined criteria.
- Approval Processes – Notify approvers or submitters automatically during approval stages.
- Entitlement Processes – Trigger alerts for case milestones or service agreements.
- Flows (Record-Triggered Flows) – The modern, flexible way to automate alerts based on record changes or custom logic.
How to Use Salesforce Email Alerts Using Process Builder
You can automate various business processes and set up email alerts using Salesforce Process Builder. It lets you construct a workflow process based on a set of criteria. For instance, you can easily send emails via Process Builder using its “send an email” standard action, like an email alert.
The email alert functions with the object associated with the process builder. Email alerts are available in both Salesforce Classic and Lightning Experience.
Step 1: Create an Email Template
To configure email alerts, go to Setup and enter Email Alerts in the Quick Find box. Then, select Email Alerts. Here, you will find the settings to configure your alerts. Here’s a step-by-step guide on how to set up Salesforce Email Alerts.
- First, you should create an email template for use. To build a template, go to Setup, then click Administer > Communication Template, and finally, Email Templates.
- Click New Template and select a type:
- Text – plain text only.
- Custom without Letterhead – simple HTML formatting (commonly used).
- HTML with Letterhead – includes branded design.
- Lightning Email Template – modern drag-and-drop editor with folders.
- Select the customer template without the hung letterhead.
- Check Available for Use. (If unchecked, you won’t be able to select it later.)
- Click Save.
Step 2: Create an Email Alert
Once your template is finalized, you need to create an email alert on the user object.
- To do so, navigate to Setup > Build > Create.
- On this screen, select Workflow and Approvals. Then, click Email Alerts.
- Fill in details:
- Description and API Name.
- Object: choose the object the alert applies to (e.g., User, Lead, Case).
- Email Template: select the one you created in Step 1.
- Choose Recipients:
- Users (e.g., record owner, manager).
- Roles (entire teams).
- Related Records (e.g., Contact on a Case).
- External Email Addresses (must be entered manually).
- Choose Sender:
- Current User.
- Default Workflow User (defined in Workflow Settings).
- Org-Wide Email Address (recommended).
- Click the New Email Alert button. You will be asked to input the necessary details. Your email alert will be set up based on these.
Step 3: Set Up a Process with Process Builder
You also need to set up a process on the user object so that a welcome email is sent to new users. Here are the steps to do so.
- Select Name > Setup > App Setup.
- Then, click Create. Under Create, click Workflow and Approvals.
- Now, find Process Builder and click the new button.
- Input Name and API Name.
- Click Save to save all your changes.
- Then, add entry criteria by selecting Add Object.
- Click User Object and select only when the record is created for the entry criteria.
- Now, click Save.
Note: Salesforce recommends using Flows instead of Process Builder going forward. The steps below still work in legacy orgs.
Step 4: Add Process Criteria
Next, you need to add process criteria.
- Select Add Criteria.
- To add criteria, enter Name and Type of Action.
- Set the filter conditions. For instance, set [user]is Active Equals True.
- Click Save.
Step 5: Add Immediate Action
Now, you add immediate action to the process builder.
- Under Immediate Actions, select Add Action.
- Choose the type of action you want to create. Since we are setting up email alerts, choose Email Alert.
- Enter all the necessary details to define the action.
- Search for the email alert you want to use for the email.
- Click Save when done.
These steps will help automate your email workflow and set alerts under specific criteria defined by you.
Step 6: Testing & Activation
Before rolling out live, always test:
- Prepare Sample Data: Create or update a record that should trigger the alert.
- Preview the Email: Open the template to confirm that the merge fields pull the correct values.
- Send Test: Use a test record (e.g., create a Case with Priority = High).
- Verify Recipients: Check that the correct user, role, or contact received the email.
- Check Delivery Status: In Setup, under Email Logs, or by reviewing the record’s activity history.
Once verified:
- Activate the Flow, Workflow Rule, or Process Builder.
- Monitor for the first few days to ensure alerts are firing as expected.
How to Use Salesforce Email Alerts with Flows
Salesforce recommends using Record-Triggered Flows instead of Process Builder or Workflow Rules, since Flows are the modern automation engine. Workflow Rules and Process Builder will reach the end of support on December 31, 2025, so Flows are now the preferred tool for all new automation.
Here’s how you can set up an email alert with Flows in Lightning Experience:
Step 1: Create an Email Template
(Same as Process Builder — reuse if you already have one)
- In Setup, search Email Templates.
- Click New Email Template and select the type (Lightning Template recommended).
- Add folder, name, subject line, and body content.
- Insert merge fields to personalize.
- Check Available for Use → Save.
Step 2: Create an Email Alert
- In Setup, search Email Alerts.
- Click New Email Alert.
- Select:
- Object (e.g., Case, Opportunity, User).
- Email Template (from Step 1).
- Recipients: users, roles, related records, or external addresses.
- Sender: Current User, Default Workflow User, or Org-Wide Email Address.
- Save.
Step 3: Build a Record-Triggered Flow
- In Setup, search Flows.
- Click New Flow → choose Record-Triggered Flow.
- Select the Object (e.g., User).
- Example: Trigger a welcome email when a new user is created.
- Choose the trigger:
- When to Run Flow → A record is created (or updated, if needed).
- Decide whether to run before or after the record is saved (use after save for email alerts).
Step 4: Define Entry Criteria
- In the Start Element, set filter conditions.
- This ensures the Flow only runs when the right conditions are met.
Step 5: Add the Email Alert Action
- In the Flow canvas, click the + icon → choose Action.
- Search for Email Alert.
- Select the email alert you created in Step 2.
- Map any necessary inputs (like the record triggering the email).
- Save.
Step 6: Save, Activate & Test
- Click Save → give your Flow a clear name (e.g., “Send Welcome Email”).
- Click Activate.
- Test the Flow.
Aspects to Note About Salesforce Email Alerts
Email alerts are highly beneficial to optimize the email marketing workflow of your company. However, there are some aspects of this Salesforce feature that you should consider before or during setup.
There is a daily allocation for sending email alerts. In the free developer edition, the daily workflow email allocation is set at 15. The same goes for trial organizations. In the paid version, you get up to 1000 email alerts per standard Salesforce license in one organization.
The total allocation for an organization is 2,000,000. This includes emails sent as email alerts in approval processes, workflow rules, flows, processes, and the REST API.
After you reach the daily workflow email allocation limit of the organization, there are certain things that can happen:
- The leftover emails in your workflow queue, if any, will be discarded.
- There is no resend action provided by Salesforce for this scenario.
- The email action will be blocked if there is a triggering of the workflow rule with an action that triggers an email alert.
- The debug log will get an added error message.
- In general, the email action will be blocked.
Why Use Email Alerts in Salesforce: Use Cases & Benefits
Salesforce email alerts are a powerful way to keep your teams informed, aligned, and proactive. Here are five key reasons why Salesforce email alerts are worth setting up in your org:
1. Faster Response to Critical Events
When a new lead arrives, or a high-value opportunity reaches a closing stage, timing is crucial. Email alerts enable you to immediately notify the right sales representative, manager, or team, so they can take action without delay.
A good example is Salesforce’s built-in Big Deal Alerts. These automatically send emails to executives when opportunities meet a set threshold (like $500,000 with 90% probability of closing), ensuring leadership is always in the loop on strategic deals.
2. Improved Team Collaboration & Alignment
Sales often intersect with service, marketing, and operations. Without real-time communication, information gets siloed. Email alerts bridge this gap by automatically sharing updates across multiple stakeholders.
For instance, when a support case is created for a high-value account, both the service team and the account owner can receive alerts. This prevents issues from being handled in isolation and ensures sales have visibility into potential blockers for their deals. This kind of alignment not only improves customer experience but also contributes to the 25–30% productivity gains that Salesforce users have seen with automated workflows.
3. Ensuring Compliance, Escalation & Accountability
In industries where compliance and accountability are critical, email alerts act as guardrails. You can configure them for approval processes, escalations, and SLA milestones.
For example, during a quote approval process, email alerts notify approvers the moment their input is needed. If an approval is rejected, the submitter is automatically notified, ensuring transparency at every step. This not only enforces compliance but also builds accountability within the team.
4. Operational Efficiency & Reduced Manual Work
Without automation, teams often rely on manually checking dashboards, sending reminders, or chasing status updates. Email alerts automate these repetitive tasks.
By reducing reliance on manual follow-ups, Salesforce alerts save teams hours each week. In fact, inefficient workflows can cost mid-sized companies over $500,000 a year, making automation not just a productivity tool but a bottom-line booster.
5. Better Decision-Making & Monitoring
The true value of email alerts isn’t just speed, it’s clarity. By embedding contextual data and links in alerts, decision-makers can act with all the information they need at their fingertips.
For example, consumption threshold alerts help admins monitor usage and get notified when their org approaches limits (e.g., API calls, storage). This proactive visibility prevents business disruption and enables smarter resource planning.
When Native Email Alerts Are Not Enough: Introducing MassMailer
Salesforce’s native email alerts are fine for basic notifications, but the moment your business tries to scale, they start showing their limits.
That’s why more Salesforce users are turning to MassMailer, the all-in-one email solution built natively inside Salesforce that eliminates these pain points.
Limitations of Salesforce Native Email Alerts
While useful, Salesforce’s built-in alerts come with some challenges:
- Deliverability issues: No inbox placement tools, no DMARC/SPF/DKIM checks, higher risk of emails landing in spam.
- Constrained design options: No drag-and-drop editor, limited personalization, weak mobile responsiveness.
- Tight quotas: Standard Salesforce editions restrict the number of emails you can send (e.g., 5,000 per day in Enterprise Edition). For marketing or large-scale communications, these limits quickly become roadblocks.
- Minimal tracking: You can’t natively track opens, link clicks, unsubscribes, or bounces in detail. This makes it difficult to measure performance or optimize campaigns.
- Rigid usability: Native alerts are tied to workflow/flow actions and don’t provide advanced scheduling, testing, or bulk-send flexibility.
If you only need a one-off internal notification, that might be enough. But if you want professional, scalable communication, native alerts simply don’t cut it.
How MassMailer Solves These Gaps
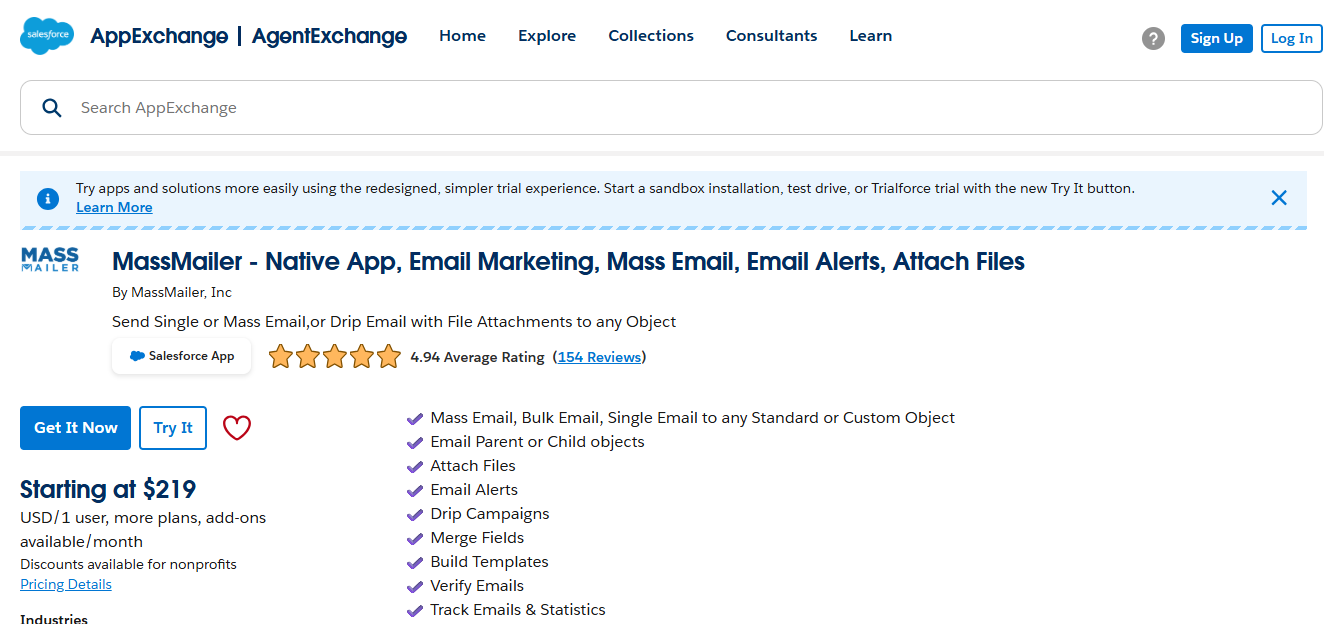
Salesforce appexchange MassMailer listing view
MassMailer is designed to overcome the limitations of native Salesforce email alerts while keeping everything inside Salesforce. Here’s how it helps:
- Native Salesforce integration: Built 100% within Salesforce, so you don’t need to export data or use third-party connectors.
- Drag-and-drop email builder: Create beautiful, branded templates without HTML. Add personalization, responsive layouts, dark mode previews, and more.
- Email verification & deliverability tools: Built-in email verification for spammy language, broken links, and compliance with SPF, DKIM, and DMARC. Ensures your emails land in inboxes, not spam folders.
- Real-time tracking & analytics: Track opens, clicks, bounces, and unsubscribes directly inside Salesforce. See engagement at the lead, contact, or campaign level.
- Bulk + transactional support: Send both high-volume marketing campaigns and individual transactional emails (e.g., invoices, shipping updates) without hitting Salesforce’s daily caps.
- Automation ready: Plug seamlessly into Flows, Process Builder, or APIs to trigger the right emails at the right time.
When to Choose MassMailer vs Native Alerts
| Use Case | Native Email Alerts | MassMailer |
|---|---|---|
| Branded marketing emails | Limited formatting, basic design | Drag-and-drop templates, responsive design |
| High-volume sending | Daily caps (5,000 emails in Enterprise) | Scales to bulk sends without limits |
| Deliverability assurance | No spam/DMARC validation | Built-in deliverability score & validation |
| Detailed tracking (opens, clicks, unsubscribes) | Not available | Real-time analytics inside Salesforce |
| Automation with Flows | Supported | Supported + more flexible |
Native alerts are for reminders. MassMailer is for results. If your business depends on email, whether it’s marketing, transactional, or customer communication, MassMailer gives you the control, flexibility, and insights Salesforce alone can’t provide.
Try MassMailer for free today and transform the way you send, track, and scale emails inside Salesforce.
Conclusion
In your email workflow automation journey, you need the right partner to streamline the processes and automate your mailing needs. With MassMailer, you can send automatedemails in Salesforce CRM for your marketing campaigns.
You retain control over the content and number of emails you send, set alerts for important workflows, and gain insights from the in-depth reporting of each email’s performance.
Start MassMailer’s 15-day free trial to gain leverage on your email marketing issues and run successful campaigns.
Frequently Asked Questions
Can Salesforce email alerts be scheduled for a specific time?
Do Salesforce email alerts work in both Classic and Lightning?
Can I send attachments with Salesforce email alerts?
How many recipients can I add to a single Salesforce email alert?
Can email alerts be triggered by record updates as well as creation?
Where can I check the status of Salesforce email alerts?
Start Your Free Trial Today
Experience MassMailer the easiest way to send personalized emails from Salesforce.
Related Blogs
Salesforce Flow Email Alert: Setup, Tracking, and Best Practices
MassMailer Resources


MassMailer Glossary
About the Author

Siva Devaki 
Siva Devaki is the founder of MassMailer Inc., a tool that helps Salesforce users optimize email marketing. A passionate advocate for email marketing, Siva writes and hosts podcasts on the topic, sharing insights to help businesses drive revenue and enhance customer engagement through Salesforce email automation and tracking.