


Table of Contents
Introduction
“Why do our Salesforce emails land in spam even when everything looks correctly set up?”
Teams raise this question often, and it usually comes down to a missing layer of authentication. When Salesforce sends messages without a verified identity, mailbox providers hesitate to trust those emails. That hesitation affects inbox placement, engagement, and overall deliverability.
Salesforce DKIM changes that. DKIM, or DomainKeys Identified Mail, adds a secure digital signature to every message that Salesforce sends from your domain. It confirms that the email is legitimate, and it protects the content from being altered along the way.
In this guide, we explain how Salesforce DKIM works, how to set it up, and how to verify that your configuration functions correctly. You will also see practical steps, actionable insights, and real-world examples that help strengthen your domain’s credibility and improve deliverability across sales, service, and marketing messages.
Let’s begin with the core concepts so you can configure Salesforce DKIM with clarity and confidence.
How Salesforce DKIM Works
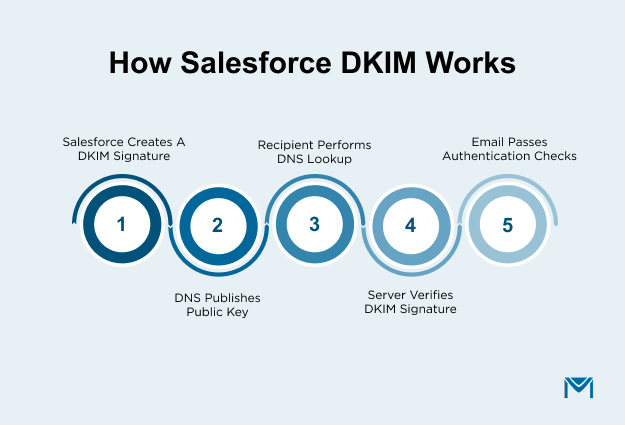
Salesforce DKIM works by adding a digital signature to every email that Salesforce sends from your approved domain. Receiving servers look up your public DKIM key in DNS, verify the signature, and treat the message as authenticated if everything matches. This process protects your domain identity and supports higher email-deliverability rates.
1. What Is Salesforce DKIM
Salesforce DKIM, short for DomainKeys Identified Mail, is an email-authentication method that proves an email really came from the domain it claims to use.
Here is how it works in simple terms:
- Salesforce uses a private key to generate a unique signature for each outgoing message and places it in the email header.
- Your DNS zone holds the matching public key as a DKIM record, so receiving servers can look it up.
- When the recipient’s server gets the email, it checks the signature against the public key and confirms that the message came from your domain and was not changed in transit.
- If the signature is valid, DKIM shows a “pass” result in the message authentication status, which supports better inbox placement.
- If the signature is missing or invalid, the server treats the email as unauthenticated, which might lower trust or trigger spam filtering.
We go deeper into DNS and record best practices in our Salesforce email-deliverability guide on the MassMailer blog.
2. Salesforce DKIM Across Email Channels
Salesforce uses the DKIM key you configure in Setup to sign outbound email from matching domains. Once you create and activate a DKIM key, Salesforce signs messages that meet your domain-match rules.
Key Salesforce behaviors to understand:
- You configure DKIM in Setup under DKIM Keys, then tie the key to a specific domain and match pattern, such as the exact domain or its subdomains.
- Salesforce signs emails when the From domain matches the DKIM domain pattern you set for that key, for example, example.com or *.example.com.
- Standard Salesforce CRM emails, such as workflow alerts or case updates, can use the same DKIM key if they share the same From domain.
- Account Engagement (Pardot) recommends DKIM for its marketing emails as an additional authentication layer, which aligns the channel with your Salesforce DKIM strategy.
- If you use separate subdomains for marketing, transactional, or regional sending, you can create multiple DKIM keys or adjust domain-match patterns so each mailstream is covered correctly.
This structure gives you consistent authentication across different Salesforce-driven channels while keeping control in your DNS.
3. Why Salesforce DKIM Improves Deliverability
DKIM strengthens both trust and deliverability because mailbox providers prefer authenticated traffic. They can see that your domain takes email security seriously and that messages come from a verifiable source.
Here is why DKIM matters for Salesforce-sent email:
- It proves domain ownership at the message level, which helps stop spoofing and impersonation of your Salesforce-based emails.
- It supports DMARC policies that rely on SPF and DKIM alignment to decide whether to accept, quarantine, or reject messages.
- Industry reports show that senders who use authentication protocols such as SPF, DKIM, and DMARC see better inbox placement and lower spam rates over time.
- As Gmail, Yahoo, and other providers tighten authentication requirements for bulk senders, DKIM becomes a basic requirement rather than a nice-to-have feature.
- Email-security studies from firms like Forrester and Gartner highlight domain authentication as a core control for stopping phishing and business email compromise, which reinforces why DKIM is essential, not optional.
For Salesforce teams, DKIM becomes one of the most practical, data-driven solutions to boost trust, protect brand identity, and support consistent deliverability across all outbound messages.
4. Salesforce DKIM Limitations Explained
DKIM solves a very specific problem, but it does not fix every deliverability or security issue on its own. Knowing the limits helps you design a realistic, data-driven email-auth strategy.
Important limits to keep in mind:
- Salesforce does not activate a DKIM key until it confirms that the CNAME records are correctly published in DNS, so misconfigured DNS can block activation.
- A DKIM key only covers domains that match the pattern you define, so messages that use unmanaged domains or third-party senders might still go out unsigned.
- DKIM does not control content quality, list health, or sending frequency, which remain major drivers of spam filtering and engagement.
- Shorter keys, such as 1024-bit, may meet the minimum bar, but security experts now recommend 2048-bit keys for stronger protection against attacks.
- DKIM does not replace SPF or DMARC. You still need a complete policy that aligns all three protocols to fully protect your Salesforce domains and satisfy modern provider requirements.
When we treat Salesforce DKIM as one layer in a broader authentication stack, rather than a silver bullet, we set more accurate expectations and build a stronger, standards-aligned email program.
Salesforce DKIM Setup Requirements
Before we generate a DKIM key, we confirm two things:
- We have the correct Salesforce admin permissions, and
- We control the domain and can update its DNS records.
Without these, DKIM activation will fail, and Salesforce emails will remain unauthenticated.
1. Salesforce DKIM Setup Requirements
Salesforce restricts DKIM setup to specific admin capabilities. We verify these before touching any settings.
You need:
- The Customize Application permission.
- The Manage DKIM Keys permission.
- Access to Setup → DKIM Keys in the org.
- A stable admin account responsible for future key rotation and updates.
- Access to other email settings, such as Deliverability, so DKIM stays aligned with SPF and DMARC work.
These permissions ensure that DKIM keys are created, maintained, and rotated by an authorized team member rather than a temporary or limited-access user.
2. Salesforce DKIM DNS Requirements
DKIM only works if we sign an email from a domain we control. That means we must confirm DNS ownership before we create any keys.
You need:
- The exact sending domain used in Salesforce, such as example.com.
- Access to the DNS provider that manages this domain.
- Permission to create CNAME or TXT records for selector._domainkey.example.com.
- A quick check for conflicting DKIM records or old selectors.
- Alignment with your existing SPF and DMARC policies to keep all authentication layers consistent.
Once these pieces are in place, we can complete Salesforce DKIM setup without delays, failed activations, or misaligned email-authentication records.
Step 1: Create your Salesforce DKIM key
The first step in Salesforce DKIM setup is generating the DKIM key inside Salesforce. This key contains the public information that mailbox providers use to verify that your emails are authentic. Once you create it, Salesforce gives you the DNS record values you will publish in the next step.
1. Generate a new DKIM key in Salesforce
You create the DKIM key inside Salesforce and define the parameters that control how the signed email will be authenticated. Follow the recommended configuration below:
- Go to Setup, search for DKIM Keys, and open the page.
- Select Create New Key.
- Enter a selector, which acts as an identifier for the DKIM record. A structured selector like sf-2025 supports easier monitoring and future key rotation.
- Choose a 2048-bit key size. This size meets current industry guidance for cryptographic strength and improves resilience against key-based attacks.
- Add the sending domain that appears in your Salesforce From address. Salesforce uses this domain to align your DKIM signature with DMARC.
- Save the key to generate your DKIM authentication values.
Why this setup matters:
- The selector tells mailbox providers where to find your DKIM record in DNS.
- The key size determines the strength of your DKIM signature.
- The domain you enter must match the domain in your From header to avoid alignment failures.
- A clean setup reduces DKIM lookup issues and prevents activation delays.
Salesforce now has the internal key pair it will use to sign outbound messages.
2. Copy the Salesforce DKIM DNS record values
After generating the key, Salesforce displays the DNS records required for verification. These records store the public key that mailbox providers use to authenticate your Salesforce DKIM signature.
You will see the following values:
- Host name, typically selector._domainkey.example.com.
- CNAME or TXT value that stores the public DKIM key Salesforce generated.
- Selector and domain summary tied to the key you created.
- Record type Salesforce expects your DNS provider to host.
- Status, which remains inactive until DNS propagation completes.
These values must be copied exactly as shown, because:
- A misplaced character breaks the public-key lookup.
- A mismatched selector causes a DKIM verification failure.
- Incorrect domain mapping results in failed DMARC alignment.
- Incorrect record type (CNAME vs TXT) causes activation errors.
- DNS formatting errors prevent Salesforce from validating the signature.
Once copied, these records will be published in Step 2 to authenticate your domain.
Step 2: Publish the DKIM DNS records
Salesforce DKIM works only when your DNS publishes the public key that Salesforce generated in Step 1. Mailbox providers use this DNS record to confirm that the DKIM signature attached to each email matches the domain you own. Publishing it accurately is essential because even a minor formatting error can prevent Salesforce from activating the key.
1. Add the Salesforce DKIM record to your DNS provider
To authenticate your domain, add the DKIM record values from Salesforce to your DNS. Every DNS provider organizes records differently, but the information you enter stays the same.
Follow this structure:
- Open your DNS provider, then select the option to add a new DNS record.
- Choose the record type Salesforce provided, usually CNAME. Some setups may require TXT, depending on the DNS host.
- Enter the host name, which follows the format selector._domainkey.example.com.
- Paste the record value exactly as shown in Salesforce. This value stores the public DKIM key.
- Save the record and allow DNS propagation to begin.
Technical accuracy matters here:
- The host name must match the selector you created in Step 1.
- A single missing character or extra space breaks DKIM verification.
- Some DNS hosts automatically append your domain; if so, avoid duplicating it.
- Keep TTL at the default unless your security team recommends otherwise.
Once saved, your DNS begins publishing the public DKIM key across the global DNS system.
2. Verify that your Salesforce DKIM record is live and correctly configured
After adding the DNS record, make sure it resolves correctly. This ensures Salesforce can validate the public key before activation.
Use the checks below:
- Confirm the DKIM record appears when queried through a DNS lookup tool.
- Verify that the selector, domain, and record type match what Salesforce provided.
- Check that the value length is intact, especially for 2048-bit keys, which some DNS providers wrap across multiple lines.
- Make sure the CNAME correctly points to the Salesforce DKIM target.
- Confirm that DNS propagation has begun. Some providers update within minutes, while others take several hours.
Once the DNS record becomes publicly available, Salesforce will be able to authenticate it in the next step when you activate the DKIM key.
Step 3: Activate your Salesforce DKIM key
After your DNS record propagates, Salesforce can validate the public key and begin signing outbound email with your DKIM key. Activation confirms that your domain is authenticated and that mailbox providers can verify every message Salesforce sends. This step finalizes the setup and ensures DKIM alignment for better deliverability.
1. Check Salesforce DKIM DNS Record
Before activating the key, confirm Salesforce can read the DKIM record published in your DNS. This prevents activation failures and ensures your domain is ready for signing.
Use the checks below:
- Query the DKIM record using any DNS lookup tool. You should see the CNAME or TXT value exactly as Salesforce generated.
- Verify that the selector in DNS matches the selector you created in Step 1.
- Confirm the domain in the record aligns with the domain used in your Salesforce From address.
- Check that the DNS record type is correct. Salesforce expects CNAME in most cases, unless your DNS provider requires TXT.
- Make sure the public key appears as a complete string. Truncated records cause DKIM verification failures.
These checks ensure that Salesforce can detect and validate the DKIM key without errors.
2. Activate the DKIM key inside Salesforce
When DNS propagation is complete, activate the key:
- Go to Setup, search for DKIM Keys, and open the page.
- Find the key you created in Step 1.
- Select Activate.
- Wait for Salesforce to validate the DNS record. This verification confirms that the domain you entered belongs to you and that the public key is published correctly.
- Check the key status. It should update to Active, which means Salesforce will now attach DKIM signatures to all emails sent from the authenticated domain.
What activation achieves:
- Salesforce begins signing your emails with your DKIM key.
- Mailbox providers can verify the DKIM signature against your DNS record.
- DKIM alignment supports stronger DMARC performance.
- Your messages gain better trust signals, which improves deliverability.
- Your domain identity stays consistent across all Salesforce mailstreams.
Once activated, your Salesforce DKIM setup is functional, and your domain is authenticated for outbound email.
Troubleshooting Salesforce DKIM issues
Even with correct setup steps, Salesforce DKIM can fail if the DNS record does not align with your sending domain or if the selector cannot be found by mailbox providers. These issues affect authentication, DMARC outcomes, and email deliverability, so resolving them quickly protects your domain reputation.
1. Fix Salesforce DKIM DMARC Failures
DKIM alignment fails when the domain in the DKIM signature does not match the domain used in the From address. Alignment is a DMARC requirement, and misalignment prevents mailbox providers from trusting Salesforce-signed messages.
Use these checks to correct alignment errors:
- Match the DKIM domain to the From address domain. If your From address uses example.com, your DKIM key must also use example.com.
- Remove senders that override the domain. Some Salesforce features, such as organization-wide addresses or email relays, may introduce a different sending domain.
- Check that Salesforce is signing the correct email stream. If a subdomain or app sends messages through a different path, it may bypass DKIM.
- Verify that the signature uses a valid selector and domain pair. Mailbox providers reject signatures that map to missing or misconfigured DNS records.
- Confirm that the DNS record publishes the full public key. Incomplete or truncated keys cause verification failures.
Correct alignment improves DKIM authentication and ensures your messages pass DMARC policies applied by receiving inboxes.
2. Resolve Salesforce DKIM DNS Conflicts
Activation fails when Salesforce cannot detect the required DKIM DNS record. This problem usually comes from record formatting issues or selector conflicts inside the DNS zone.
Review these areas to clear activation blocks:
- Check that the selector matches exactly. Even a small variation, such as uppercase letters or extra characters, prevents Salesforce from locating the record.
- Confirm that your DNS uses the correct record type. Salesforce expects a CNAME in most cases, unless your DNS provider requires a TXT entry.
- Remove old or duplicate DKIM records that use the same selector. Conflicting entries cause mailbox providers to retrieve the wrong key.
- Ensure your DNS provider does not auto-append the domain. Some hosts attach the domain name to the record, which produces an incorrect host path.
- Verify that the DNS record contains the entire public key. Long records, especially 2048-bit keys, sometimes wrap across multiple lines, which breaks DNS formatting.
When DNS issues are resolved, Salesforce can validate the public key and activate the DKIM key without errors.
Salesforce DKIM and SPF Alignment
DKIM and SPF serve different purposes in Salesforce email authentication, but together they create a stronger trust signal for mailbox providers. DKIM verifies message integrity and domain identity through cryptographic signatures, while SPF verifies whether Salesforce is authorized to send email on behalf of your domain. When both pass, your messages gain higher inbox placement and more consistent DMARC alignment.
1. Why SPF Matters With DKIM
SPF remains essential because DKIM only confirms message integrity, not the sending IP or platform. Salesforce uses multiple mail hosts and IP ranges, so mailbox providers expect a valid SPF record that includes Salesforce’s sending infrastructure.
Use SPF in parallel with DKIM for these reasons:
- SPF validates the sending source. It confirms that Salesforce is allowed to send mail for your domain.
- SPF supports DMARC alignment. If DKIM fails, DMARC checks whether SPF aligns with your From domain.
- SPF protects against spoofing attempts that use unauthorized IPs. This reduces impersonation risk across sales, service, and automation messages.
- Some mailbox providers still weigh SPF heavily in their classification logic. Failing SPF can cause messages to route to spam, even when DKIM passes.
- SPF helps maintain sending reputation when your domain uses multiple mail systems. Salesforce often sits alongside platforms like Google Workspace or Microsoft 365.
SPF reinforces DKIM and provides a second verification path for DMARC, improving overall deliverability.
2. Recommended Salesforce SPF Setup
Your SPF record must authorize Salesforce’s sending servers to prevent SPF failures. While Salesforce may change or expand IP ranges over time, the recommended syntax uses the standard include mechanism.
A correct SPF entry usually follows this pattern:
v=spf1 include:_spf.salesforce.com include:_spf.google.com ~all
Salesforce publishes spf.salesforce.com to maintain its allowed IPs. Use the best practices below:
- Start with v=spf1 and include Salesforce’s SPF host. This signals mailbox providers to evaluate Salesforce’s sending IP range.
- Avoid using multiple SPF records. A domain must publish only one SPF record to avoid lookup errors.
- Keep the total DNS lookups under 10. SPF fails when the lookup limit is exceeded.
- Align the SPF domain with your DKIM domain whenever possible. This supports DMARC pass conditions.
- Place Salesforce includes before the ~all mechanism. The final mechanism defines how to treat unauthorized senders.
A properly aligned SPF record ensures Salesforce mailstreams authenticate correctly and avoid SPF-related filtering issues.
When Salesforce DKIM Needs Experts
Salesforce DKIM handles domain authentication, but it does not manage the full spectrum of deliverability issues that influence inbox placement. High-volume senders, complex domain setups, or shared infrastructure often require deeper monitoring and specialized tools.
Deliverability specialists help you analyze authentication gaps, domain reputation trends, and performance across different Salesforce email channels.
1. When Salesforce DKIM Requires Support
Some Salesforce environments operate at a scale where email authentication alone is not enough. Specialists help diagnose issues that DKIM, SPF, and DMARC do not solve on their own.
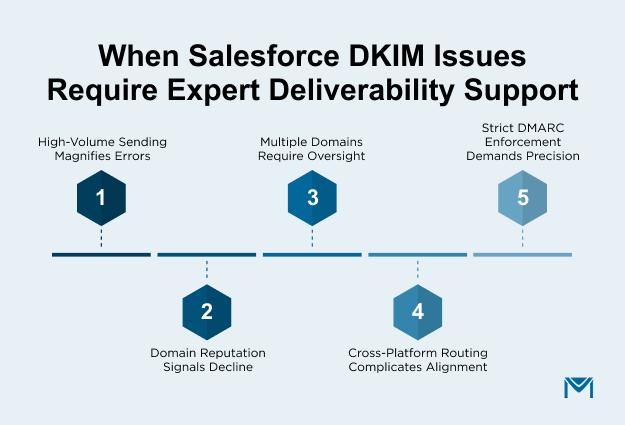
Situations where expert support becomes essential:
- High-volume email programs, such as automated workflows, marketing sends, or customer-service notifications. Large volumes amplify minor configuration issues.
- Domain reputation drops, detected through lower inbox placement, reduced engagement, or increased spam-folder routing.
- Multiple sending domains or subdomains, where each one requires independent DKIM, SPF, and DMARC management.
- Cross-platform sending, such as Salesforce plus Google Workspace or Microsoft 365, raises alignment and routing complexity.
- Security requirements that involve strict DMARC enforcement, where misconfiguration may cause email rejection instead of simple filtering.
Experts provide deeper diagnostics, analyze bounce patterns, and identify whether failures originate from Salesforce, DNS, or external systems.
2. How MassMailer Enhances Salesforce DKIM
MassMailer supports reliable authentication for Salesforce mailstreams by providing tools that improve visibility, consistency, and control over your sending environment. It complements Salesforce DKIM rather than replacing it.
Here’s how MassMailer helps:
- Improves email delivery visibility by showing whether authentication, engagement patterns, or reputation signals need attention.
- Surfaces issues across Salesforce channels, including workflow email alerts, case notifications, and user-level sends.
- Helps validate sender domains to ensure DKIM and SPF alignment stays intact over time.
- Reduces configuration errors that occur when managing multiple domains or delegated DNS setups.
- Supports long-term deliverability health, which becomes essential when volumes grow or when you enforce stronger DMARC policies.
MassMailer gives teams a more reliable view of how authenticated email performs, which helps maintain consistent inbox placement.
Salesforce DKIM Summary
Salesforce DKIM gives your domain a verified identity, improves message integrity, and supports stronger inbox placement. When you create the key, publish the DNS record, and activate signing, Salesforce can authenticate every email you send. This foundation strengthens your DKIM, SPF, and DMARC alignment and keeps your mailstreams trusted across sales, service, and automation workflows.
As your sending volume grows or your domain setup becomes more complex, keeping authentication consistent takes more oversight. MassMailer helps you monitor domain health, validate authentication, and maintain stable deliverability across all Salesforce channels. It reduces configuration mistakes and gives you a clearer view of how your emails perform.
If you want a more reliable way to protect your domain reputation and improve Salesforce email deliverability, explore how MassMailer supports authenticated sending and long-term deliverability performance.
Frequently Asked Questions
1. Does Salesforce automatically enable DKIM for new domains?
2. Can Salesforce use different DKIM selectors for different subdomains?
3. How long does Salesforce take to validate a DKIM DNS record?
4. What happens if my DNS provider does not support 2048-bit DKIM keys?
5. Can workflow emails, case notifications, or user-sent emails fail DKIM even after activation?
6. Do you need to update Salesforce DKIM keys when migrating to a new DNS host?
Start Your Free Trial Today
Experience MassMailer the easiest way to send personalized emails from Salesforce.
Related Blogs
Salesforce SPF Record: Setup, Recommended Value, and Common Errors

Salesforce Email Encryption: How It Works, Setup & Limitations
MassMailer Resources


About the Author

Siva Devaki 
Siva Devaki is the founder of MassMailer Inc., a tool that helps Salesforce users optimize email marketing. A passionate advocate for email marketing, Siva writes and hosts podcasts on the topic, sharing insights to help businesses drive revenue and enhance customer engagement through Salesforce email automation and tracking.