


Table of Contents
Introduction
Before assimilating a new software solution into your enterprise or rolling out modifications and upgrades, it is standard practice to test everything first. Sandboxes are an excellent way to simulate new IT setups and upgrades for your enterprise, monitor them for potential problems, and to test their efficacy.
Salesforce also provides organizations with Sandboxes to create a copy of Salesforce org in an exclusive environment where development, app performance, training, and testing can be carried out without hindering regular enterprise operations.
Through this blog, you will learn how to set up MassMailer in Salesforce Sandbox.
Preliminary Steps to Setup MassMailer in Salesforce Sandbox
Sandboxing your MassMailer before launching it across your Salesforce org allows you room to customize your app for upgrades, release cycle testing, and any other operation that needs to be examined before launch.
- Prior to setting up MassMailer in the Sandbox, you need to purchase the Sandbox plan in MassMailer for a basic fee of $50 a month.
- Once the purchase is successful, you will receive a new user name and API key for SendGrid, separate from your SendGrid credentials for Production.
- Your new SendGrid credentials would be applicable for MassMailer Sandbox only. Along with this ID, you will also receive a limit of 10,000 emails a month from the same IP address you use with Salesforce.
Why do you need a MassMailer Sandbox for Salesforce?
One of the primary reasons to use Sandbox for MassMailer is to keep the Production environments exclusive and separate for apps that have been tested and vetted as compatible with your enterprise environments.
MassMailer rolls out upgrades and new features regularly, making testing and tweaking necessary before connecting them with your enterprise apps.
Installing Sandbox for MassMailer allows your organization to ensure that the latest updates from MassMailer are working well with your systems. If not, your IT team can work with the new SendGrid credentials to make the necessary changes.
Simple Steps to Setup Sandbox for MassMailer
It is extremely easy to set up MassMailer in Sandbox. Follow the steps detailed below to get started:
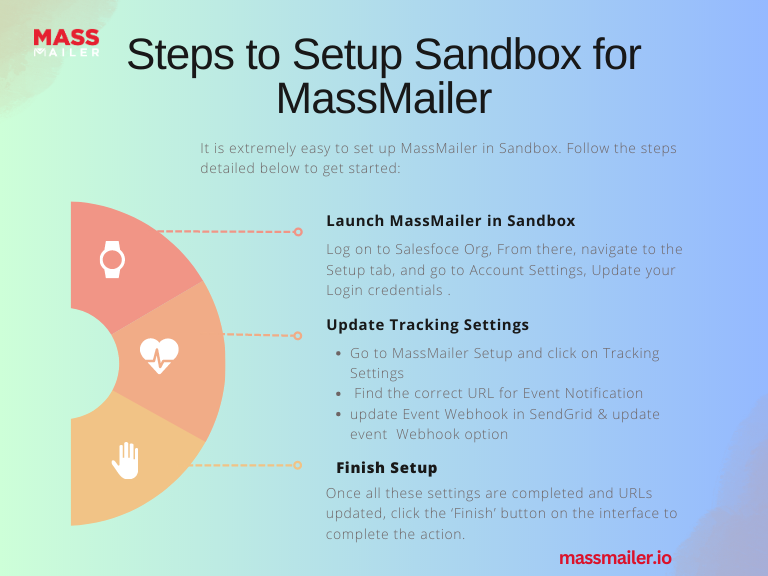
Launch MassMailer in Sandbox
- You need to request your Administrator or IT professionals to help you log in to the Sandbox environment for Salesforce. Once logged in, you then need to launch your MassMailer app in the App Launcher of the Sandbox environment.
- From there, navigate to the Setup tab, and go to Account Settings.
- You will be presented with a Login screen. This login screen would already have the credentials typed into the text fields; however, they must be updated. You must now work with your new SendGrid ID that came with MassMailer Sandbox instead of the production-level credentials that are auto-filled.
- Update your Login credentials on this screen and proceed to the next step.
Update Tracking Settings
You need to update the settings of email tracking in MassMailer by following the steps detailed below:
- Go to MassMailer Setup and click on Tracking Settings. Here, you need to update the URL for Event Notification.
- To find the correct URL for Event Notification, go to Salesforce Setup, and select Sites. Locate “MassMailer_Site” in the list and click on it. This is the correct URL you need for Event Notification.
- Next, you need to update Event Webhook in SendGrid. You can do that by finding the Settings option in SendGrid and clicking on the Mail Settings option. You will find the Event Webhook option – update it.
- You must now update Tracking Settings and Email Preference Groups from the same interface.
Complete guide on How to Setup Mass Mailer in Salesforce Sandbox
Why update tracking settings?
Tracking settings are important to configure for Sandbox because of how MassMailer works. When you send emails using the SendGrid ID in MassMailer, it also sends you an event notification on Salesforce. This is done using the event notification URLs (which you configure using the steps above).
Therefore, they need to be configured correctly for the app to work as it should. Each event notification URL is unique for every Salesforce instance.
Since this is not your usual Production environment in Salesforce, the event notification URLs used in the Sandbox would differ from those in the Production environment. This is why Sandbox's email tracking settings need to be updated.
Finish Setup
Once all these settings are completed and URLs updated, all you need to do is click the 'Finish' button on the interface to complete the action. Your Sandbox is now ready to use for MassMailer.
MassMailer for All Your Enterprise Emails
Email marketing remains one of the top-rated and preferred methods to reach consumers, nurture leads, and boost sales and customer engagement.
Keeping that in mind, MassMailer offers enterprises a simple way to improve their outreach to customers using bulk emails. The MassMailer app is Salesforce native; it can be easily integrated within your Salesforce org environment and accessed from the same dashboard.
With MassMailer, your enterprise also gets added functionalities as peripherals to bulk email:
- Email verifier
- Email alerts
- Email template builder
- Email monitor
You also get access to tools to build campaigns, sidestep spam filters, set up workflow email alerts, and much more. MassMailer assists businesses with complete emailing solutions - from individual to bulk mail.
Get in touch if you want to enhance your business potential through email with MassMailer. If you're not ready to commit to growth, you can opt for a free trial instead!
Start Your Free Trial Today
Experience MassMailer the easiest way to send personalized emails from Salesforce.
Related Blogs
MassMailer Resources


About the Author

Siva Devaki 
Siva Devaki is the founder of MassMailer Inc., a tool that helps Salesforce users optimize email marketing. A passionate advocate for email marketing, Siva writes and hosts podcasts on the topic, sharing insights to help businesses drive revenue and enhance customer engagement through Salesforce email automation and tracking.