Table of Contents
Thanks to social media, homegrown and small-scale businesses are on the rise. With multiple competitors vying for customer attention, standing out requires a strategic approach—this is where marketing campaigns come in.

In fact, 57% of sales leaders and managers report that competition has intensified over the past year. A well-executed campaign can help businesses differentiate themselves, especially when launching a new product, service, or initiative.
A campaign is a series of planned activities designed to promote a brand, product, or service. To maximize impact, campaigns span multiple channels, including print, digital, social media, email, and more.
With MassMailer, businesses can streamline their email marketing efforts by sending bulk emails directly from their CRM.
The platform allows for targeted outreach, segmenting leads and contacts based on demographics. Plus, it offers intuitive tools to create visually stunning, professional emails with ease.
Create a MassMailer Campaign: A Quick Guide
Follow these two ways to create a campaign on MassMailer:
Method 1:
- Go to the Marketing App on the dashboard.
- When the screen refreshes, you will see a tab called Campaigns at the top. After clicking on it, you can see a list of all the campaigns.
- At the top left corner, you will see a button called New.
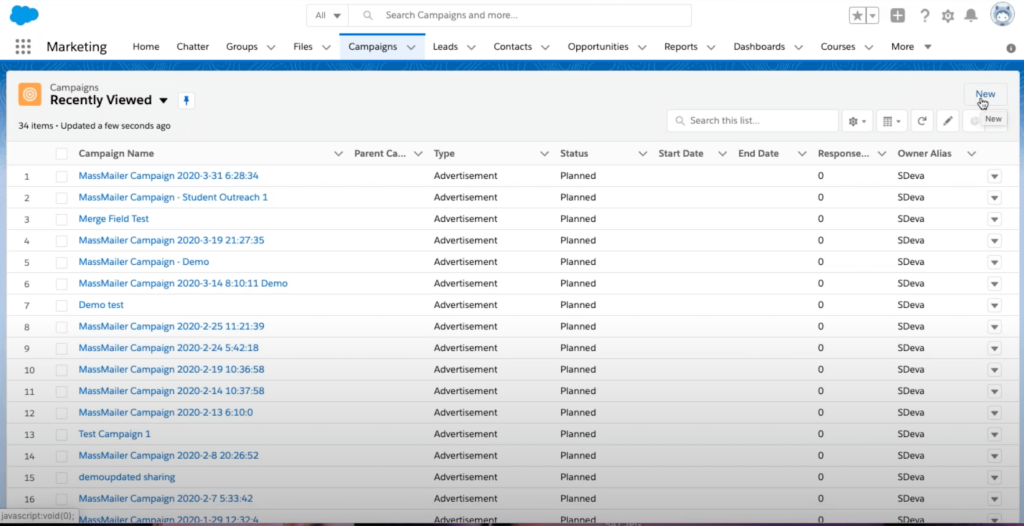
- Click the New button, and a pop-up form will open up.
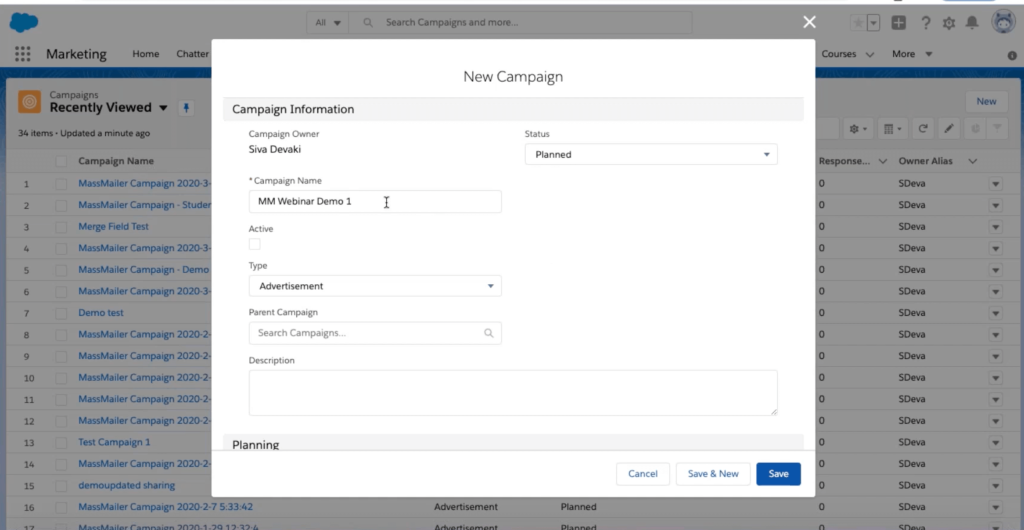
- You can fill in all the required details for the campaign you want to create.
- Firstly, enter the name of the campaign. Next, select the type of campaign, like an advertisement, email, etc. You can also choose a parent campaign if you want to.
- After entering all the required details, click Save to finalize your campaign.
The next step is to set the campaign member status. When you create a campaign on Facebook, these values are not set. If you see the member status on MassMailer, it means the Facebook campaign is now a Salesforce campaign.
- Click on campaigns and then on the drop-down menu button called New Case on the top right.
- Click on Set Member Status. If you do not see the member status on the screen, you can go to the campaign object manager and then to Campaign Layout and Page Layout.
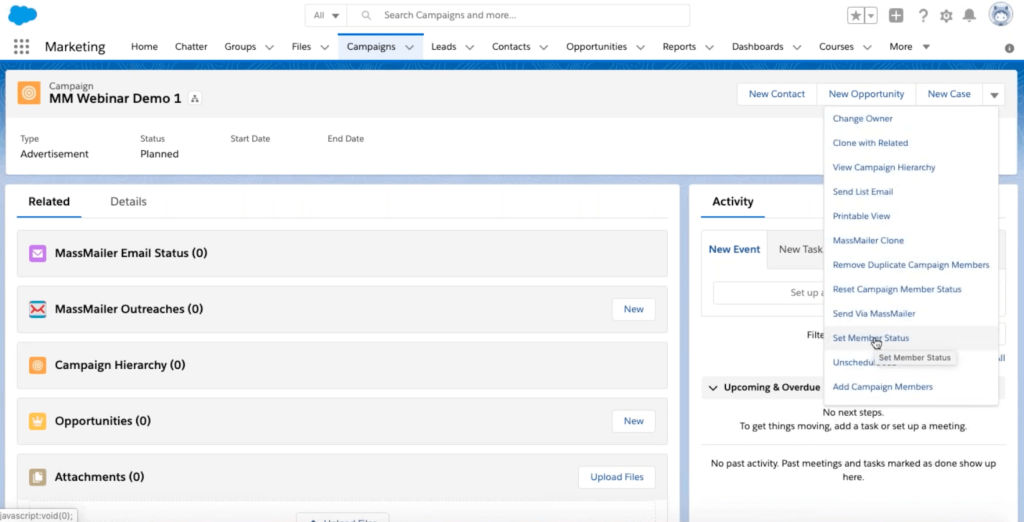
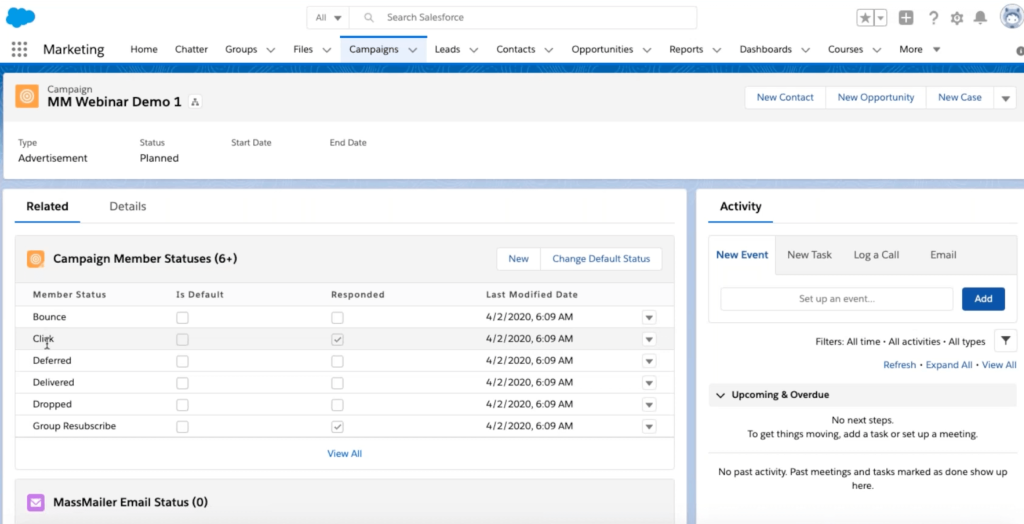
- For the related list values you see on the new screen, drag and drop the campaign member status and save it.
- Refresh the screen, and you will see different Campaign Member Status values, such as bounce, click, deferred, delivered, etc.
- Once you see all these values, your Facebook campaign becomes a MassMailer campaign.
Method 2:
Here is an alternate method to create a campaign on MassMailer:
- Go to the Marketing App on the dashboard.
- When the screen refreshes, you will see a tab called Campaigns at the top.
- Select any list view, and you will see a button called New MassMailer Campaign at the top left.
- Click the button, and a new screen will open with a default campaign name. You can edit the name. Once you are done, click on the Next button.
- The step is to add campaign members. You can add from Lead or Contacts.
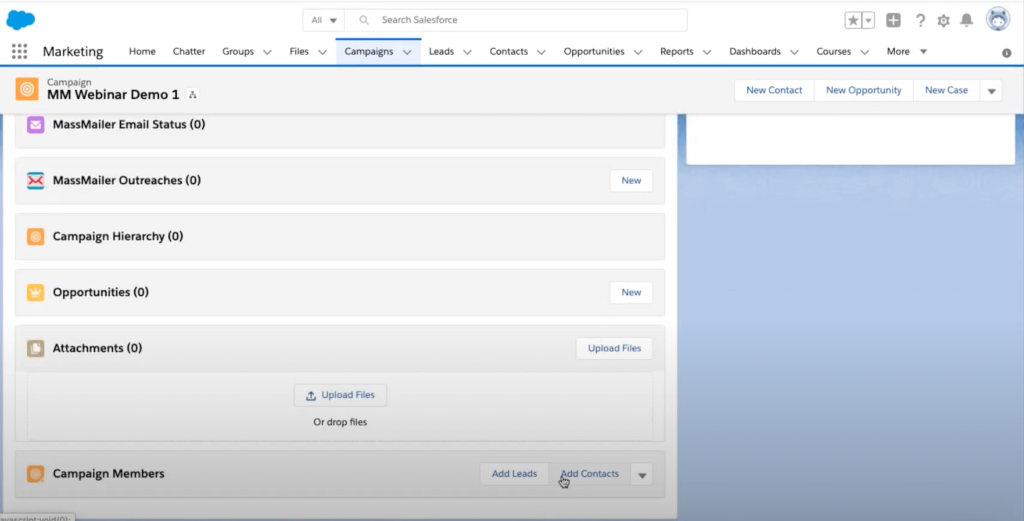
- Once you have added campaign members, the next step is the MassMailer Outreach Wizard.
- You can see all the campaign-related information on the campaign page.
Add Campaign Members
You can select the members from your existing database that you want to add to your campaign using two methods.
Method 1:
- Click on the campaign to which you want to add new members.
- When you click on it, you will see the existing members—both leads and contacts.
- To add a new member, click on the appropriate button at the top, “Add Lead” or “Add Contact.” Suppose you click the Add Lead button to add leads.
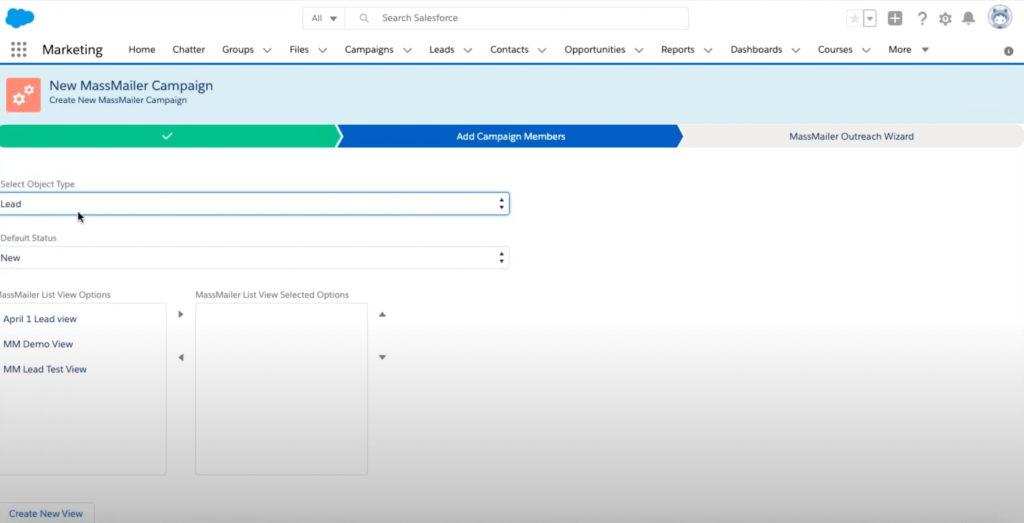
- Once you click, you will see a list of members. You can select any number of leads.
- When you select a new lead, the member status is set to New. However, you can change it as you deem fit. Click on Submit.
- You can follow the same steps to add a new contact.
Method 2:
- If you have a predefined report, click on the Reports tab in the Marketing app.
- You will see a list of reports. Click on the report that you want to add to the campaign.
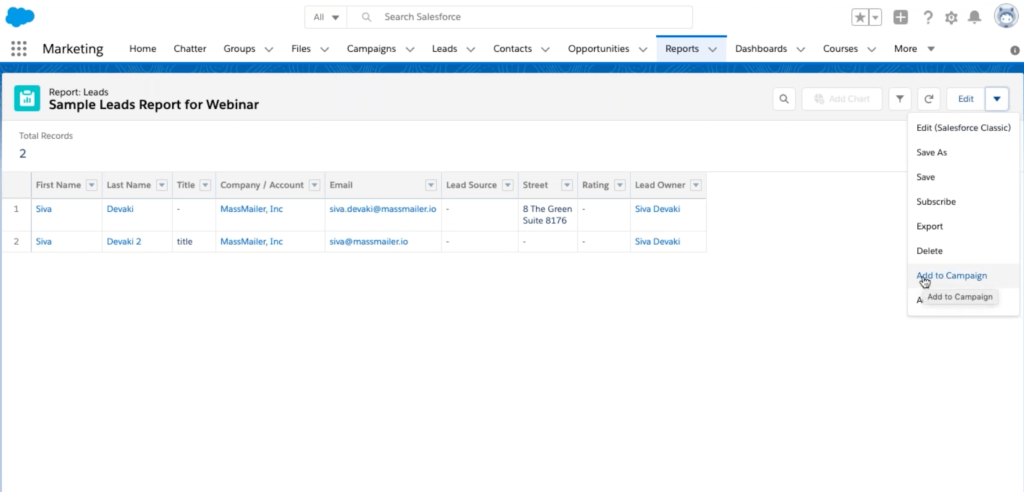
- A pop-up box will open. Select the campaign from which you want to add the leads.
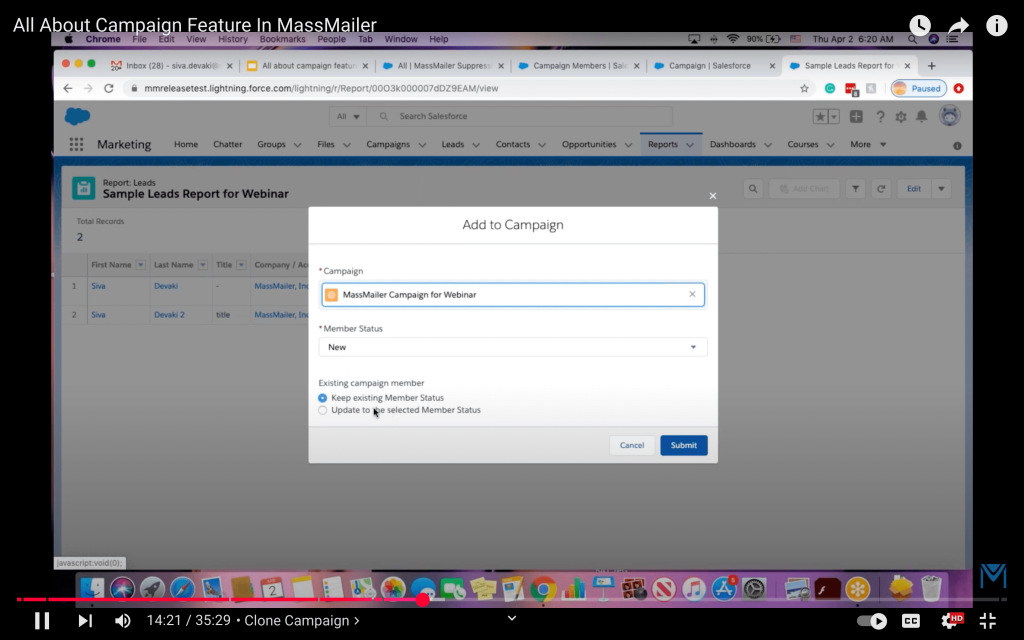
- You can either keep the existing Member Status value or update it.
- Follow the same steps to add contacts from a contact report.
Remove Duplicate Campaign Members
Sometimes, a campaign may have duplicate entries. By following this step, you can remove the duplicate entries and keep only one record.
- Click on the campaign from which you want to remove the duplicates.
- Go to the New Case drop-down menu and select the option of “Remove Duplicate Campaign Members.”
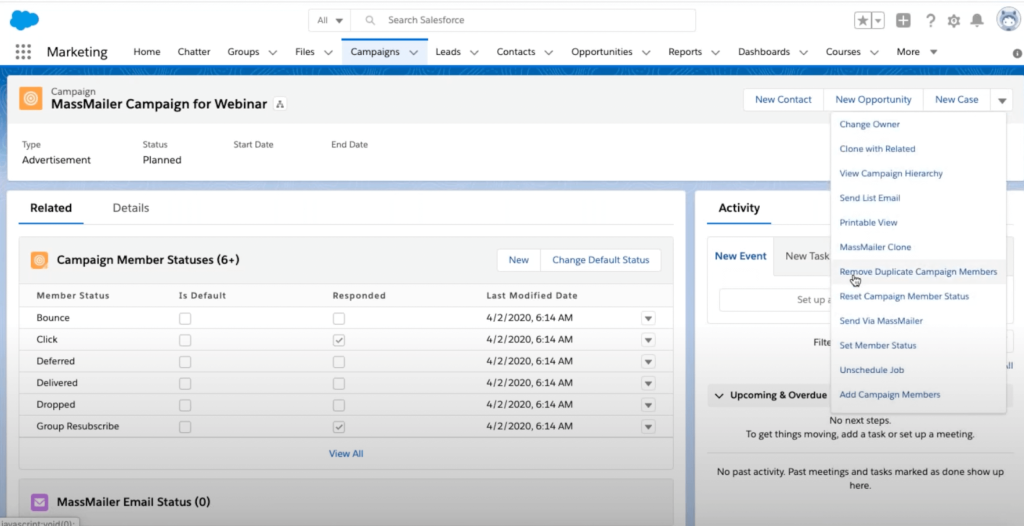
- Now, your campaign will have unique values.
Send an Email through MassMailer
Here’s how you can efficiently send an email using MassMailer:
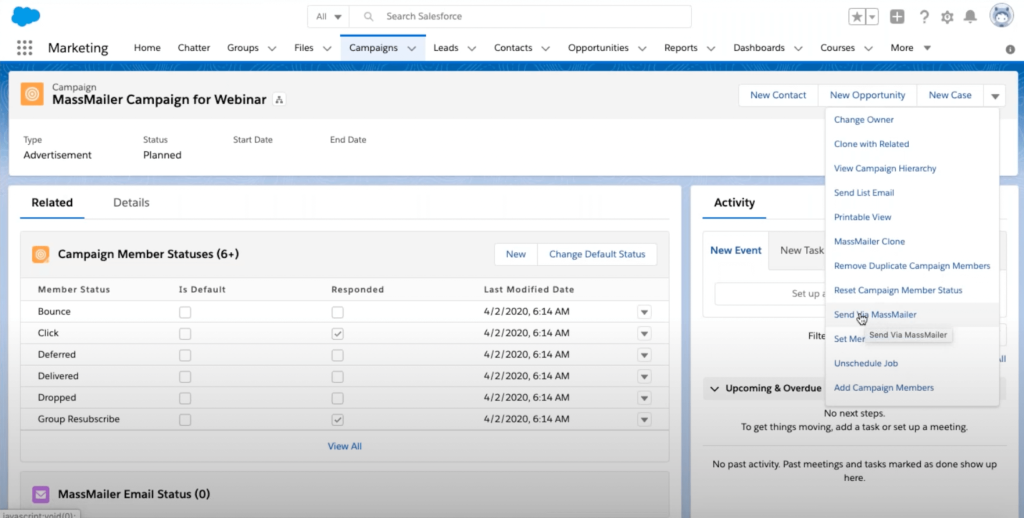
- From the particular campaign page, go to the New Case button at the top left. From the list of options, select “Send via MassMailer.”
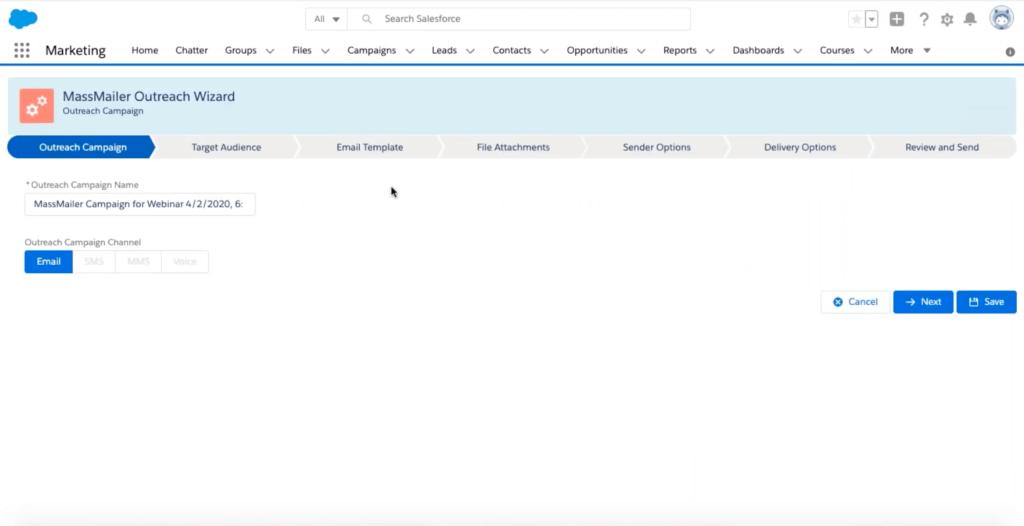
- It will take you to the Outreach Wizard. The outreach campaign name gets created for you. The Outreach Campaign Channel is set to Email by default. Click on the Next button.
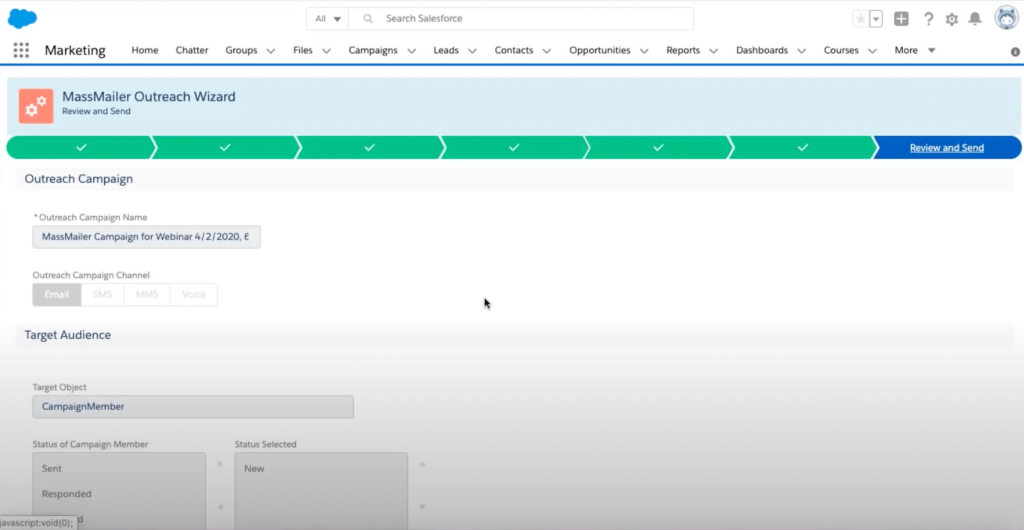
- In the next tab of Target Audience, the platform selects the new status for campaign members. If the status is not new, you can change it. Once you are satisfied with the status details, click on the Next button.
- The next option is the email template. To personalize the communication, you can merge individual campaign member fields like first and last names or use them separately in the email template.
- The next section is file attachments. If you do not want to send any attachments, you can skip it.
- The next option is Sender Options. You can select a custom sender or one from the given options. You can also choose what to include in the email’s CC and BCC fields.
- Once you have filled in all these details, you go to the next step, Delivery Options. Select the type of email—transactional or non-transactional. Choose to either send the email now or schedule it for later. Once you have filled in all these details, click on the Next button.
- The last step is to review everything once and finalize the mail. You can send a test email to verify that all the information is correct. Finally, click on the Finish button to complete the campaign email.
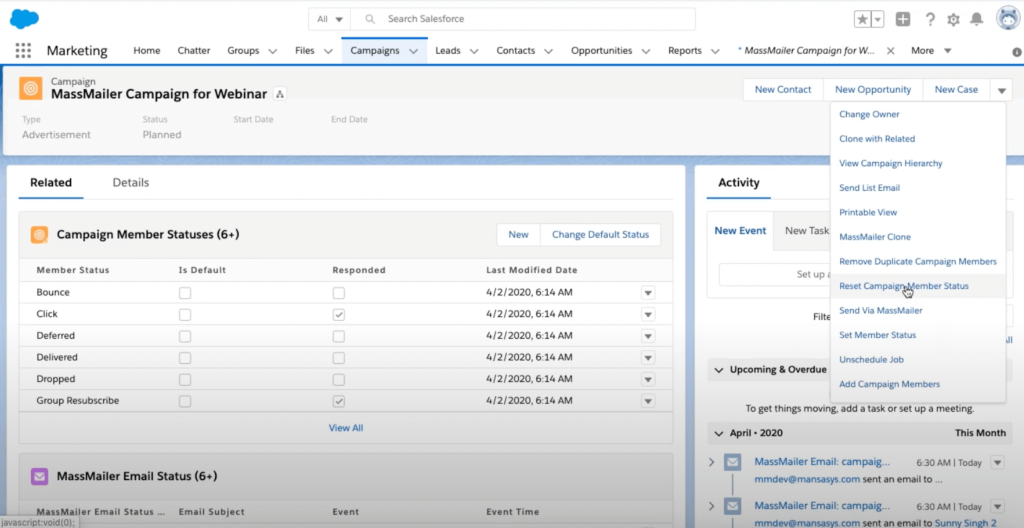
Reset Campaign Member Status
Here is a handy process to reuse a campaign by simply resetting the Campaign Member Status value:
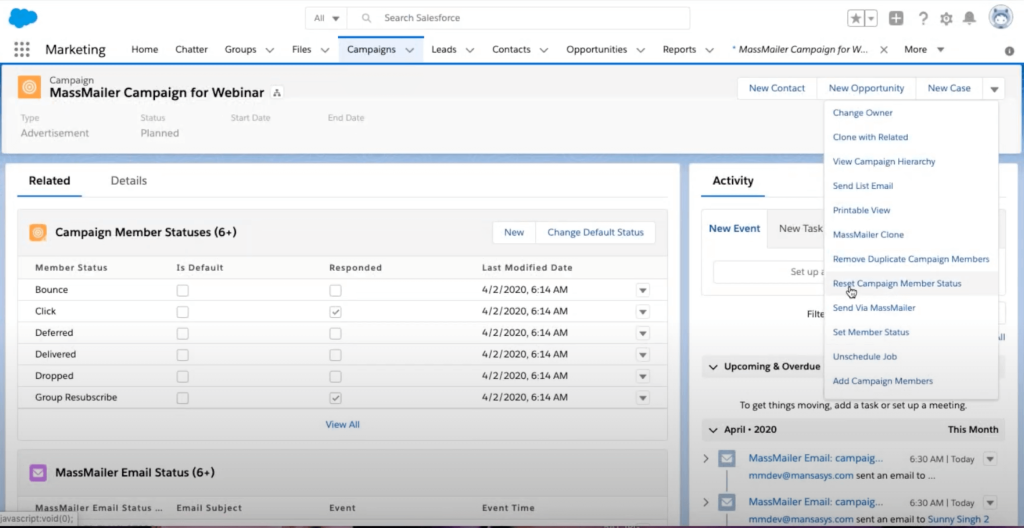
- Go to Campaigns and click on the New Case drop-down menu.
- Select the option Resent Campaign Member Status.
- By default, the status of the campaign member will be set to New. Click on the button Reset Status to change it.
- The screen will refresh to the campaign page.
Clone a Campaign
You can easily clone a campaign and save your time instead of creating one from scratch.
Step 1: Click on “Massmailer Campaign.” You will see a list of previous campaigns.
Step 2: Click on the campaign you wish to clone. You can remove the options you don’t want at this stage. When you click on the Clone button, the campaign will also get cloned.
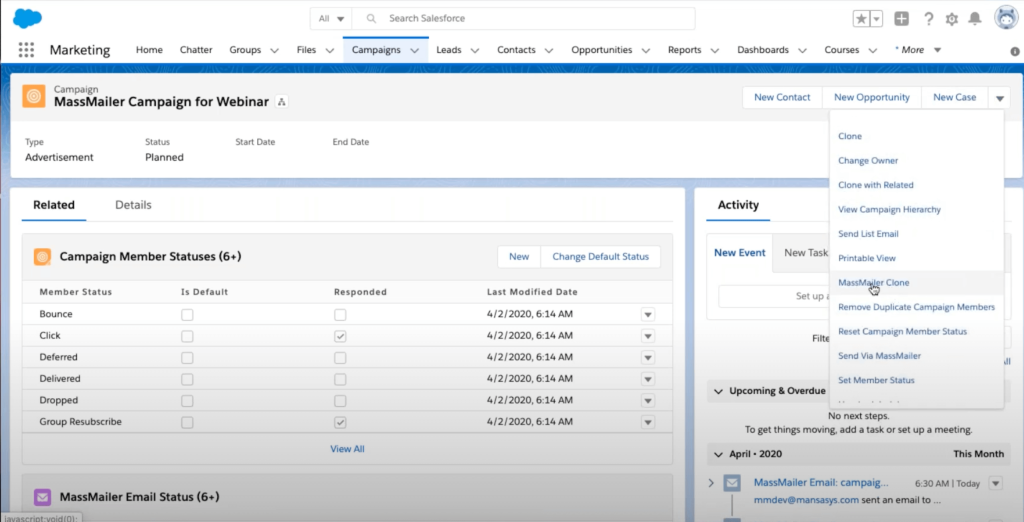
- If you want, you can change the status values of cloned campaign members.
- You can also reuse a campaign by simply changing the member status values of an existing campaign. You can do that by clicking on the New Case drop-down menu at the top right. From the options called Reset Campaign Member Status
Unscheduled Jobs
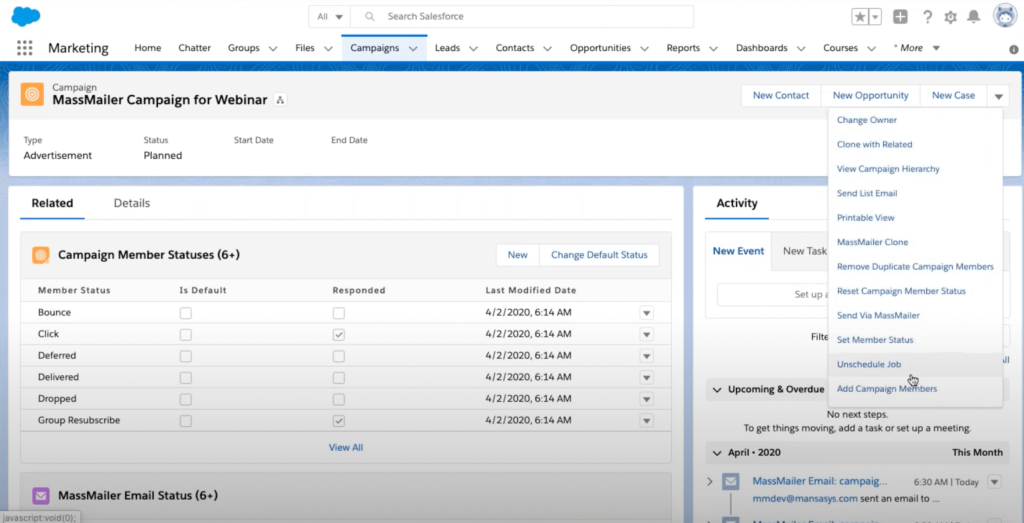
If you have already scheduled an email, here is the process to unschedule it.
You can do it by going to the campaign and clicking on the Unschedule Job button. It is available in the drop-down menu called New Case at the top right.
Summing Up
With MassMailer, you can now simplify your campaigns. With just a few clicks, you can create a new campaign, add or remove members, change the member status, and clone a campaign.
Moreover, you can customize templates and personalize emails for maximum impact on users. Try it to make your Salesforce CRM more powerful and efficient when executing your marketing strategy today!
Start Your Free Trial Today
Experience MassMailer the easiest way to send personalized emails from Salesforce.
Related Blogs
Salesforce Email Marketing: Complete Guide for 2025
How to Create an Email Template in Salesforce: Step-by-Step Guide
How to Create a Salesforce Drip Campaign (Step-by-Step)
MassMailer Resources


